The Users screen lists all the users for the MID you are currently processing under. You can use the filters above each column to search through the users. Click the filter icon next to the field to select a setting to further refine the search.
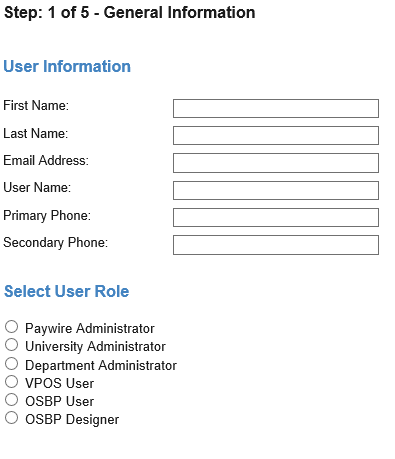
There are five types of users - University Administrator, Department Administrator, VPOS User, OSBP User, and OSBP Designer. The University Administrator is the highest administrator and has the most rights. They have control over all merchants. Department Administrators have the rights to maintain certain merchants IDs in their department. A VPOS User doesn't have any administrative rights, and all their rights are assigned by an administrator. An OSBP User can process transactions on the Off Site Buy Page. An OSPB Designer cannot process any transactions, they can only edit the design of the Off Site Buy Page.
Adding a User
To create a new user click the "Add New User" button at the bottom right of the screen. This will take you to the first step in creating a user. There are five steps all together. The first step is General Information.
The First Name, Last Name, Email Address, and User Name must be filled in. The phone numbers are optional. You must also select a user role before clicking Next. If an OSBP User or Designer is selected then an additional field for password will appear under General Information. The user roles will determine the second step of the process. All other steps are the same for all types of users.
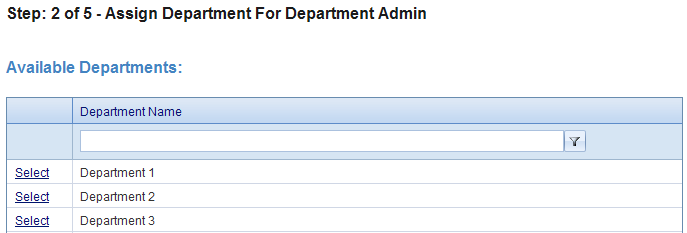
Department Administrator
If a the new user is a Department Administrator then the next screen will be to assign departments. You can use the filter above the Department Names to search through the Departments. To assign a department or multiple departments to a Department Administrator click select next to the Department Name. The Department will then be moved to the Assigned Department section. To remove a department, click Remove next to the Department Name in the Assigned Department section, and the Department will move back to the available departments list. Once the Department Administrator has been assigned departments click Next.
University Administrator
To assign the role of University Administrator select University Administrator and click Next. The second step is skipped for this role because the University Administrator will have access to all departments and MIDs. The next screen you will see is the third step, assigning user rights.
VPOS User
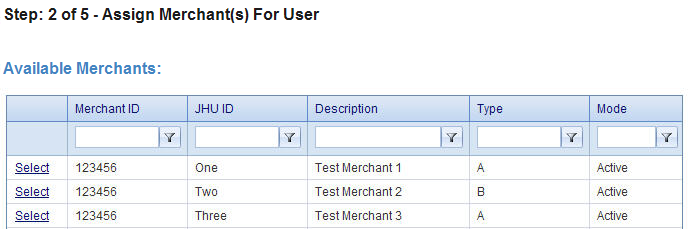
If the new user's role is User then choose user and click Next. The second screen will be to assign merchants to the user. You can use the filters above each column to search through the merchants. To assign a merchant or multiple merchants to a user click Select next to the Merchant ID. The merchant ID will then be moved to the assigned Merchants section. To remove a Merchant click Remove next to the merchant ID, and the Merchant will move back to the available Merchants section. Once the user has been assigned Merchants, click Next.
OSBP User
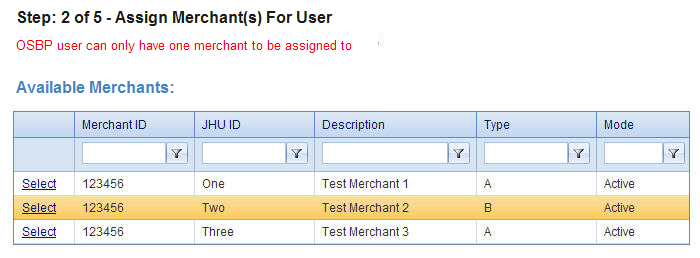
The second step for a OSBP User is to assign a Merchant for the user. An OSBP User can only be assigned one Merchant.
OSBP Designer
The second step for a OSBP Designer is to assign a Merchant for the designer. An OSBP Designer can only be assigned one Merchant. Therefore, when an OSBP Designer makes changes to the Off Site Buy Page, the changes will only appear for the Merchant they are assigned.
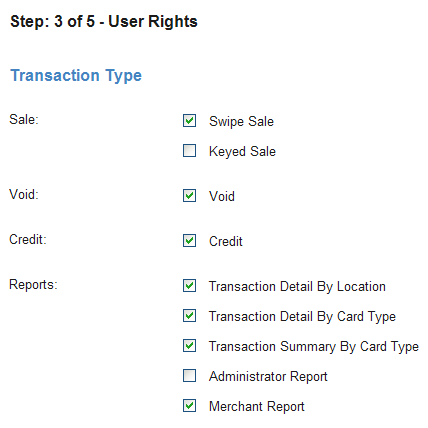
After you have completed the second step for the particular type of user you are adding, the next step is to assign user rights. You can control which types of transactions and which reports the user has access to. Checking the box next to a transaction type or report will allow the user to have access to these features. If the boxes are not checked the user will not be able to perform these functions. Once the rights are selected click Next to continue.
Note: For and OSBP User the user rights are fixed and cannot be changed. An OSBP User will be able process keyed sales, voids, and credits. They are not able to view any reports. An OSBP Designer will have no user rights because they do not process any transactions.
The fourth step is verifying all the information for the user. You will see all the information you input in the previous steps. If everything looks correct then click Create which will bring you to the final step which is the result. The Result page will show if the user has been successfully created. Click OK to finish. If at any point during the process of creating a user you no longer want to create this user, simply click cancel at the bottom right of the screen.
Editing a User
To edit a user click, select next to the particular user. This will take you to the first step in editing a user. All the steps for editing a user are the same as creating a user. Follow the steps for
creating a user except that instead of entering the information in for the first time, you can change the existing information as necessary.