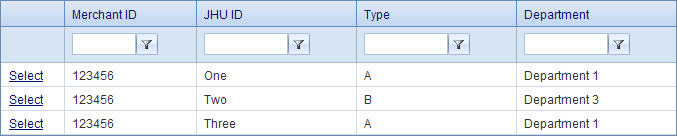
Selecting Merchants will take you to the Merchant Management screen. This screen lists all the merchants. You can use the filters above each column to search through the Merchants.
You can select a merchant by clicking Select next to the Merchant ID. This will take you to the Merchant Information screen. On this screen, you can view the merchant's current details and edit the details.
Merchant Information
The first option is for Merchant type. The Merchant Type can either be type A or type B, which determines the SAP requirements for the merchant. See SAP requirements below for more information. On this page the Department and JHU ID can also be assigned and changed for a Merchant ID. The OSBP client ID and OSBP Merchant Key are used for the Off Site Buy Page. A new OSBP Key can be generated by Clicking the "Generate New" button. The Merchant ID itself is displayed but cannot be changed. This page is also where the Merchant Location, Mailing, and Contact information is entered.
Auto close is a function that automatically closed the batch each night. Auto close is by default 6:00pm, so the batch will automatically close at 6pm every day unless you choose a different time from the drop down menu. Below Auto Close are the options for Card Reader. The type of card reader can be selected from the drop down menu.
SAP Requirements
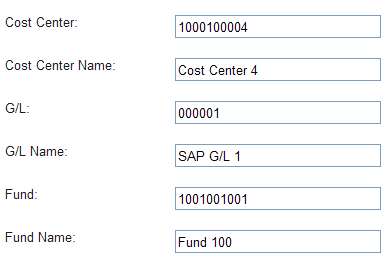
The SAP requirements depend on the type merchant. For type B merchants the SAP data is fixed. The data can either be fixed to one set or no data required. Therefore, type B merchants will have just one field each for Cost Center, G/L, Fund Number, and their names. When a transaction is processed, there will be no options to select Cost Center, G/L, or Fund because they have already been fixed on the Merchant Information page.
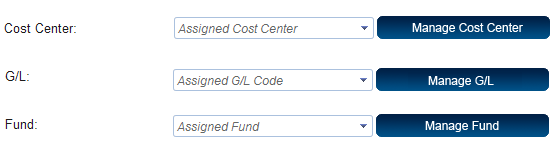
For type A merchants the data is not fixed and there can be one or many sets assigned to a merchant. Therefore, if a type A merchant is selected then you will be able to assign one or more Cost Centers, G/L Codes, and Fund Numbers by clicking the manage button next to each section. The drop down menu for each field will show what has already been assigned.
Cost Center
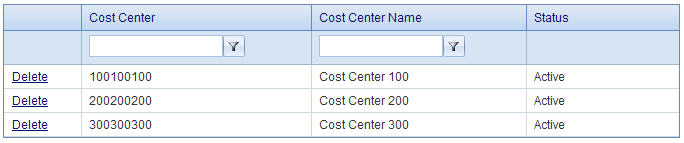
The Cost Centers can be accessed from the Merchant Information Page. Click on Manage Cost Center to go to the Cost Center Management for the respective merchant. The Cost Centers for the merchant will be listed. You can search through the Cost Centers using the filters above each column. To delete a Cost Center click Delete in the row of the Cost Center you want deleted.
To add a Cost Center click "Add" below the table. Fields will appear at the bottom of the screen to add Cost Centers. You can add ten Cost Centers at a time. A Cost Center number can be 8 to 10 digits. Fill in the Cost Center Number and Name, then click Save. The new Cost Centers will be added to the list. To return to the Merchant Information screen click Back.
G/L Code
The G/L Code can be managed the same way as the Cost Center. Click on Manage G/L and you will see the G/L Code Management screen. You can delete and add G/L codes the same way as Cost Centers. G/L Codes are 6 digits.
Fund Number
The Fund Numbers are also managed the same way as the Cost Center. Click on Manage Fund to view the Fund Management screen. You can add and delete Fund Numbers the same way as Cost Centers. Fund Numbers are 10 digits.
Back on the Merchant Information page, at the very bottom of the screen you have the option to save any changes, delete the merchant, or suspend the merchant. If a merchant is suspended you can return to the same page to reactivate.