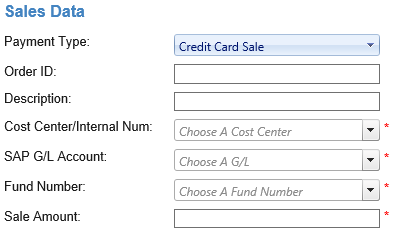
To create a credit card payment the user must click Payment from the main menu, then click Make Payment and lastly ensure that Credit Card Sale is selected within the Payment Type dropdown menu. All required fields are marked with a red asterisks, the user must ensure that all requited fields are entered and valid before clicking Process Payment. What fields are required will depend on the currently selected merchant and that merchant's type. All merchant types can process credit card payments. Merchant types differ on what information is needed within the sales data portion of the Credit Card Sale payment form. Because the difference is located only the in the sales data portion, the the below section covering Sales Data has been broken down into for four parts
Type A,
Type B,
Type C, and
Type D.
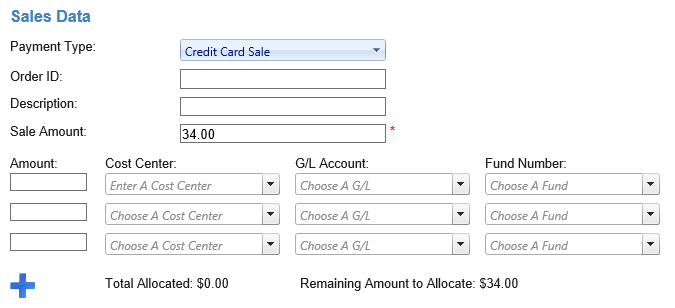
Sale Data
A type A merchant requires the following fields within the sales data section to be completed: "Cost Center/ Internal Num", "SAP GL/Account" and "Fund Number". A type A merchant can only associate one SAP revenue account to any one credit card transaction.
A type B merchant require the MRN# field be competed.
A type C merchant can enter several SAP accounts within a single credit card sale. Because Type C can enter several SAP accounts there are several rows within the Credit Card Sale form allocated for the input of SAP information. The user must ensure that the Amount fields of the SAP revenue accounts sum to the exact value of the Sale Amount field. By default the user only has three available fields to input SAP information, if the user needs to enter more than three SAP accounts he/she can click the blue addition symbol located below the last enter SAP account entered.
A type D merchant can enter several SAP accounts within a single credit card sale. Because Type C can enter several SAP accounts there are several rows within the Credit Card Sale form allocated for the input of SAP information. The user must ensure that the Amount fields of the SAP revenue accounts sum to the exact value of the Sale Amount field. By default the user only has three available fields to input SAP information, if the user needs to enter more than three SAP accounts he/she can click the blue addition symbol located below the last enter SAP account entered.
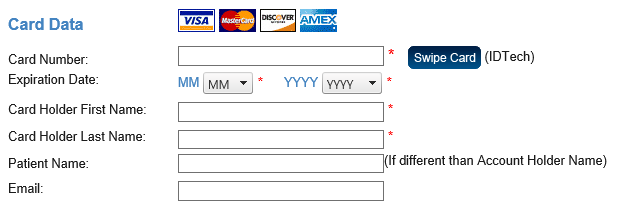
Card Data
Credit Card information can either be keyed in or the credit card can be swiped. To key in a credit card, type the credit card number in the Account Number field. Do not include spaces between the numbers. Select the Expiration date from the drop down menus labeled "MM" and "YYYY".
Credit Card Sale vs. Credit Card Force
The transaction types Credit Card Sale and Credit Card Force are very similar although Credit Card Force includes one extra required field: "Auth Code". A Credit Card Force transaction allows the user to force a credit transaction to be processed even if a customer is over their limit, or is restricted to using their credit card at certain types of businesses. Because of this the user needs a an Auth code obtained from the customers bank or creditor.
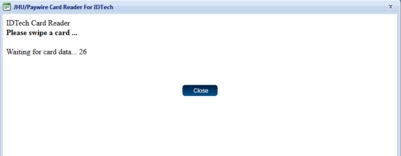
Swipe Card
To swipe a card, click on the button "Swipe Card". When the button is clicked a pop up window will appear showing that the user has 30 seconds to swipe the card. After you swipe the card this screen will close and the credit card information will be automatically be filled in.
Processing the Transaction
When you have finished filling in all the required fields and any additional fields you choose to fill in, you can process the transaction. If you decide at this point that you no longer want to process this transaction you can either click "Reset" at the bottom of the screen to reset the form and enter in new information, or you can click "Cancel" to close out the Credit Card Payment screen.
To process the payment click "Process Payment" if any required fields have invalid input or missing the user will be prompted to fill in these fields. You will not be able to proceed until all required fields are filled in.
Transaction Result
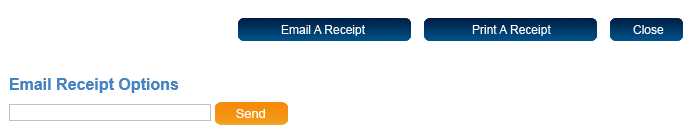
After the user has clicked "Process Payment." they will be forwarded to the Transaction Result, which will either be an approval or decline. This screen also allows you to print or email a receipt.
If you choose to email a receipt click the "Email A Receipt" button. At the bottom of the screen a field labeled Email Receipt Options will appear. Enter the customers email address into this field and click "Send". A message will appear saying that the receipt was sent.
If you choose to print a receipt click the "Print A Receipt" button. The receipt will open in a new window and you can then print the receipt. Click "Close" to close the window when the receipt has printed. When you are finished with the transaction click "Close" at the bottom of the screen, and you will return to the payment page.