Introduction
Welcome to Paywire's Virtual Point of Sale User Guide.
The Paywire Virtual Point Of Sale (VPOS) is the user interface for the gateway which enables merchants to perform the following functions:
- Process Transactions
- Manage Periodic Plans
- Search and View Transaction Details
- Batch Processing
- Manage Customers in the Paywire Vault
- View Reporting
- Administration
- Help and Support
URLs
The VPOS is available in two environments:
Staging
https://dbstage1.paywire.com
Production
https://dbtranz.paywire.com
The staging environment can also be used for testing.
Authentication
To access the VPOS you will need user credentials to log in.
If you do not have these credentials you may request them by emailing support@paywire.com.
Test Cards and Accounts
The following are available for you to test with the Paywire gateway, expiration date can be set to any date.
| Card Scheme | Number | CVV |
|---|---|---|
| VISA | 4111111111111111 | 123 |
| VISA | 4761739001010267 | 123 |
| Mastercard | 5413330089010608 | 123 |
| Discover | 6510000000000034 | 123 |
| Amex | 379605170000771 | 1234 |
| JCB | 3566000021111117 | 123 |
| Diners | 36185900022226 | 123 |
| Visa Debit | 4002960001111116 | 123 |
| Visa HSA | 4264280001234559 | 123 |
| Account Type | Routing Number | Account Number |
|---|---|---|
| Current/Savings | 222224444 | 222224444 or any same digit number |
Home Page
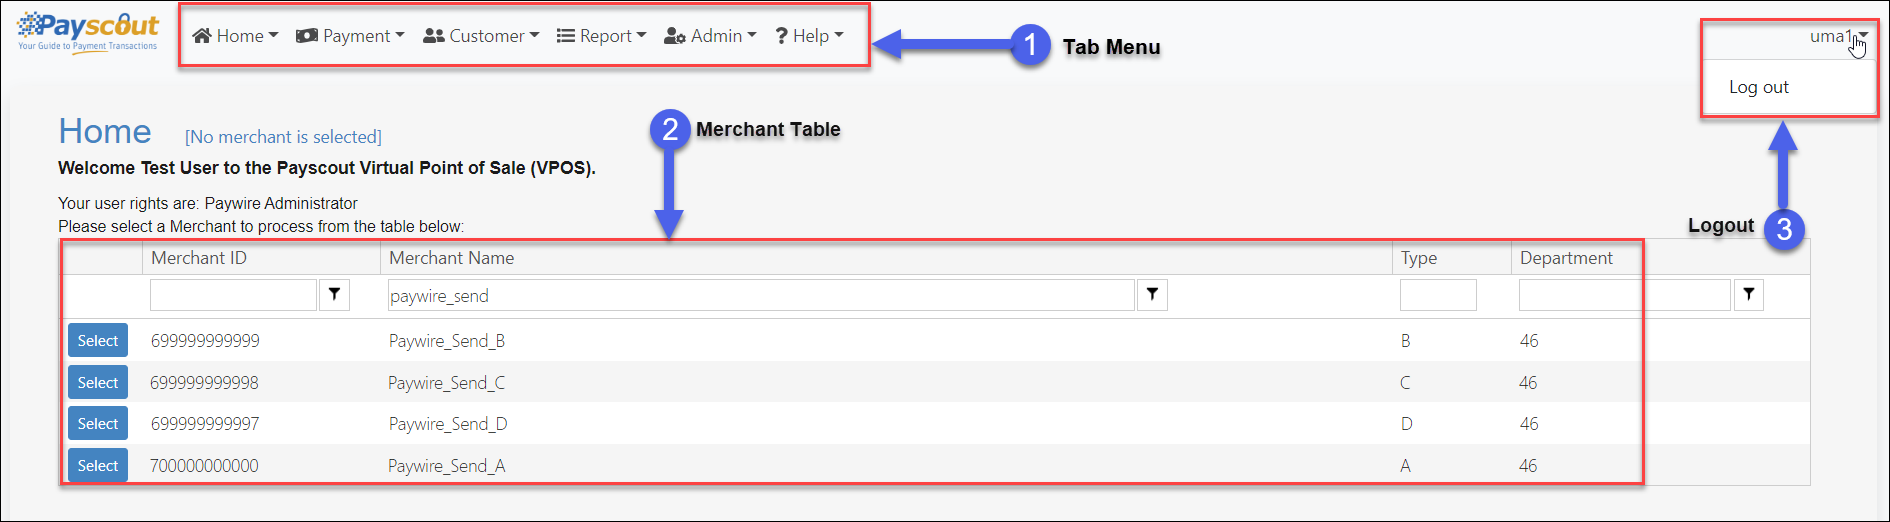
Users are presented with the Home page upon login, which displays the username of the active user (3), their rights and a table of merchants available to the user (2).
Navigation
Users can navigate using the navigation bar on top (1). Each menu item may display a secondary list of options to navigate to.
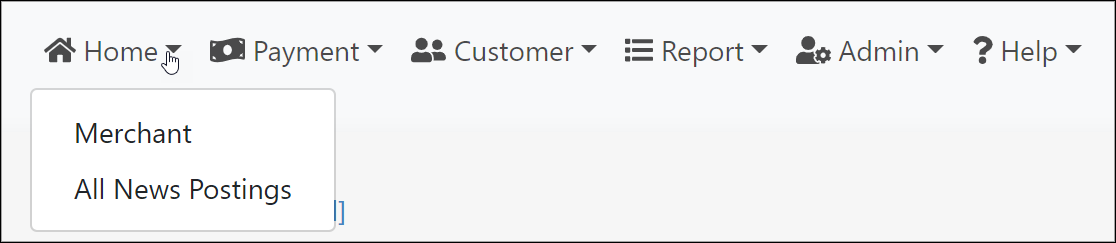
The "Home" button returns users to the Home page, with a secondary option:
- "All News Postings", containing news relevant to the VPOS.
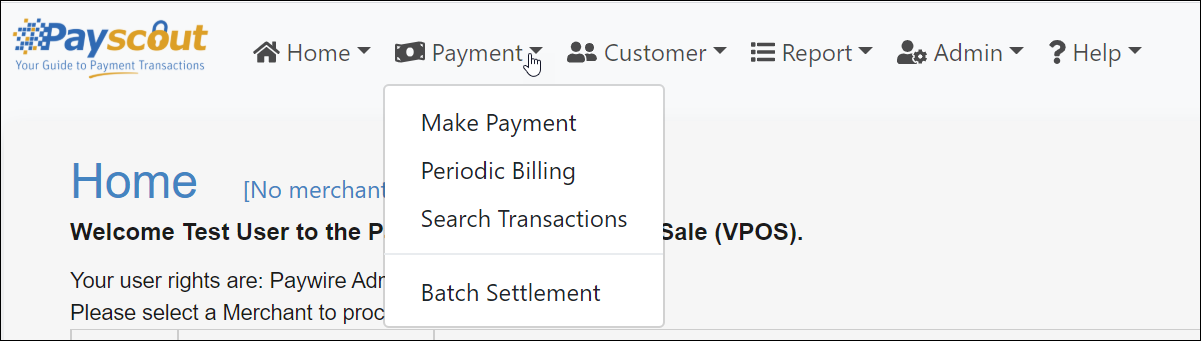
The "Payment" button provides secondary options to:
- Make Payment
- Periodic Billing
- Search Transactions
- Batch Settlment
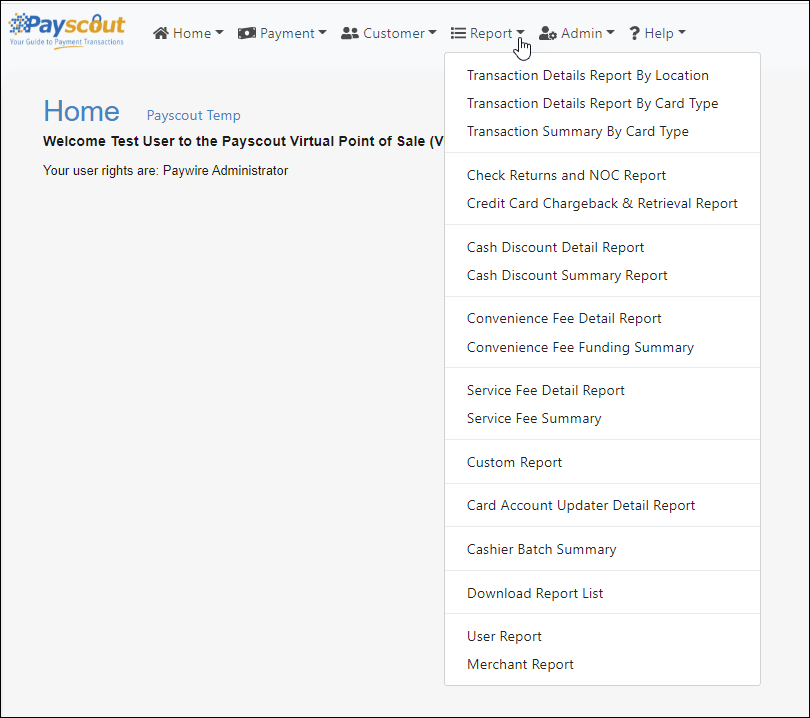
The "Reports" button provides secondary options to:
- View Transaction Reports
- View User Report
- View Merchant Report
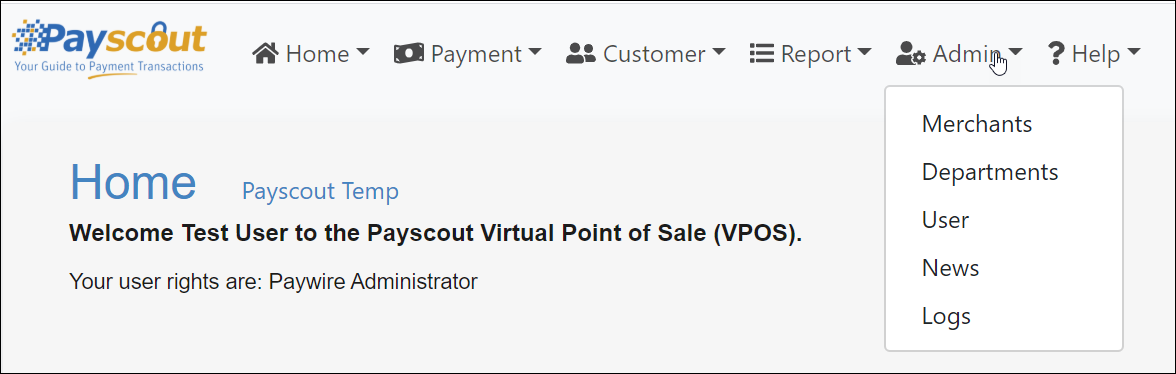
The "Admin" button provides secondary options to:
- Manage Merchants
- Manage Departments
- Manage Users
- Manage News
- View Logs
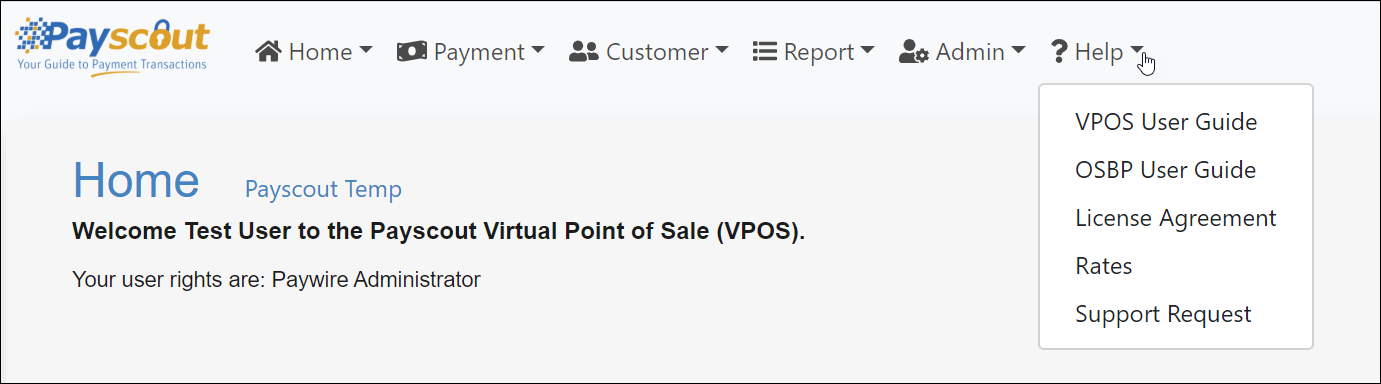
The "Help" provides secondary options to:
- Navigate to VPOS or OSBP User Guide
- View the License Agreement
- View Paywire Rates
- Open and View Support Tickets
Merchant Selection
Functions such as making a payment requires that the user selects a merchant prior to accessing the page.
This is done by using the merchant selection table, accessible from the home screen or displayed automatically when attempting to access pages that require a merchant to be selected.

Four filters are available on this table:
- Merchant ID
- Merchant Name
- Type
- Department
All filters perform a Contains query, meaning the value submitted needs only to partially contain the prefix of the column values to find a match.
By default, the table is limited to 10 rows but can be increased up to 50 rows using a drop-down list at the bottom of the table next to paging.
To select a merchant simply click on the button to the left.
Payment
Make Payment
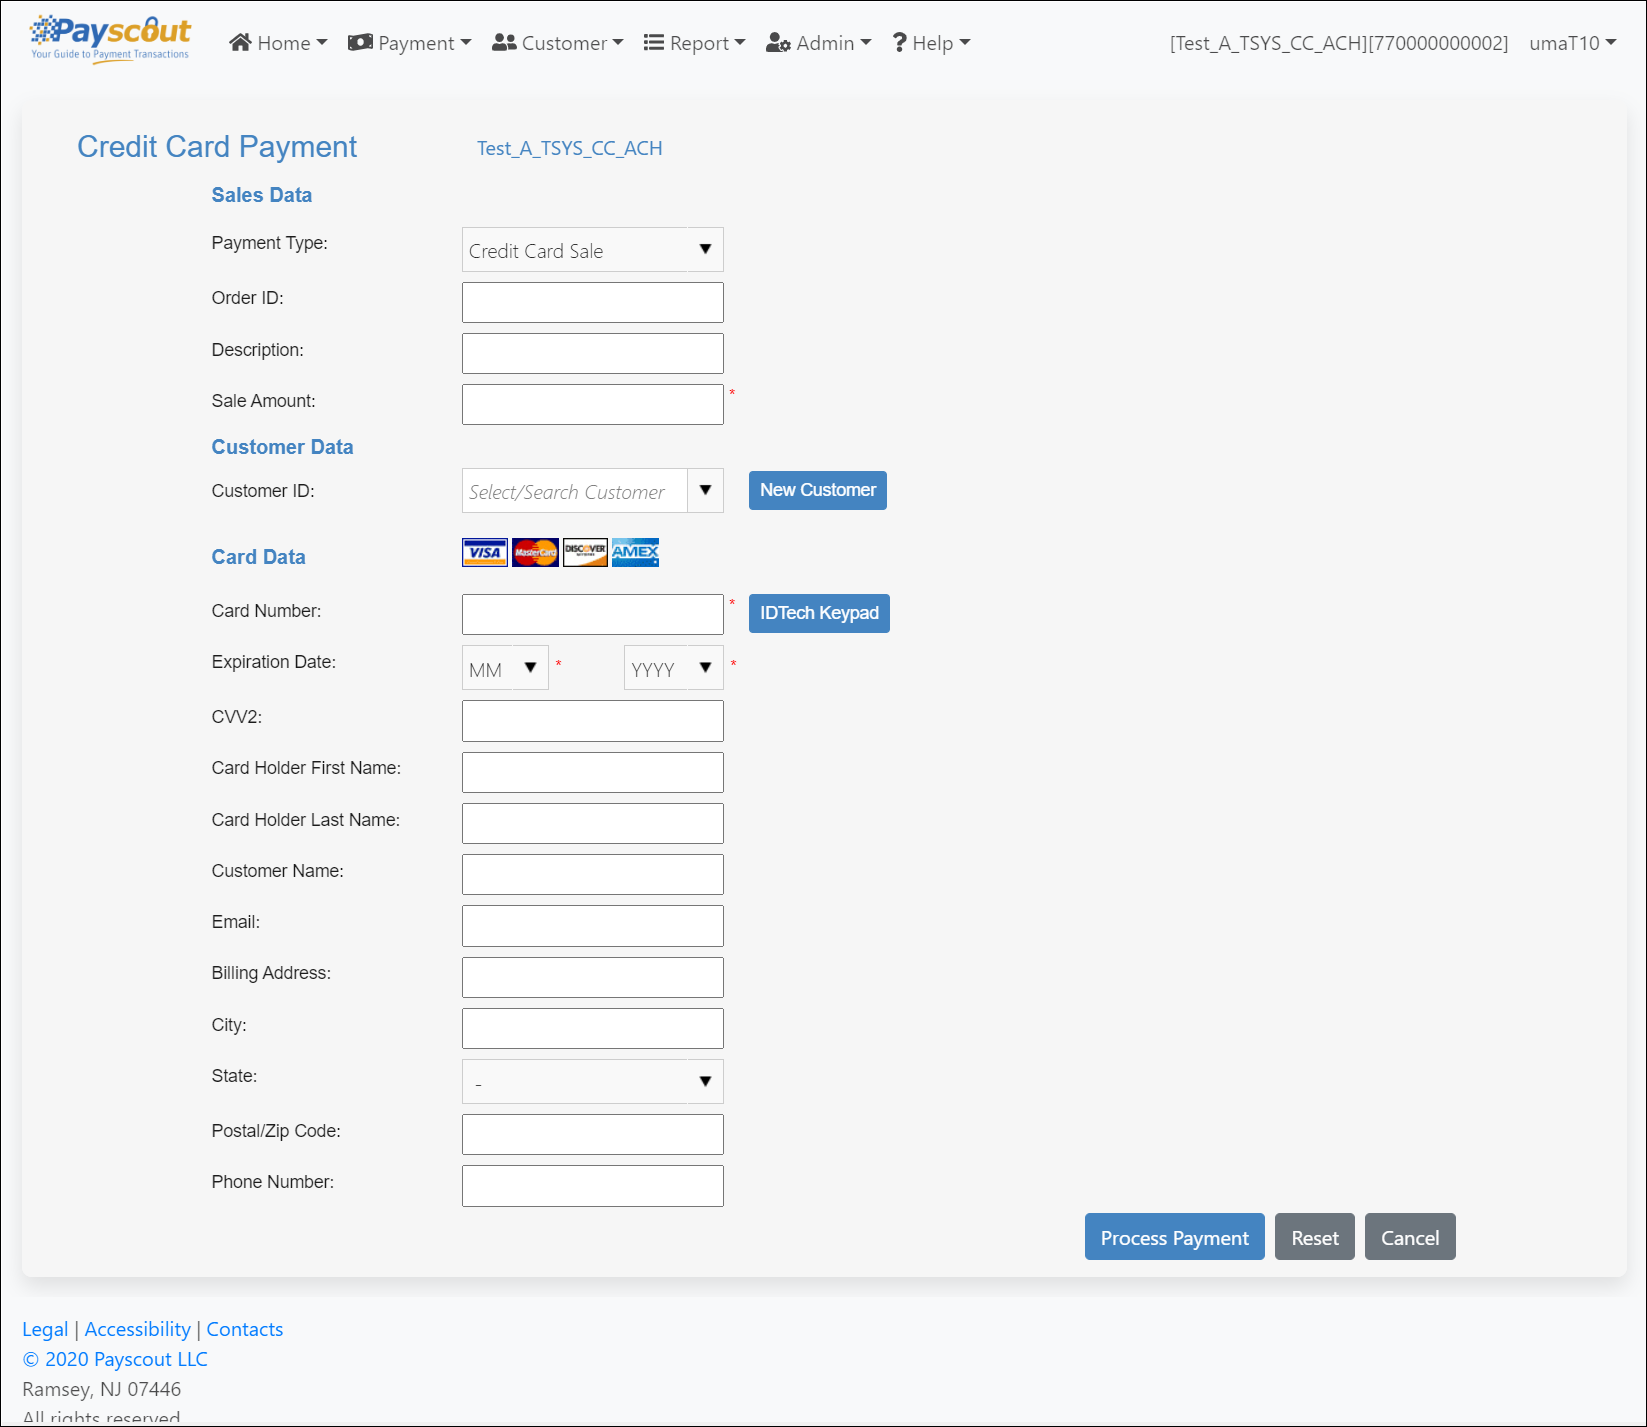
This page contains a form with which users can complete a payment.
On opening the page, Payment Type is defaulted to Credit Card Sale.
Changing this value will alter the displayed fields, relevant to the type of payment being processed.
For merchants using the Paywire Vault, this page also includes an option to use a stored customer and their payment tokens.
All required fields are marked with a red asterisk: they change depending on the currently selected merchant's type and the chosen Payment Type.
Once done, click on the button to submit the payment form.
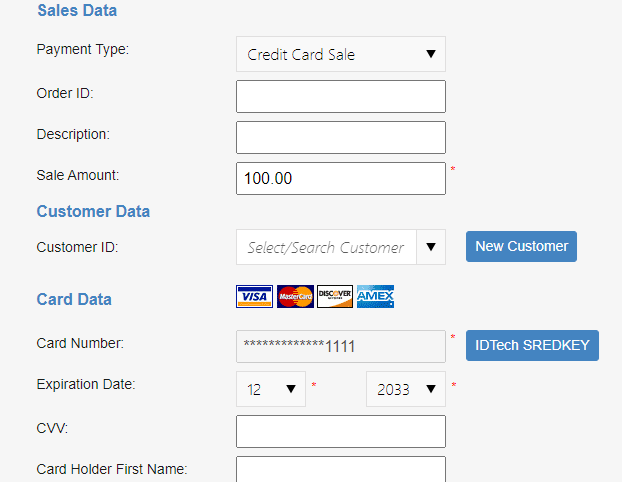
Credit Card Sale
Selecting Credit Card Sale as the Payment Type will require the user to populate at least the following fields:
- Sale Amount
- Card Number
- Expiration Date
Credit Card Sale with Encrypted Keypad
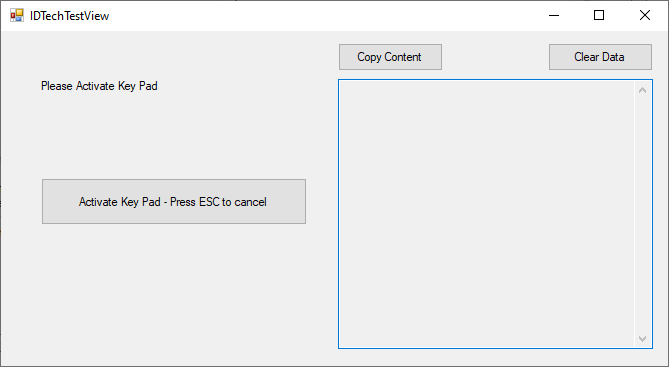
The VPOS supports IDTech SREDKey and SREDKey 2 keypads. The keypads work as keyboard emulators, and no additional drivers are required.
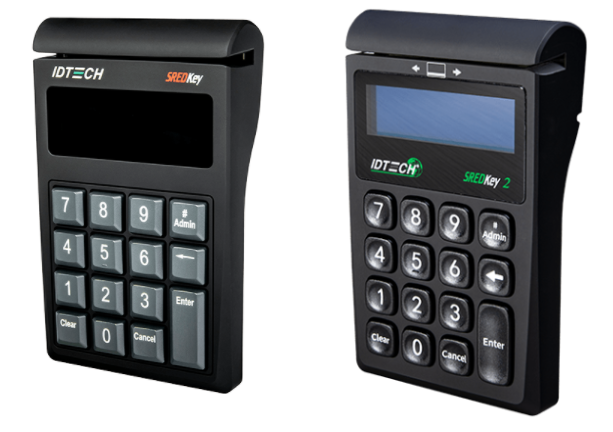
To use the IDTech keypad, the merchant account needs to be configured with IDTech SREDKey enabled.
Once the IDTech keypad option is enabled for a merchant, the credit card number input feature will be disabled immediately. All users for this merchant will need to use the keypad for card data input.
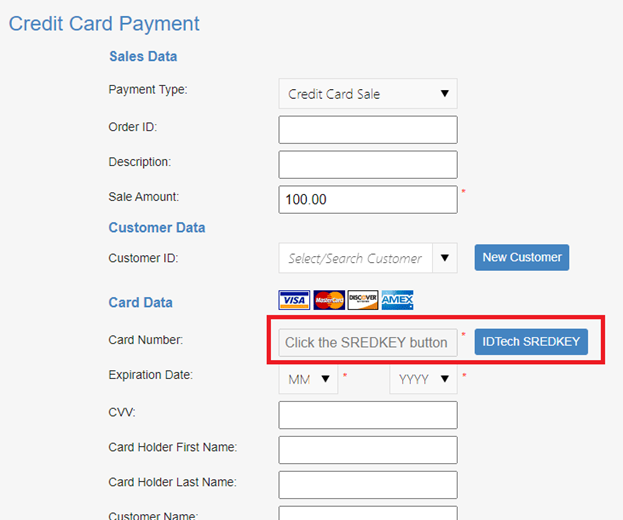
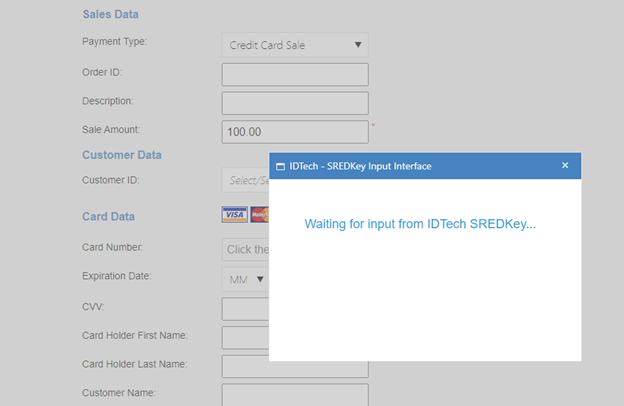
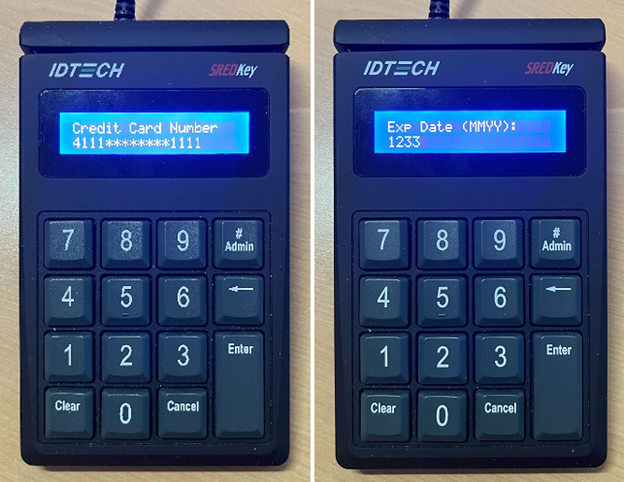
Click on the “IDTech SREDKey” button, and a popup window appears. The user then needs to follow the instructions on the keypad to input the credit card information.
After all required information is entered, the data is then encrypted and transmitted to the VPOS payment page.
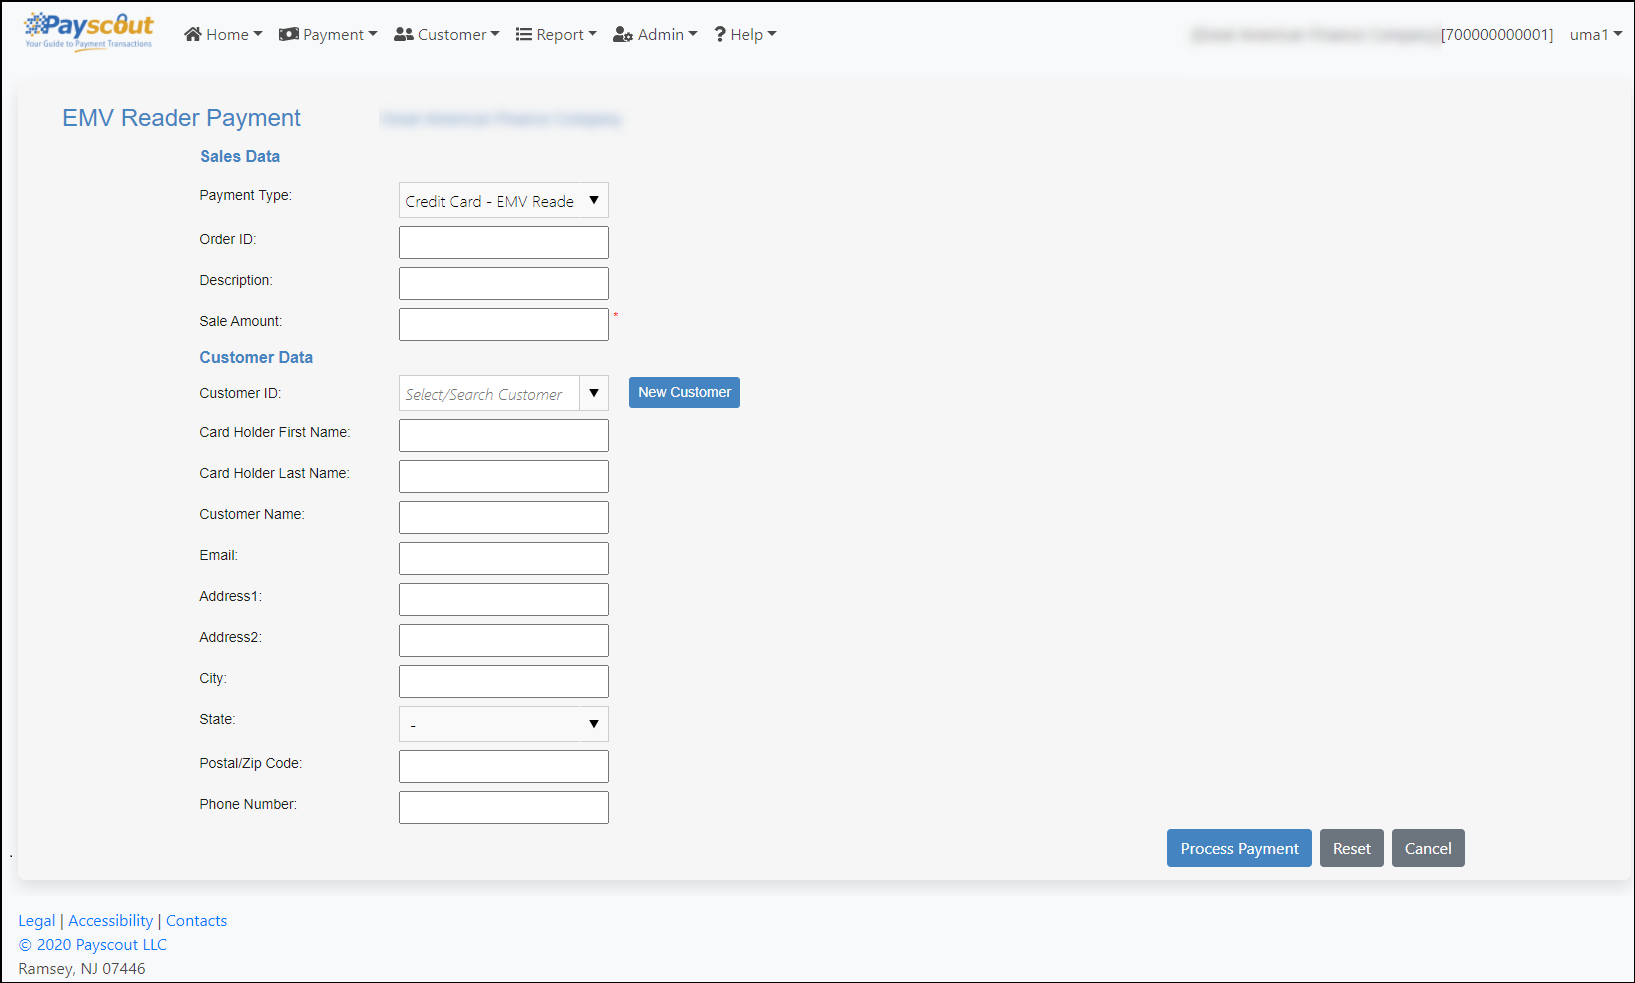
Credit Card Sale with EMV Reader
Selecting Credit Card - EMV Reader as the Payment Type will require the user to populate at least:
- Sale Amount
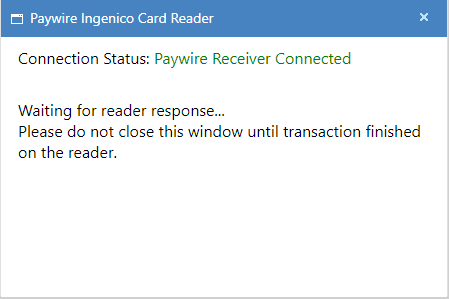
Using Ingenico EMV Reader
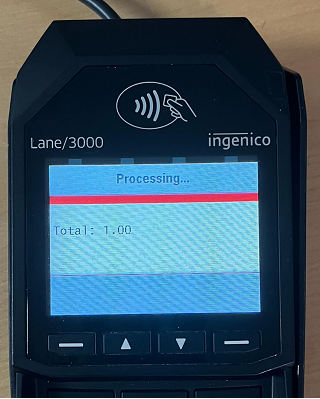
On clicking 'Process Payment', the Paywire Receiver will connect to the EMV reader on which the payment must be completed.
The EMV reader will switch to the card swipe interface where the user can swipe, insert and tap a card to process, press the F1 button to key in the card number or use the red button to cancel the transaction.
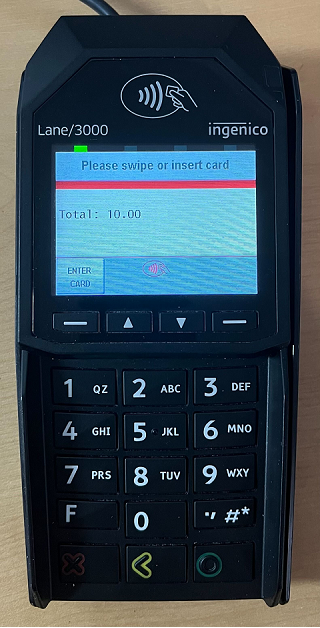
Card Swipe
Swipe a card and wait until the reader receives the transaction response.
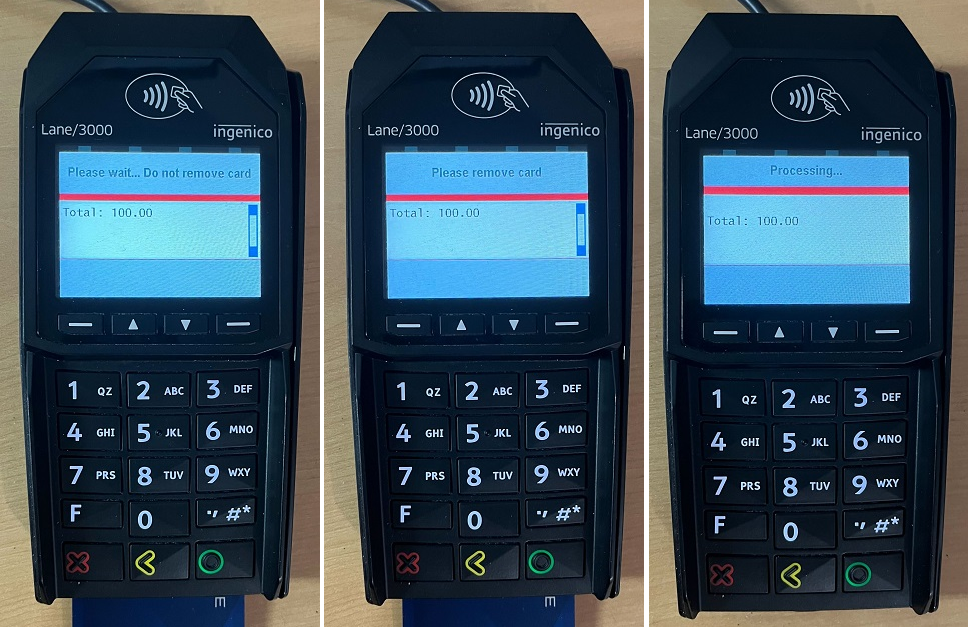
EMV Chip Card / Contactless Card
- Insert an chip card into the bottom slot, or tap the contactless card (or smart phone/watch with NFC payment functionality) on the screen to process an EMV transaction.
- Depending on the card used, the language or an on-chip application type (e.g. Debit/Credit) may need to be selected.
- Follow the instructions on the screen to process transactions. The options may vary depending on differnt on-chip applications.
- Remove the card when the reader prompts the user to do so.
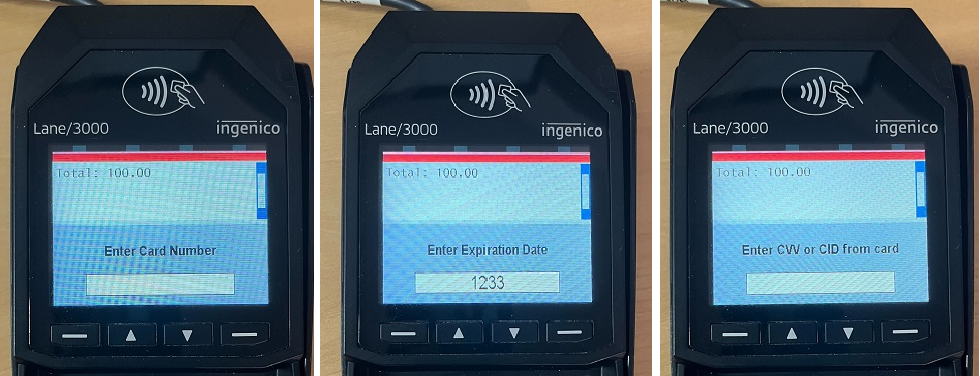
Key In Card Number
- Press the F1 button to key in the card number, then press the green button.
- Enter the expiration date with format MM/YY, then press the green button.
- Enter the CVV code, then press the green button.
- Wait until the reader receives the transaction response.
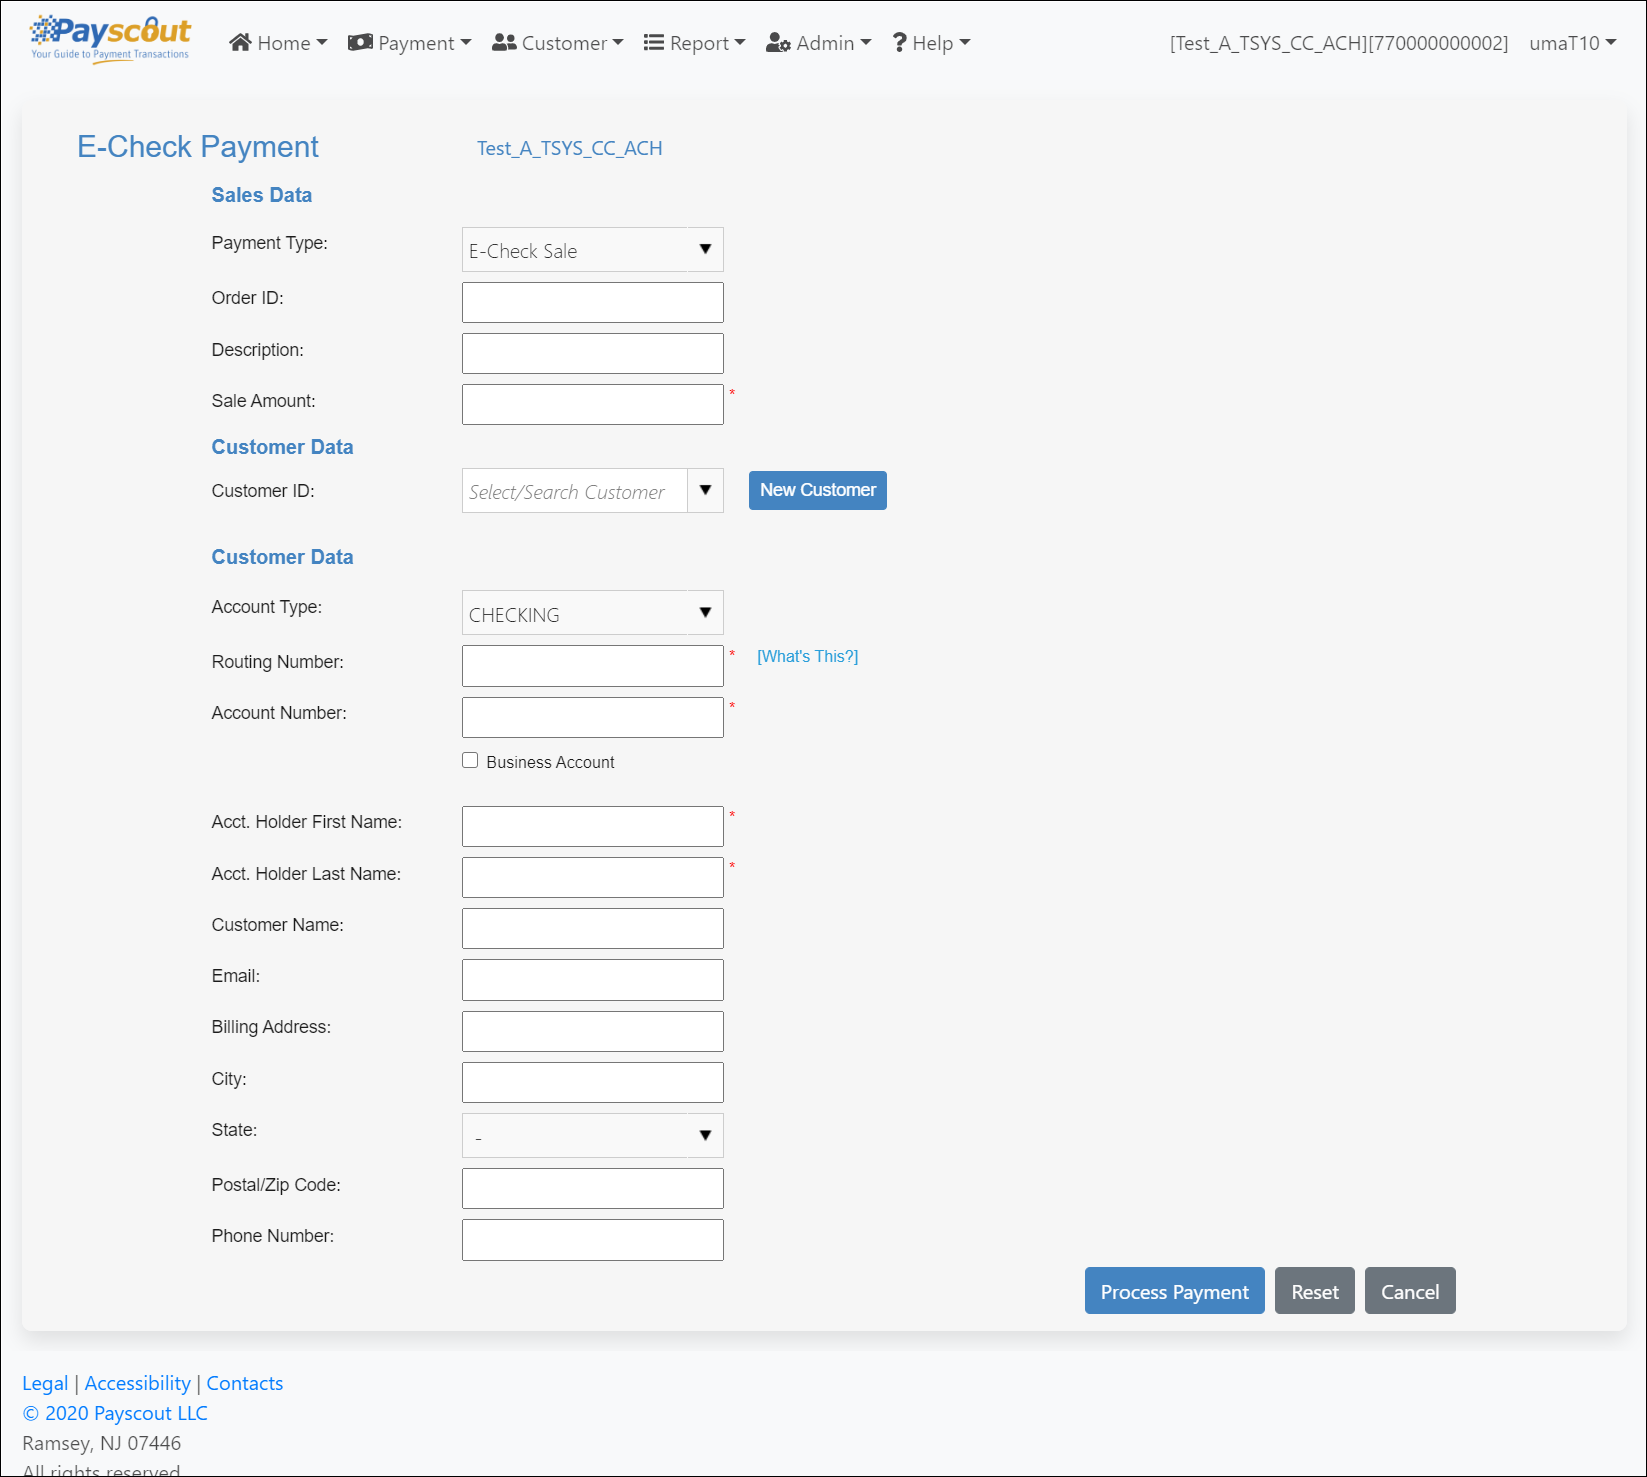
E-Check Sale
Selecting E-Check Sale as the Payment Type will require the user to populate at least the following fields:
- Sale Amount
- Routing Number
- Account Number
- Acct. Holder First Name
- Acct. Holder Last Name
Remote Check Batch
Selecting Remote Check Batch as the Payment Type allows users to scan checks. This will require the user to populate at least the following fields:
- Batch ID
- Control Amount
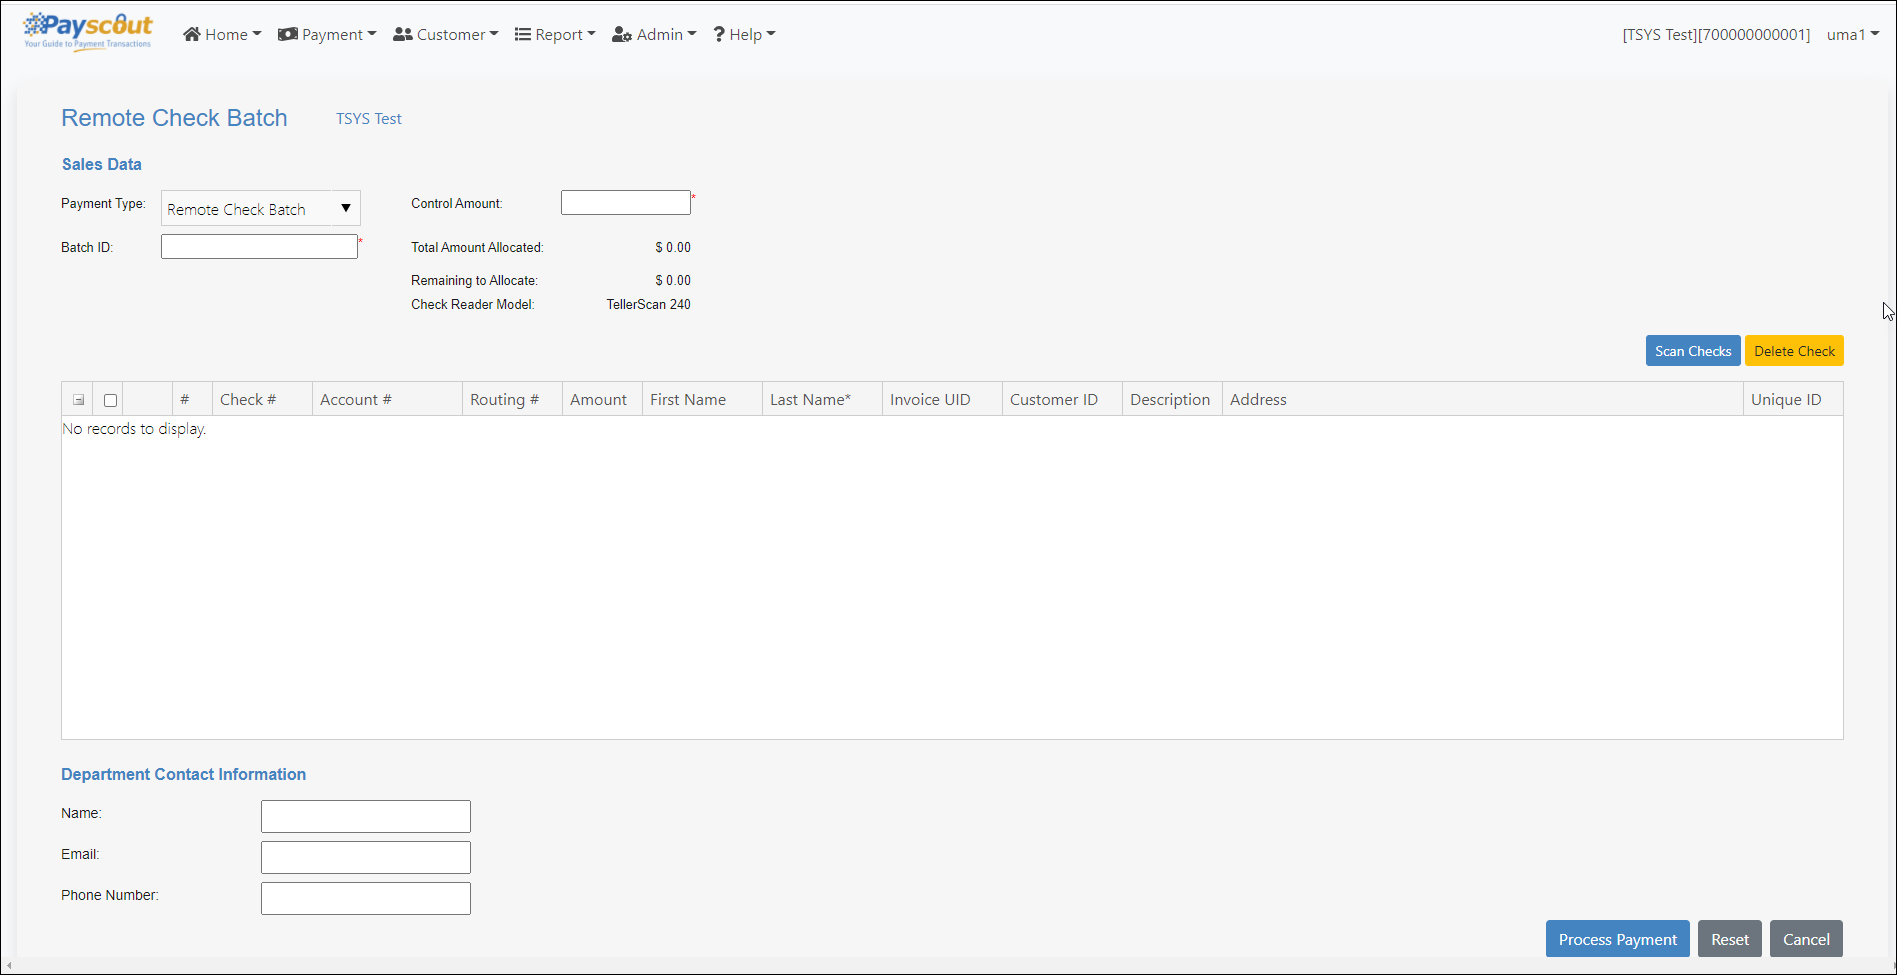
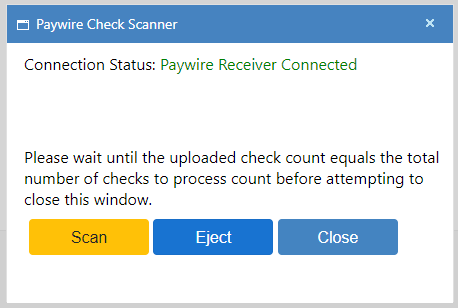
Scanning Checks
- Please insert the checks in the scanner.
- Click on the button. A pop-up is displayed: click 'Scan'.
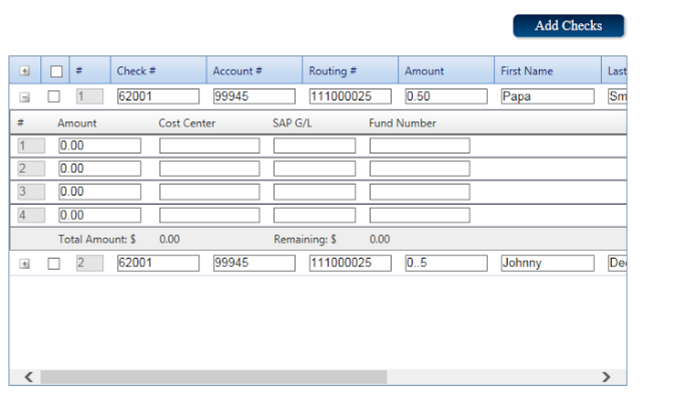
- The information from the scanned checks will populate the table. The user must manually enter any data not populated such as Amount, First Name, Last Name, Grant Number and Principal Investigator. The scanner does not capture the correct information 100% of the time, therefore it is the user's responsibility to ensure that the captured information is correct.
- After the initial scanning of checks is complete, the user may scan additional checks by clicking 'Add Checks'.
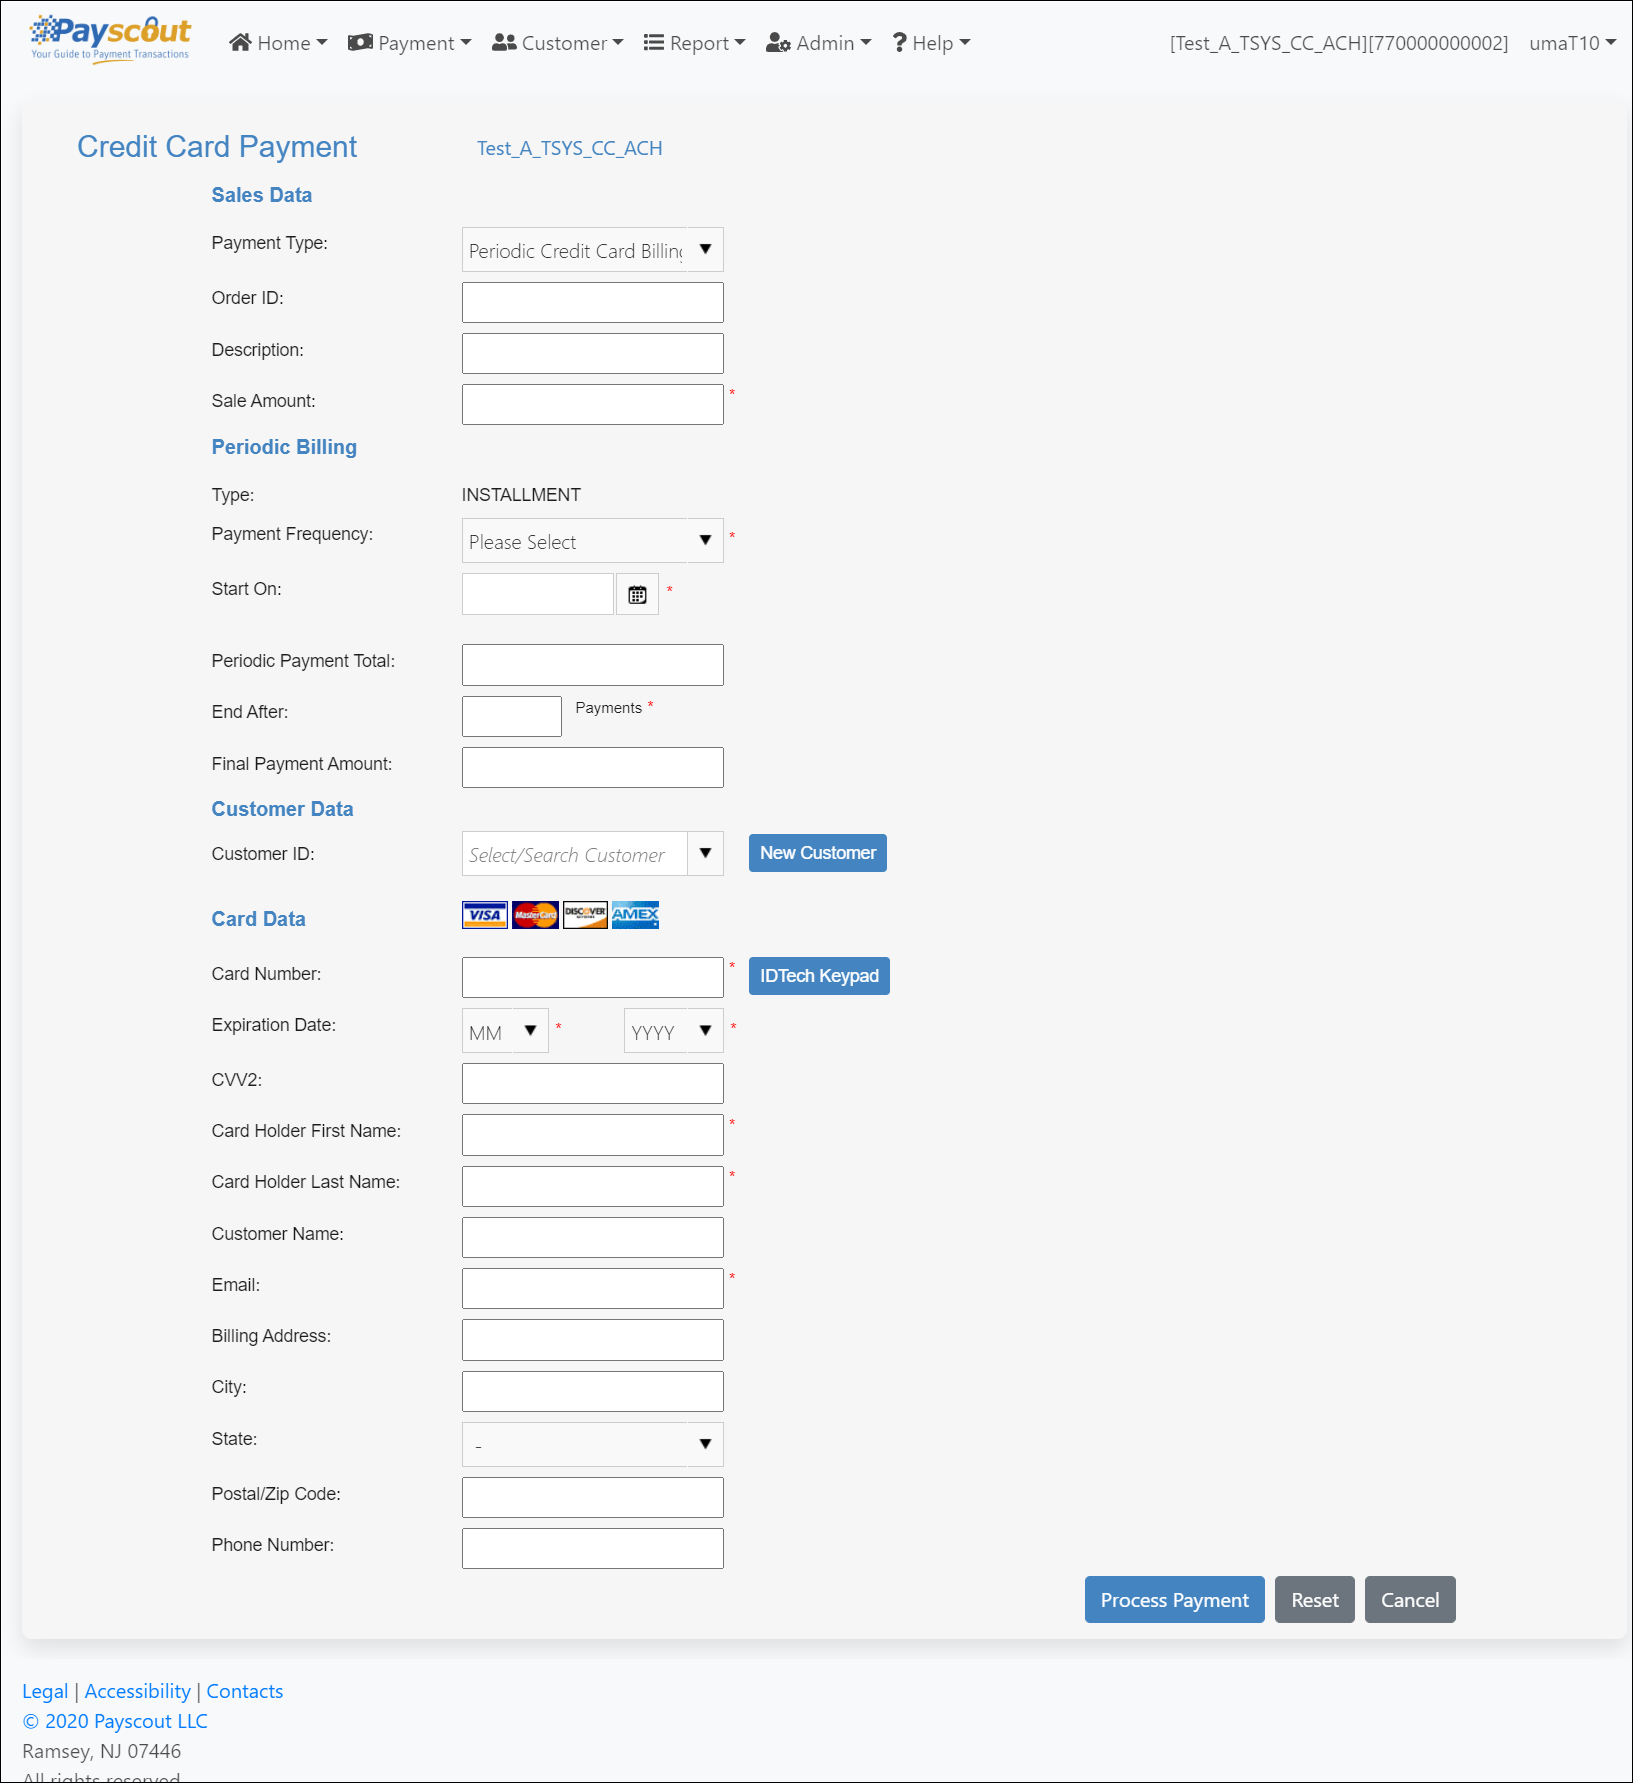
Periodic Credit Card Billing
Selecting Periodic Credit Card Billing as the Payment Type will require the user to populate at least the following fields:
- Sale Amount - amount of each payment.
- Payment Frequency
- Start On - date the Periodic plan should process the first payment.
- End After: Payments - the number of payments after which the Periodic plan should stop processing payments.
- Card Number
- Expiration Date
- Card Holder First Name
- Card Holder Last Name
Other fields:
- Periodic Payment Total - the total amount of the plan.
- Final Payment Amount - the amount of the last payment.
Once 'Periodic Payment Total' and 'Sale Amount' are populated, 'End After' and 'Final Payment Amount' are automatically calculated and displayed.
This enables users to set up a Periodic plan that processes payments to cover a specified total amount over the specified period.
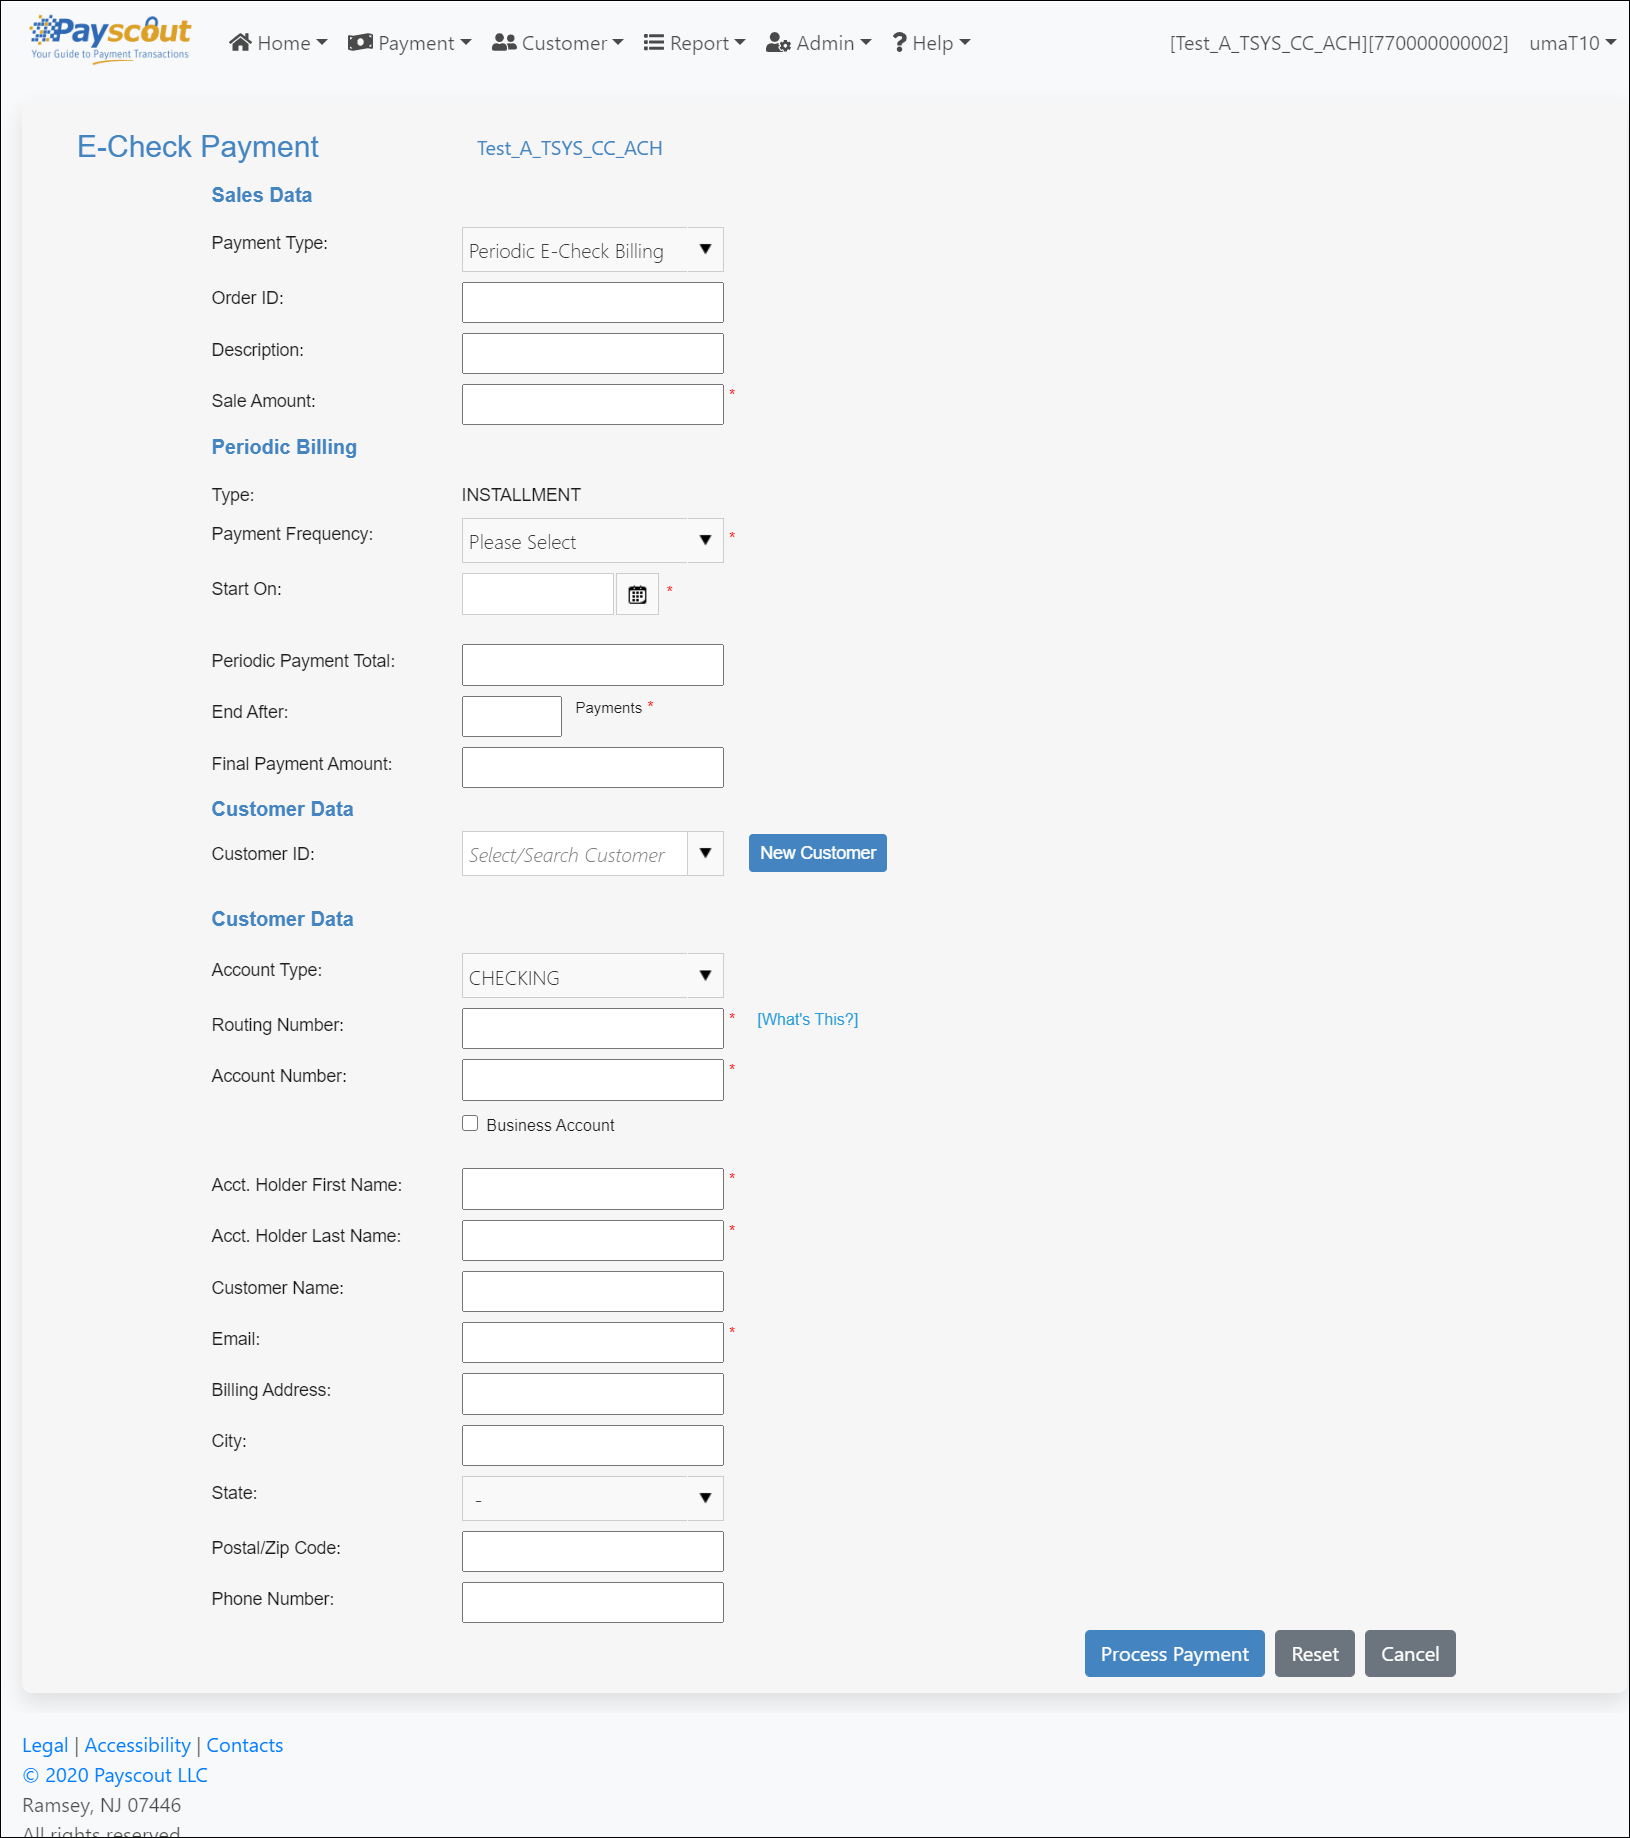
Periodic E-Check Billing
Selecting Periodic E-Check Billing as the Payment Type will require the user to populate at least the following fields:
- Sale Amount - amount of each payment.
- Payment Frequency
- Start On - date the Periodic plan should process the first payment.
- End After: Payments - the number of payments after which the Periodic plan should stop processing payments.
- Routing Number
- Account Number
- Acct. Holder First Name
- Acct. Holder Last Name
Other fields:
- Periodic Payment Total - the total amount of the plan.
- Final Payment Amount - the amount of the last payment.
Once 'Periodic Payment Total' and 'Sale Amount' are populated, 'End After' and 'Final Payment Amount' are automatically calculated and displayed.
This enables users to set up a Periodic plan that processes payments to cover a specified total amount over the specified period.
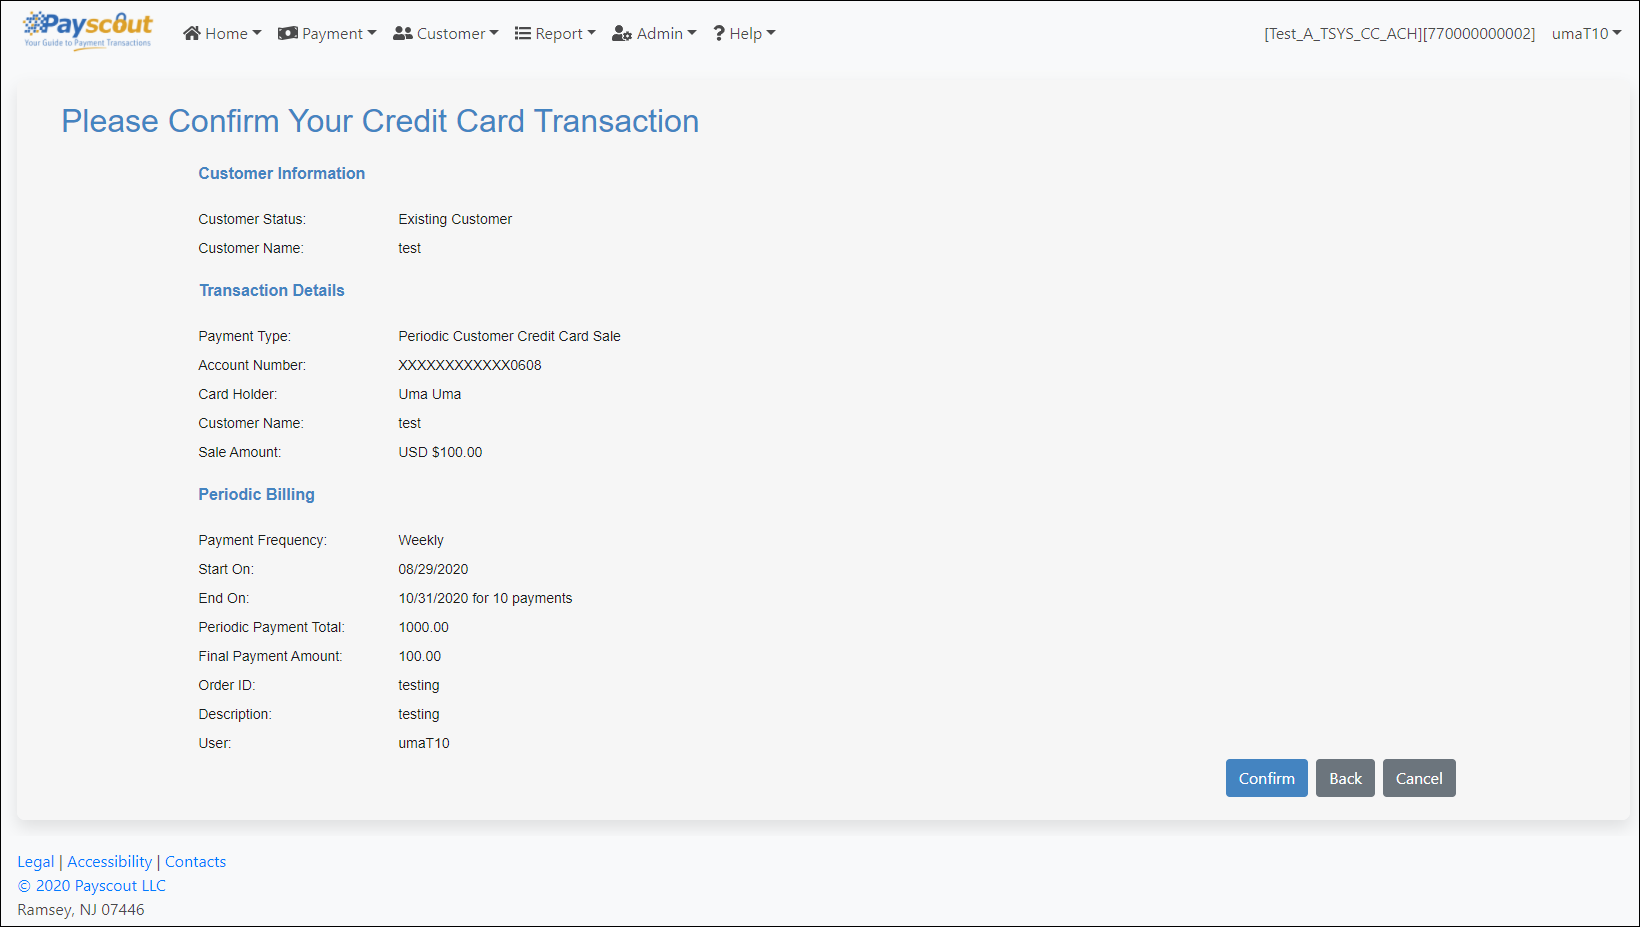
Transaction Confirmation Page
Merchants can be configured to have a confirmation screen before the transaction is being processed. After clicking on the button (providing the form data is valid) the user is redirected to the confirmation page that displays a summary of the transaction to be processed.
Transaction Result Page
After clicking on (or if merchant is not configured to show a confirmation page), the transaction is posted to the processor and the transaction result is displayed on the screen that follows:
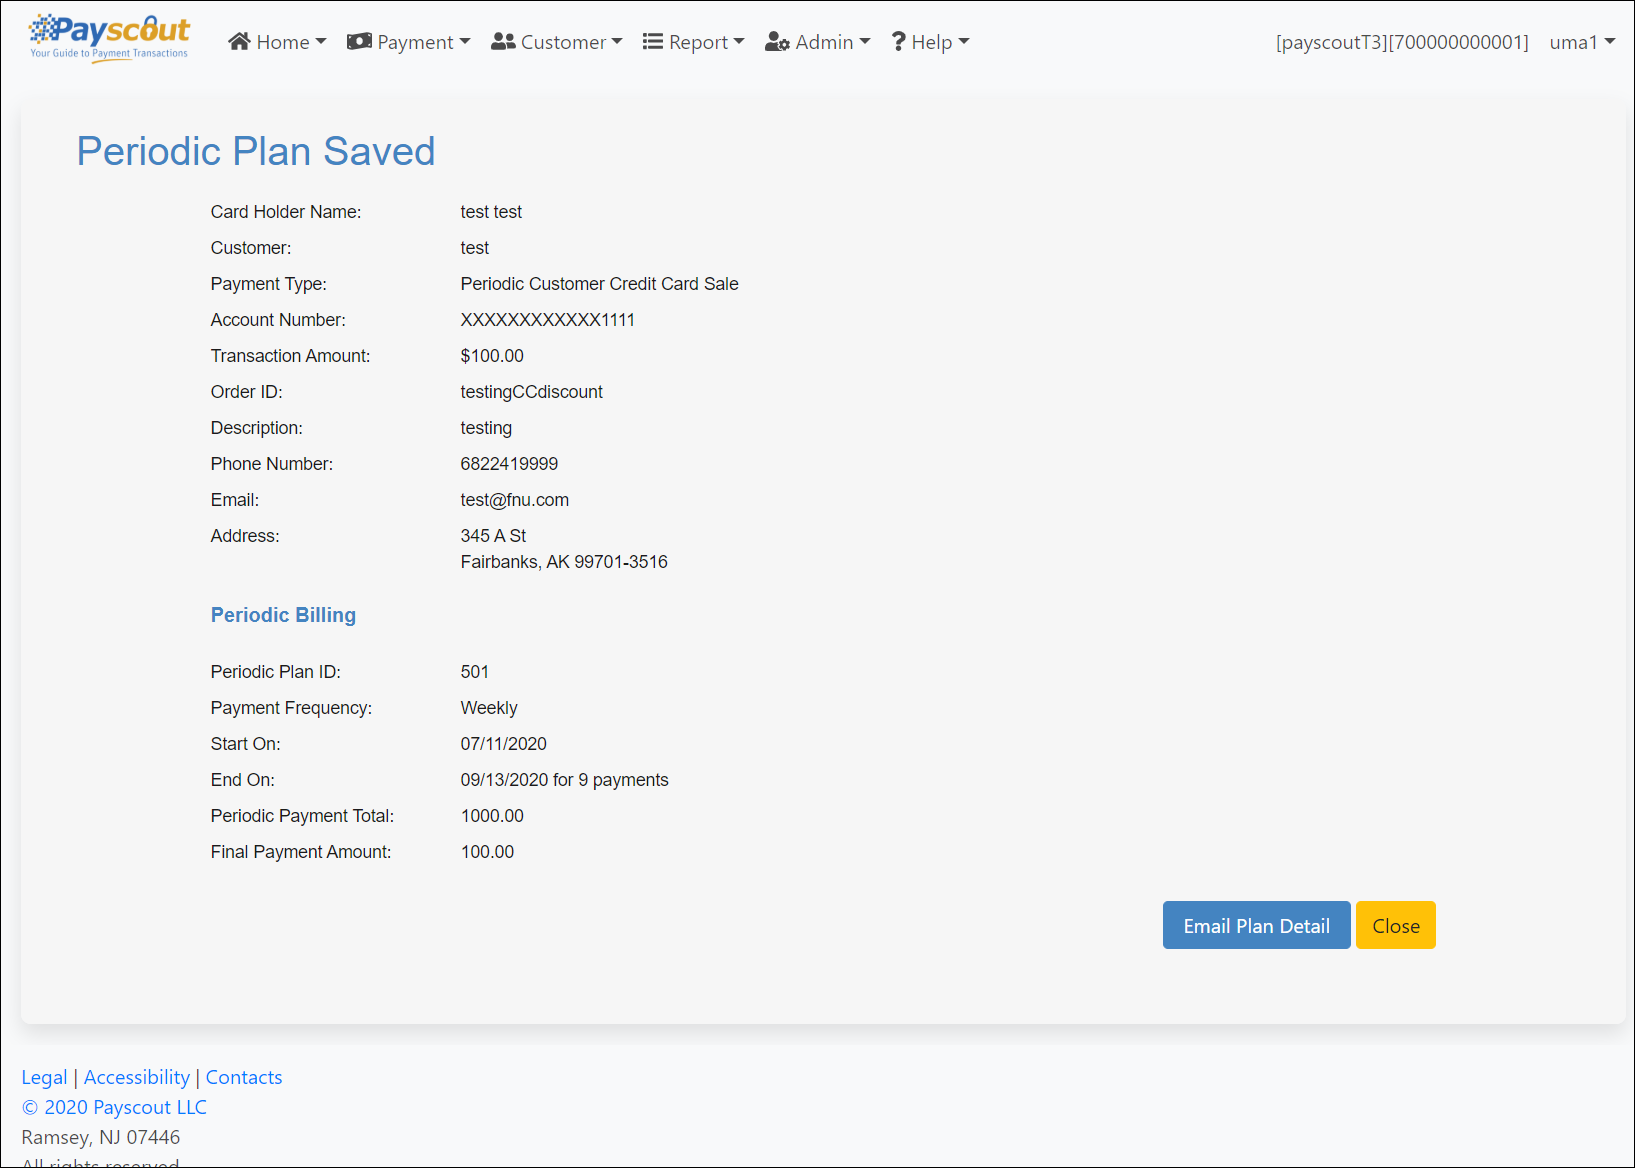
From this screen users can email plan details by using the button provided:
- Clicking on displays an email field, pre-populated with the email (if any) submitted in the payment form.
Periodic Billing
The Periodic Billing Management page displays a list of active Periodic plans for a given merchant.
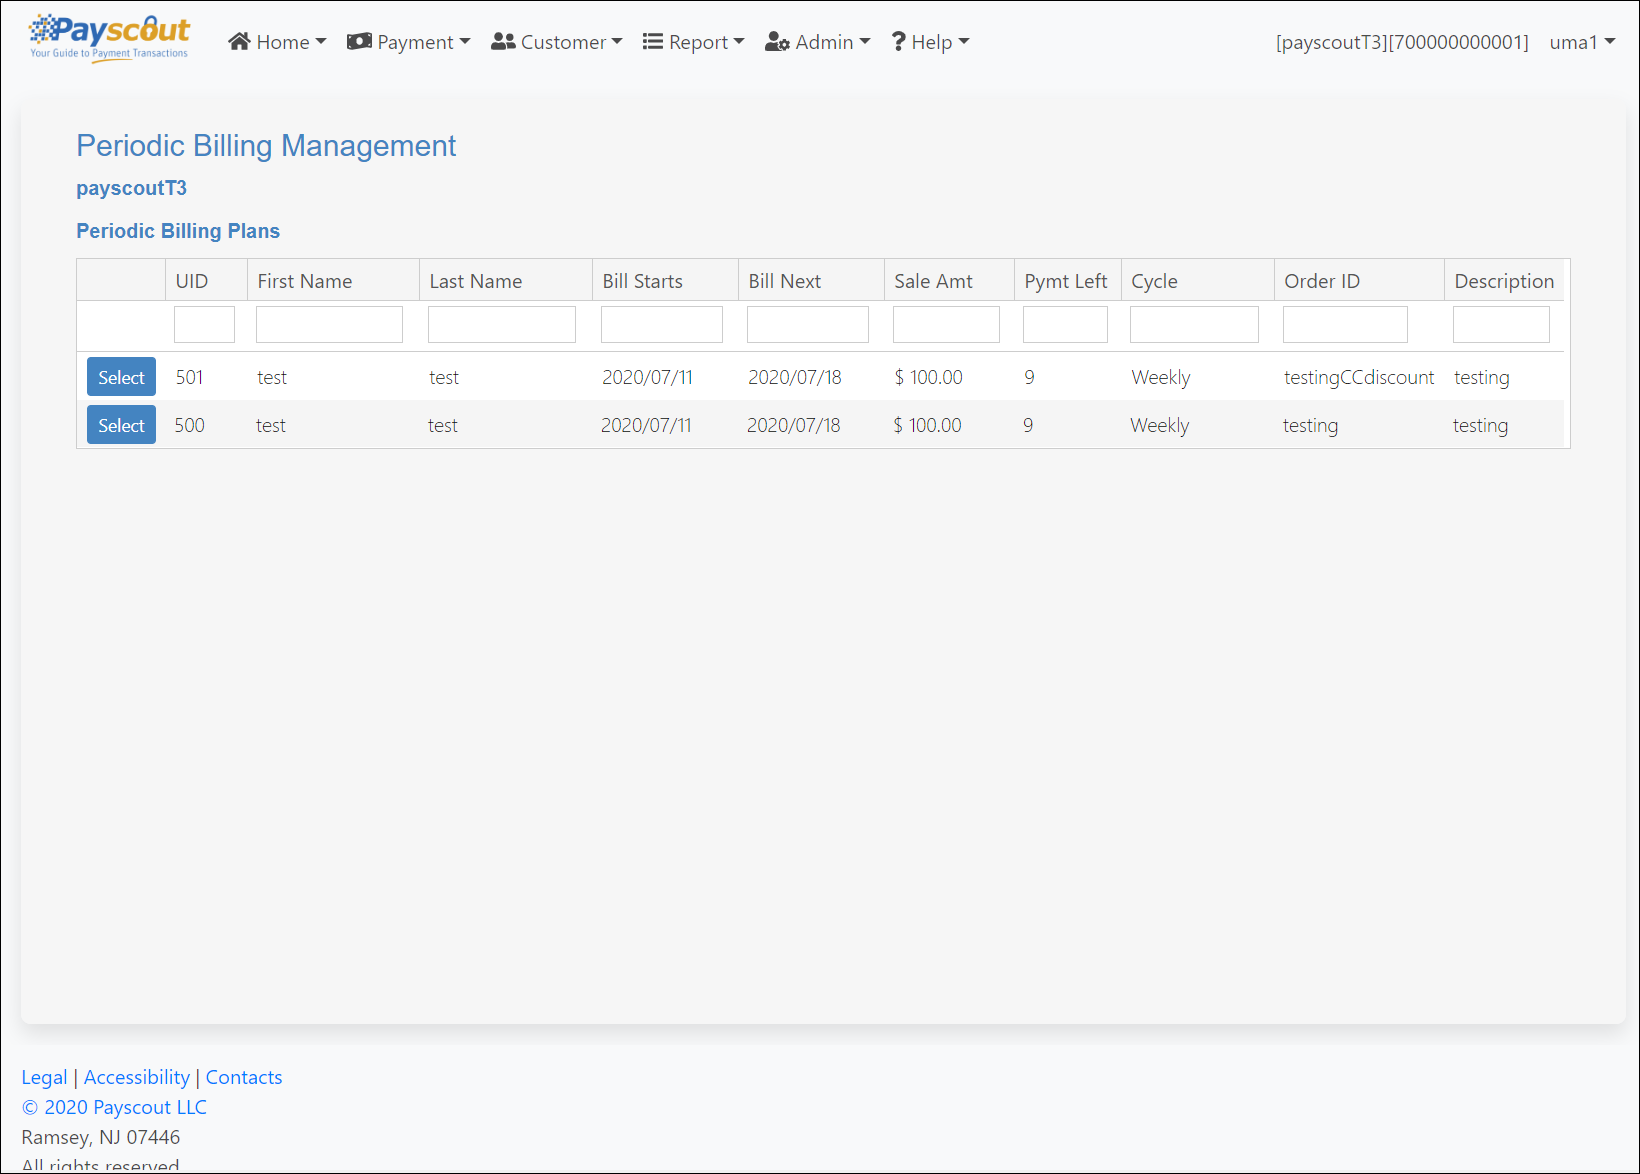
Click on the button to open a Periodic plan details page from which to view and modify the plan.
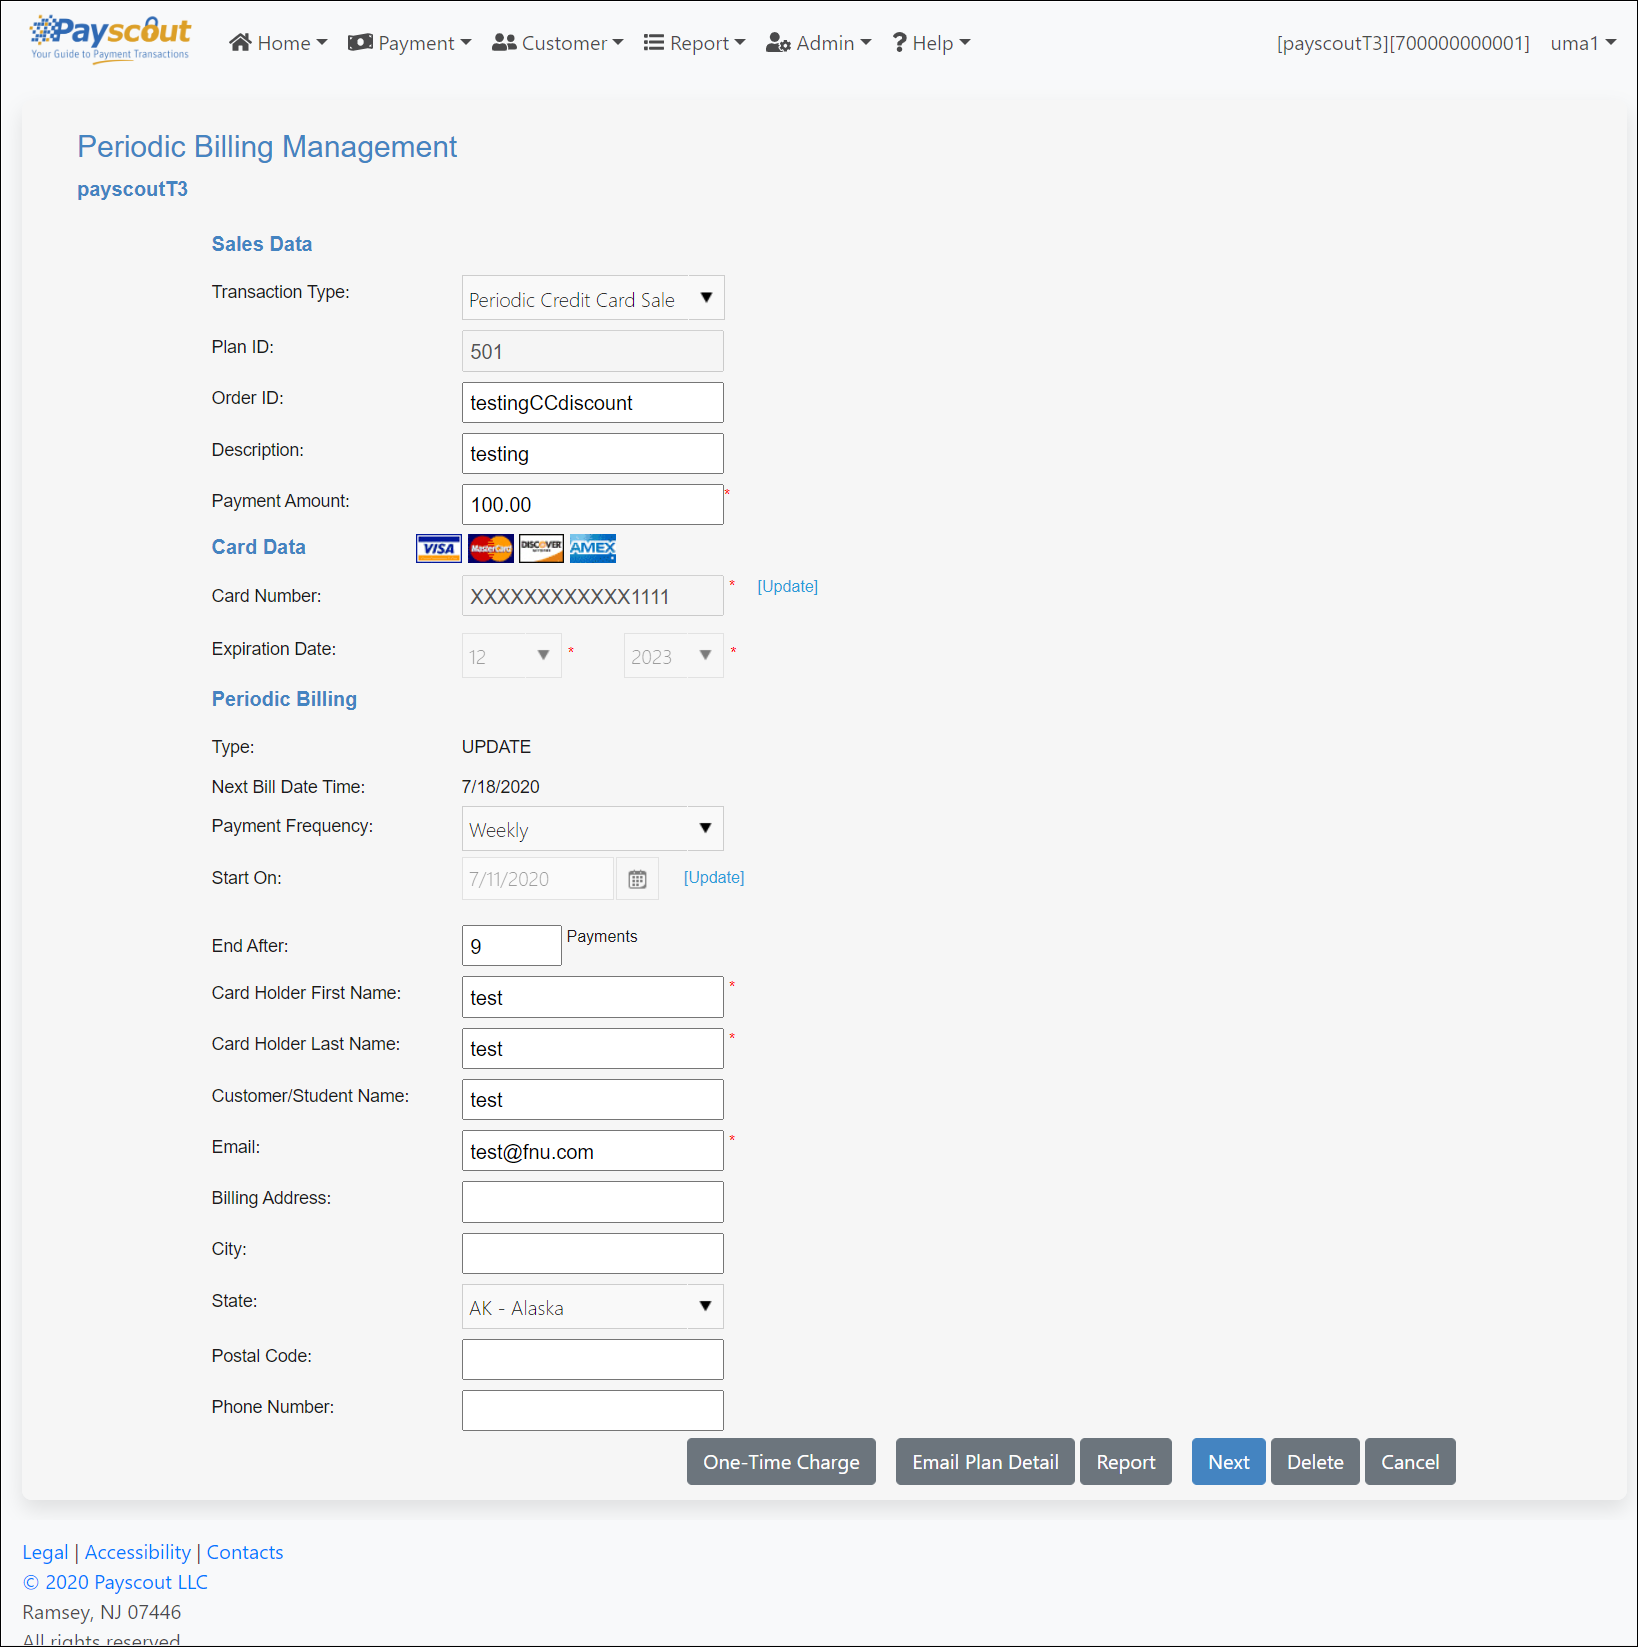
The first page shows editable fields for the plan, pre-populated with information that was submitted at the time of the creation request.
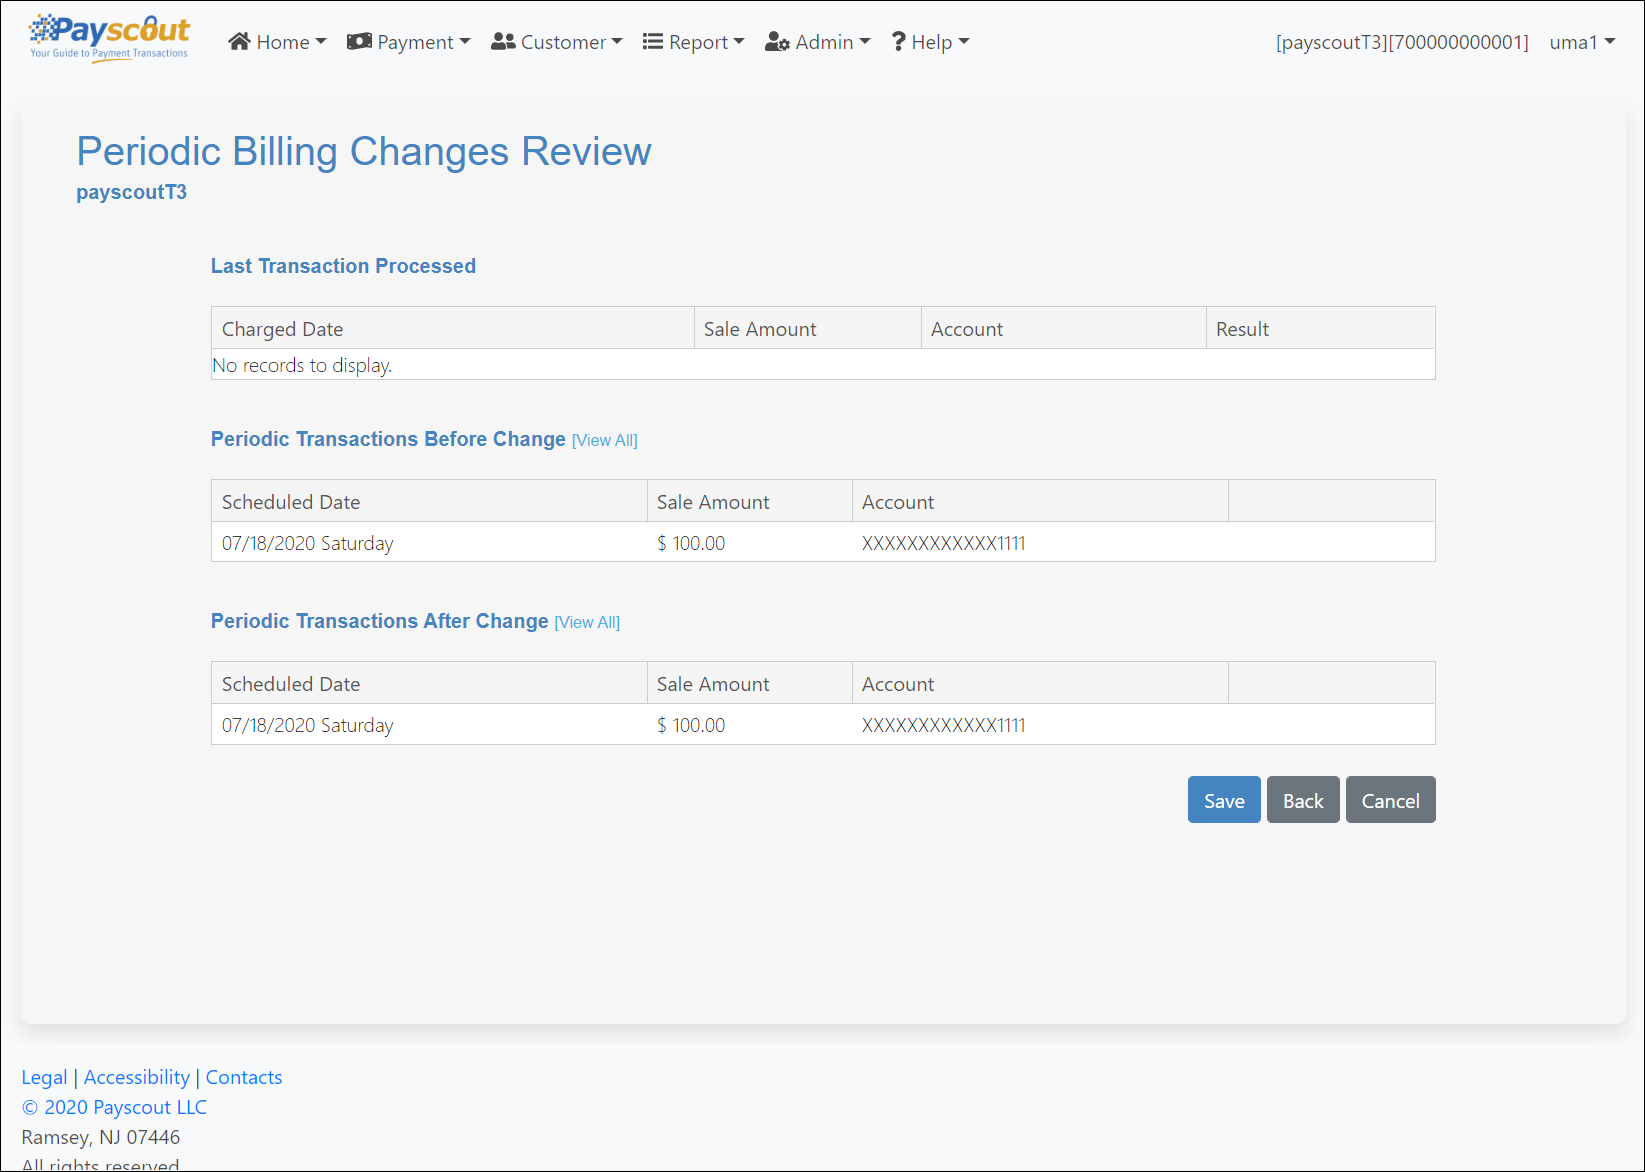
Clicking on redirects the user to the Periodic Billing Changes Review page, listing the last transaction processed within the plan. If changes were made to the Periodic plan, the expected transactions before and after the change are also listed.
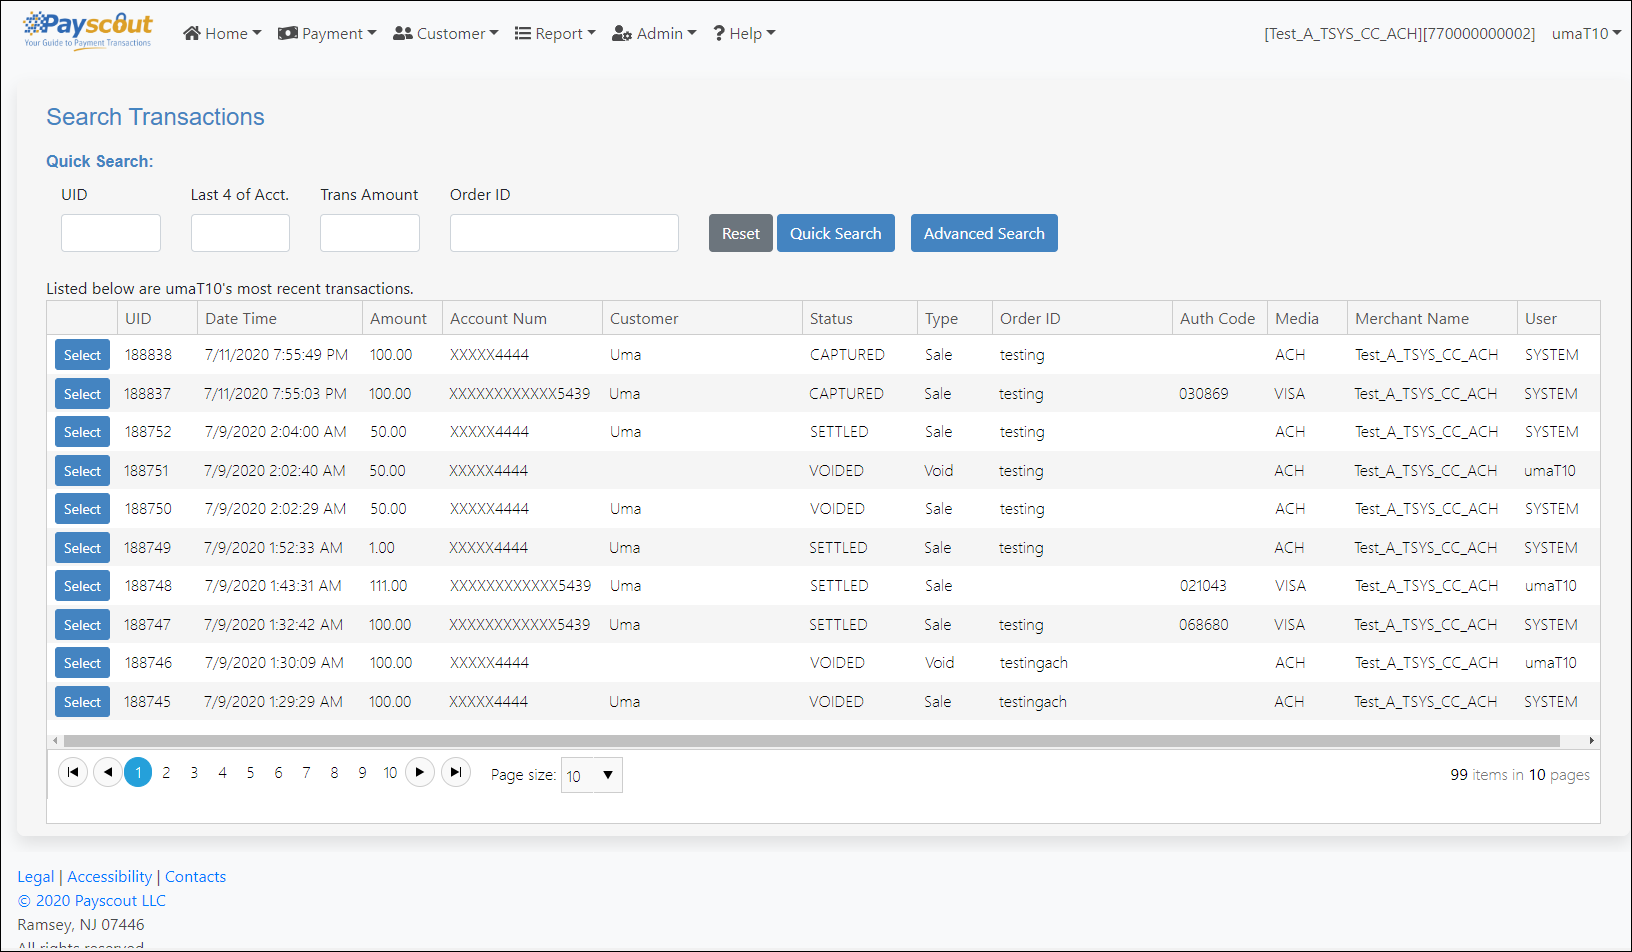
Search Transactions
Upon opening the 'Search Transaction' page, transactions posted by the active user are displayed in a table.
The default sorting is by the Date Time value in descending order. The sorting can be changed by clicking the relevant column header within the table.
Four filters are available to quickly search the user's recent transactions. Click on for additional tables.
Advanced Search
Click on the button and the 'Search Transaction' screen opens up a list of filters by which to search transactions.
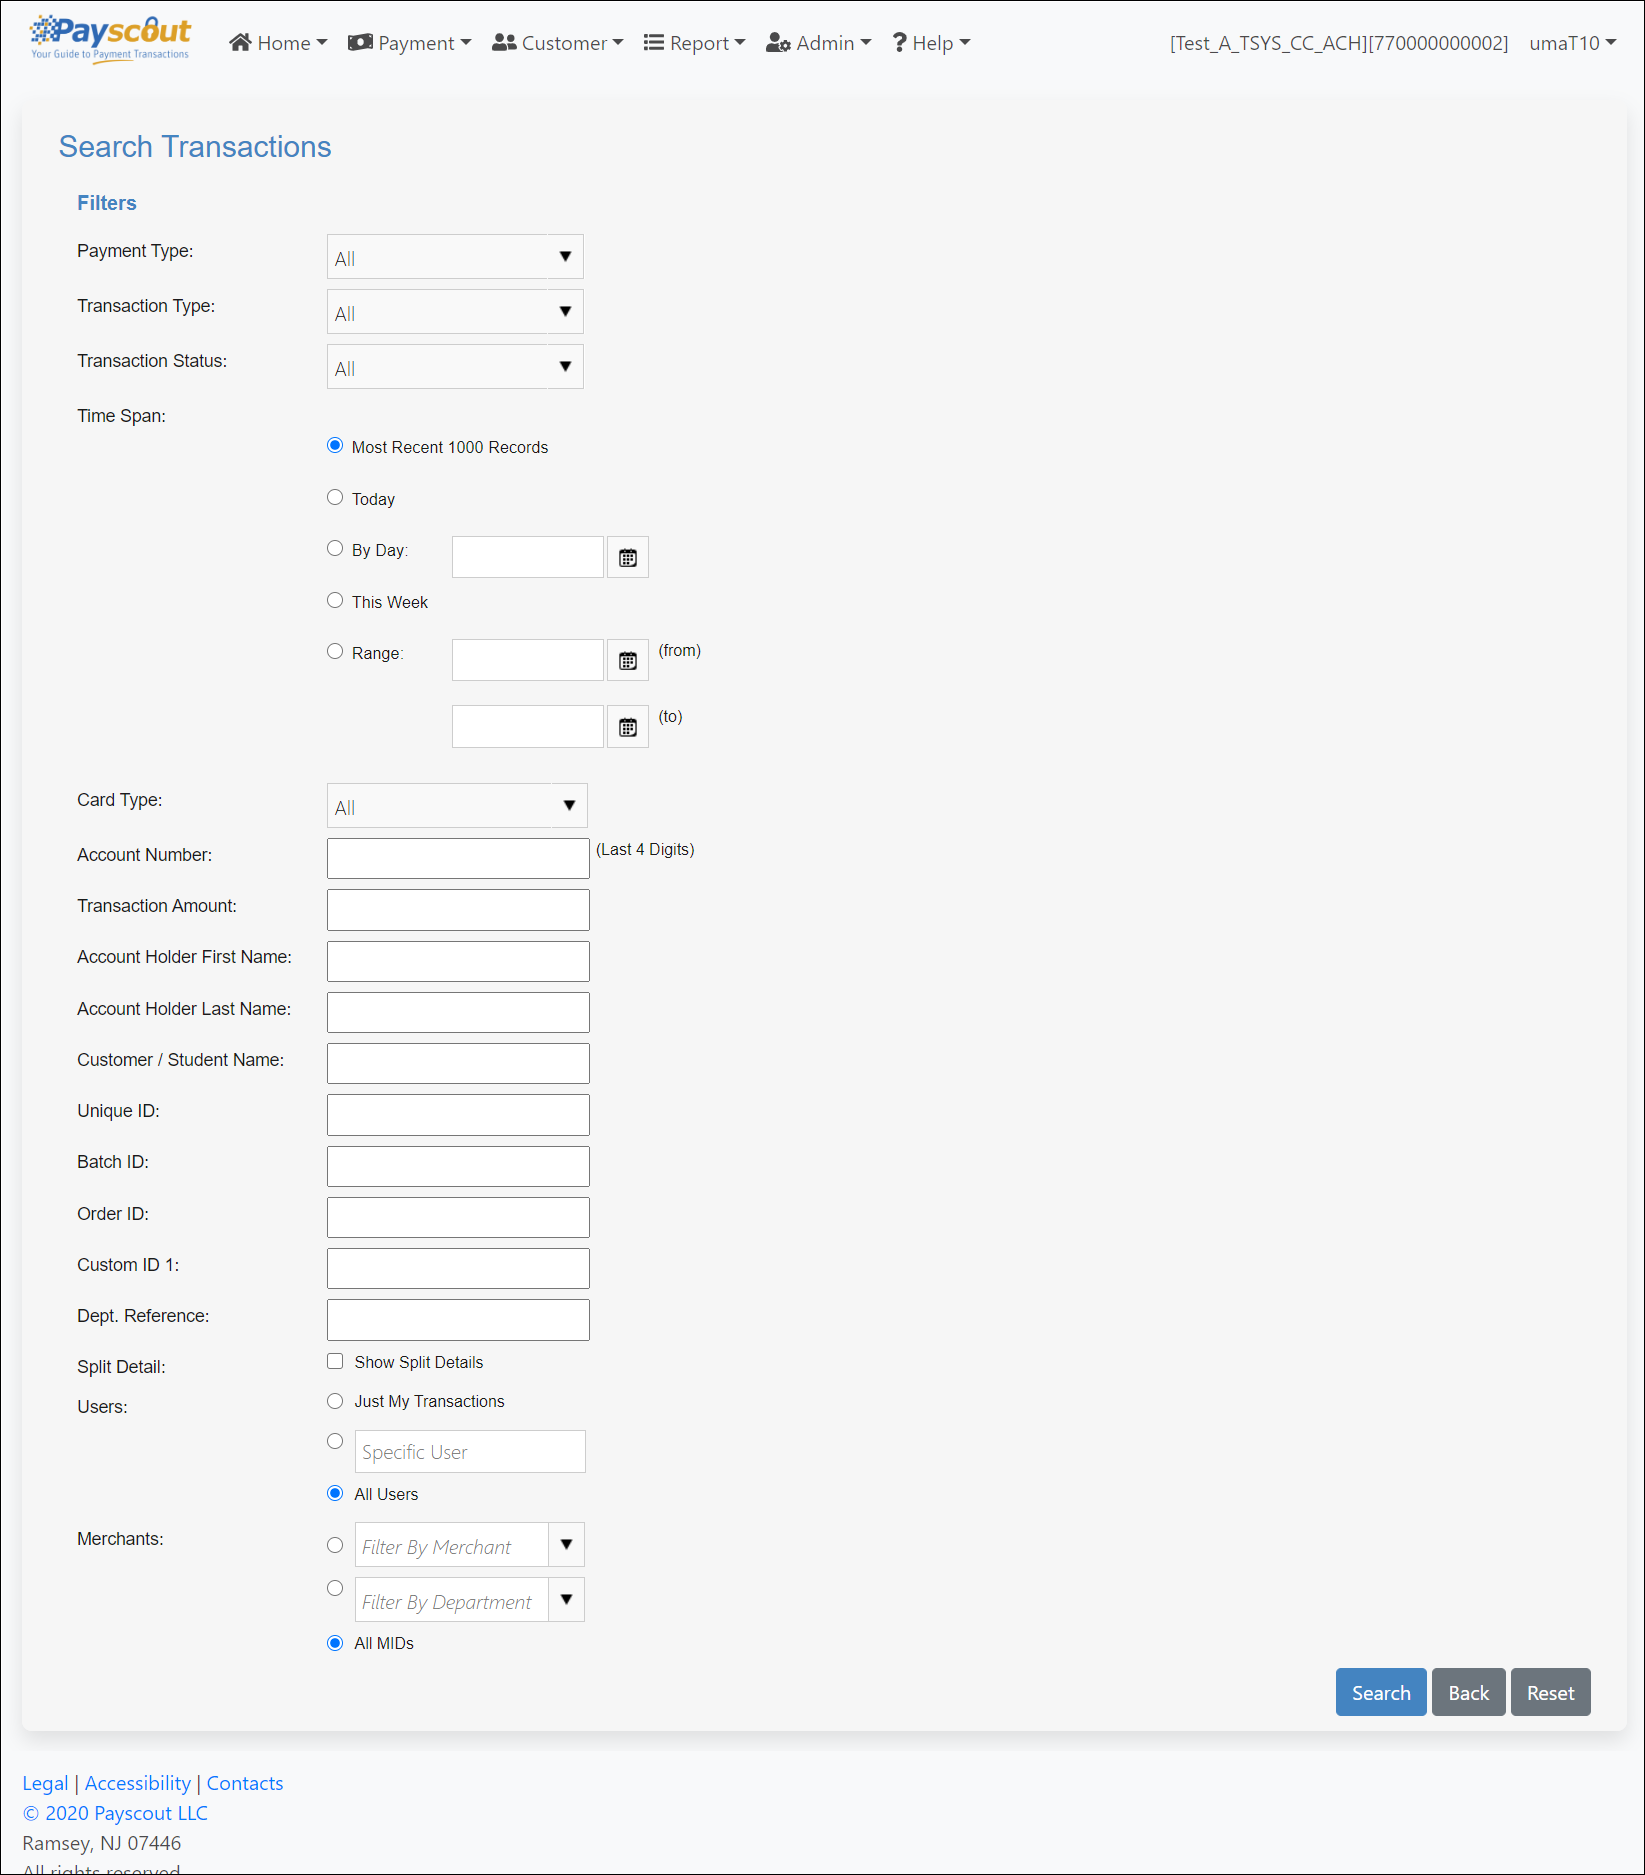
Click on the button on this screen to apply your filters and return your search results:
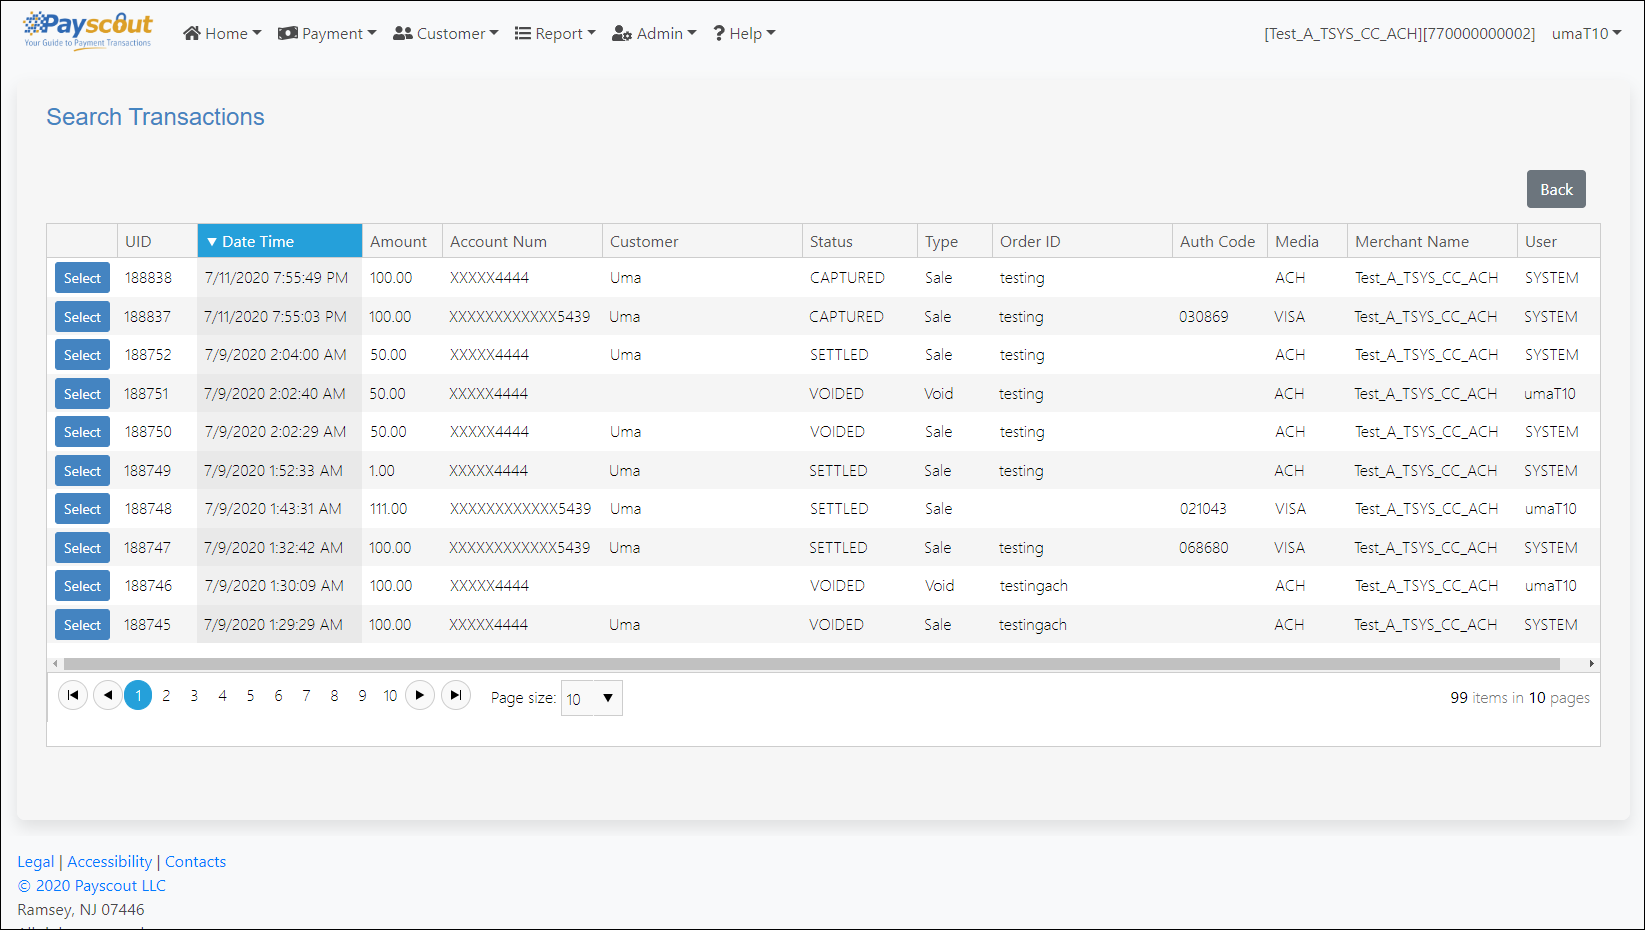
Transaction Details
Click to view a particular transaction's details.
Different actions can be performed based on the Transaction Type and Status of the transaction.
Void
Captured transactions which have not yet been settled (i.e. their batch has not yet been closed) can be voided.
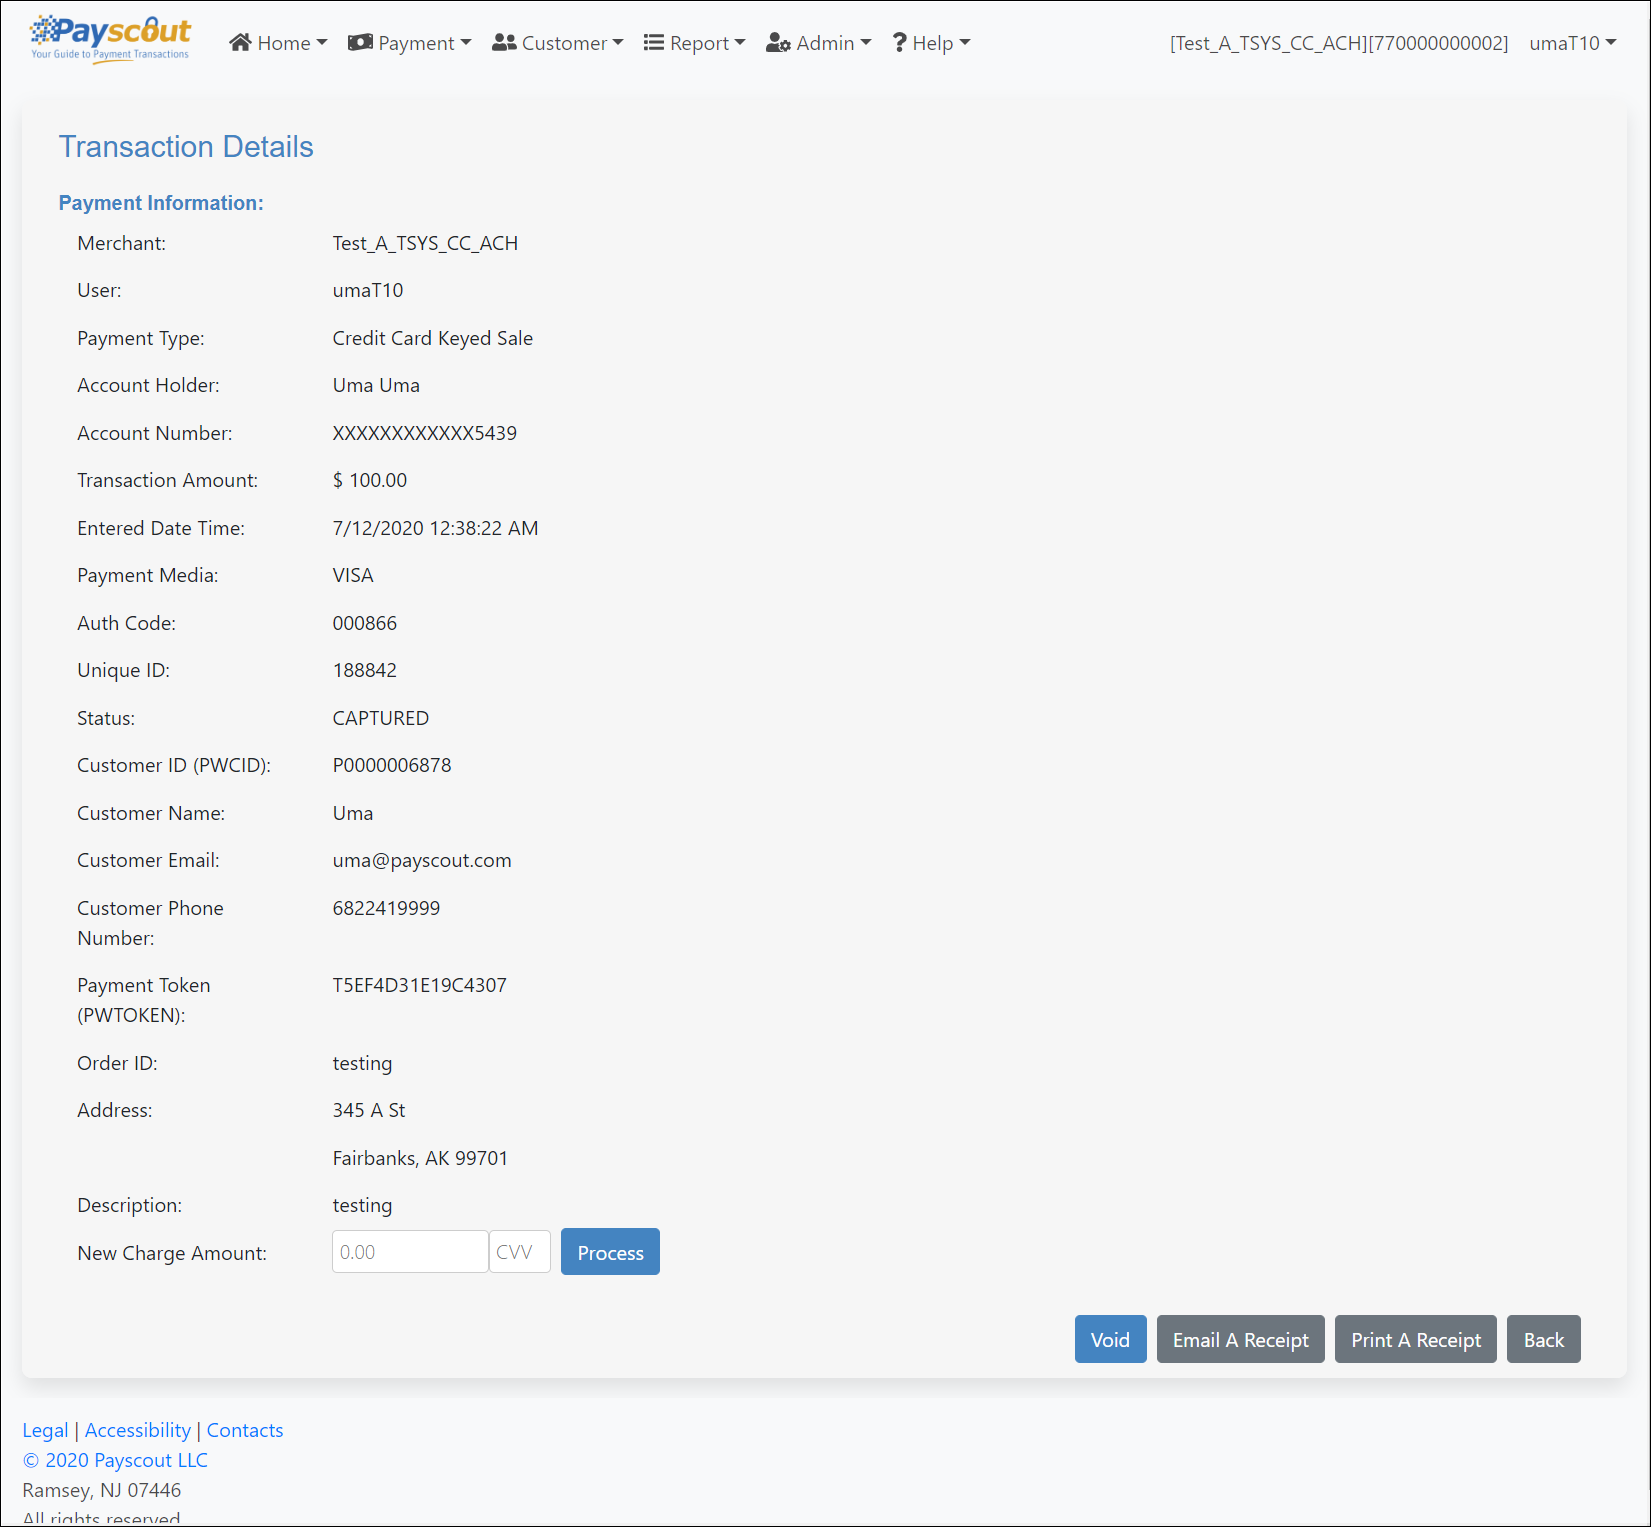
Click on the transaction detail to void the transaction.
Credit
Settled transactions can be refunded back to the customer. This can be either the full or partial amount of the purchase.
If the transaction was already partially credited, then the remaining amount of the transaction will be displayed.
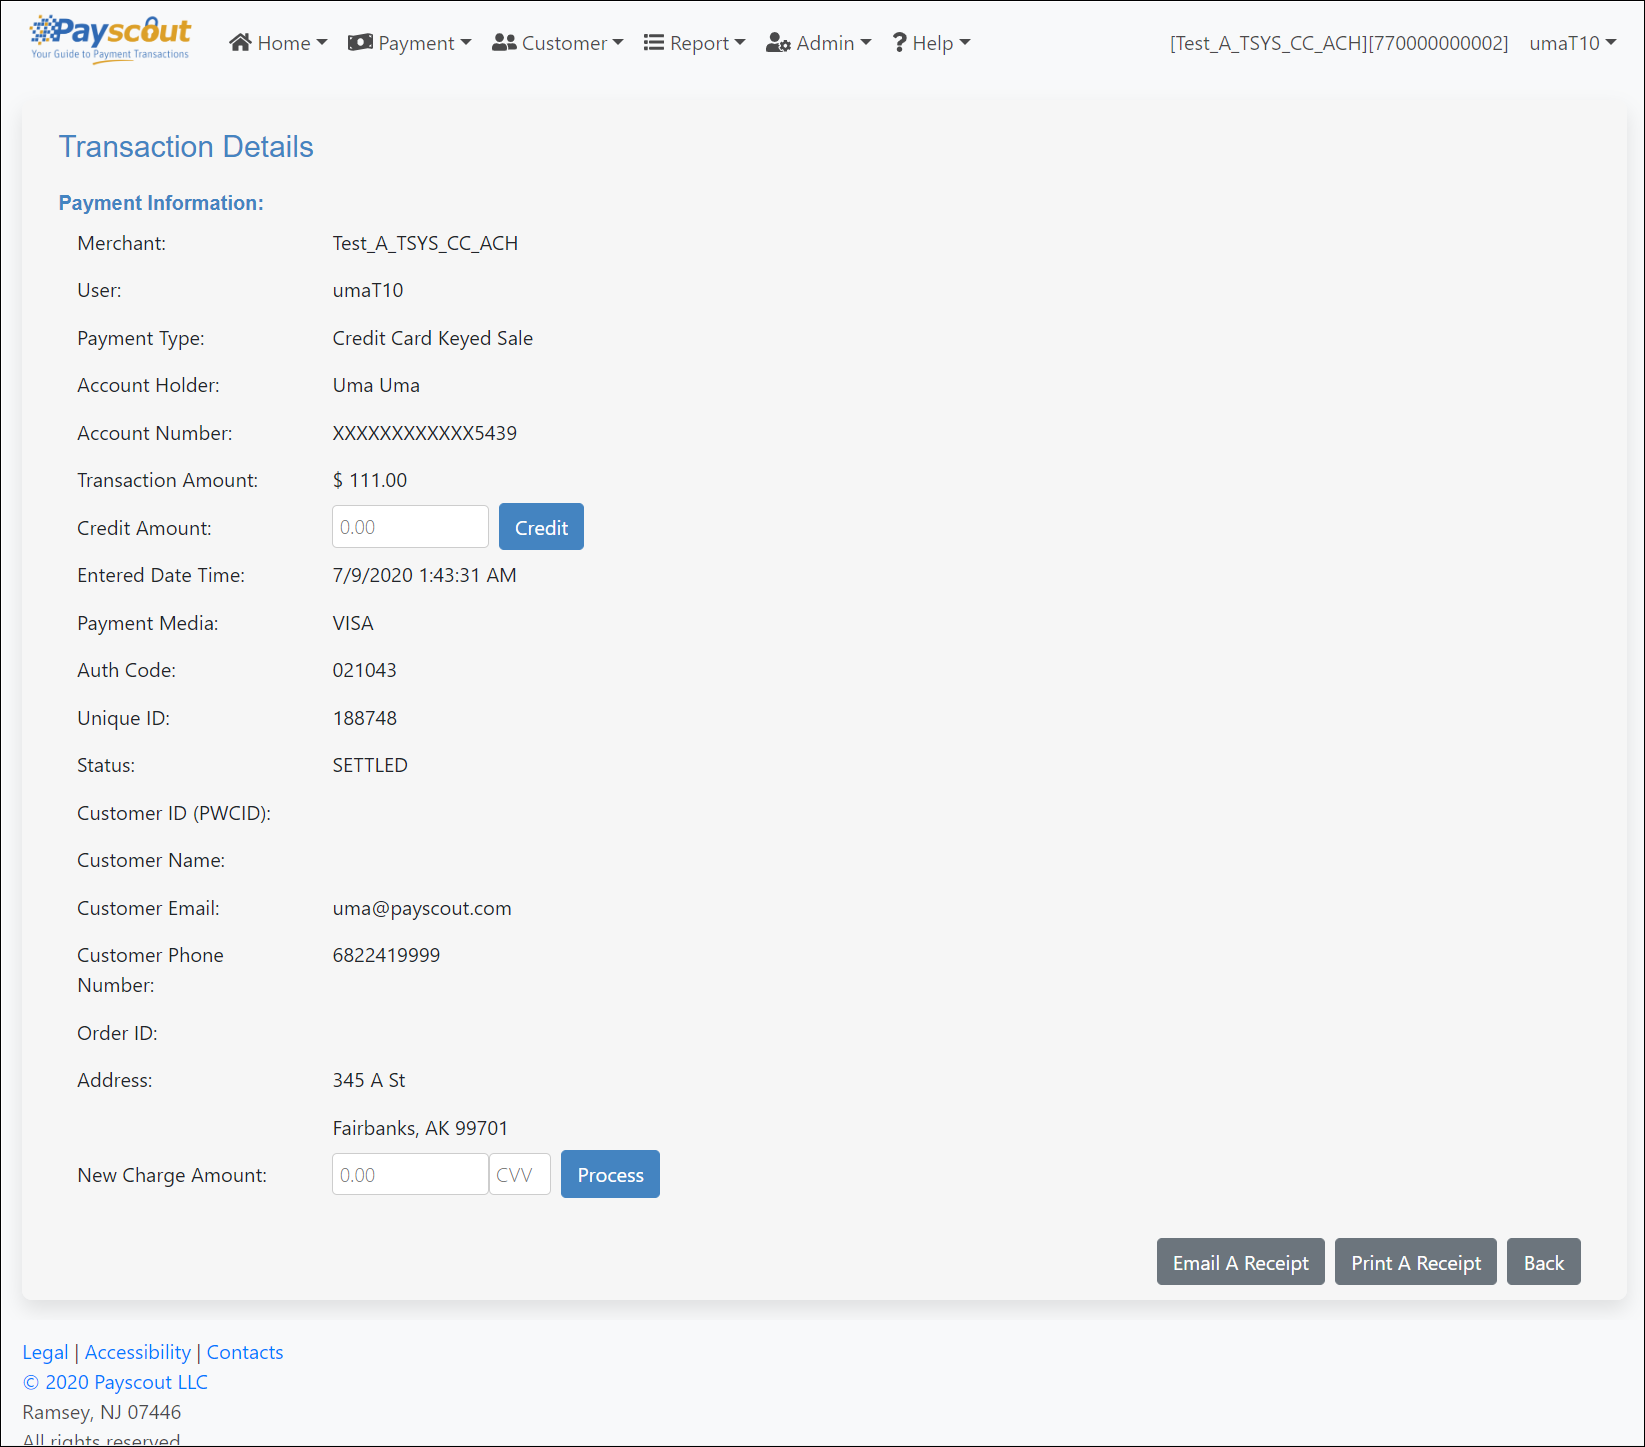
Input the refund amount and click on the transaction detail to refund the transaction.
Re-Charge
From the transaction detail screen users may re-charge a card.
Input an amount in the New Charge Amount field and the CVV (if necessary) and click on .
A new transaction will be posted.
Receipts
This screen allows users to email or manually print receipts.
Batch Settlement
This screen allows administrators to manually close batches.
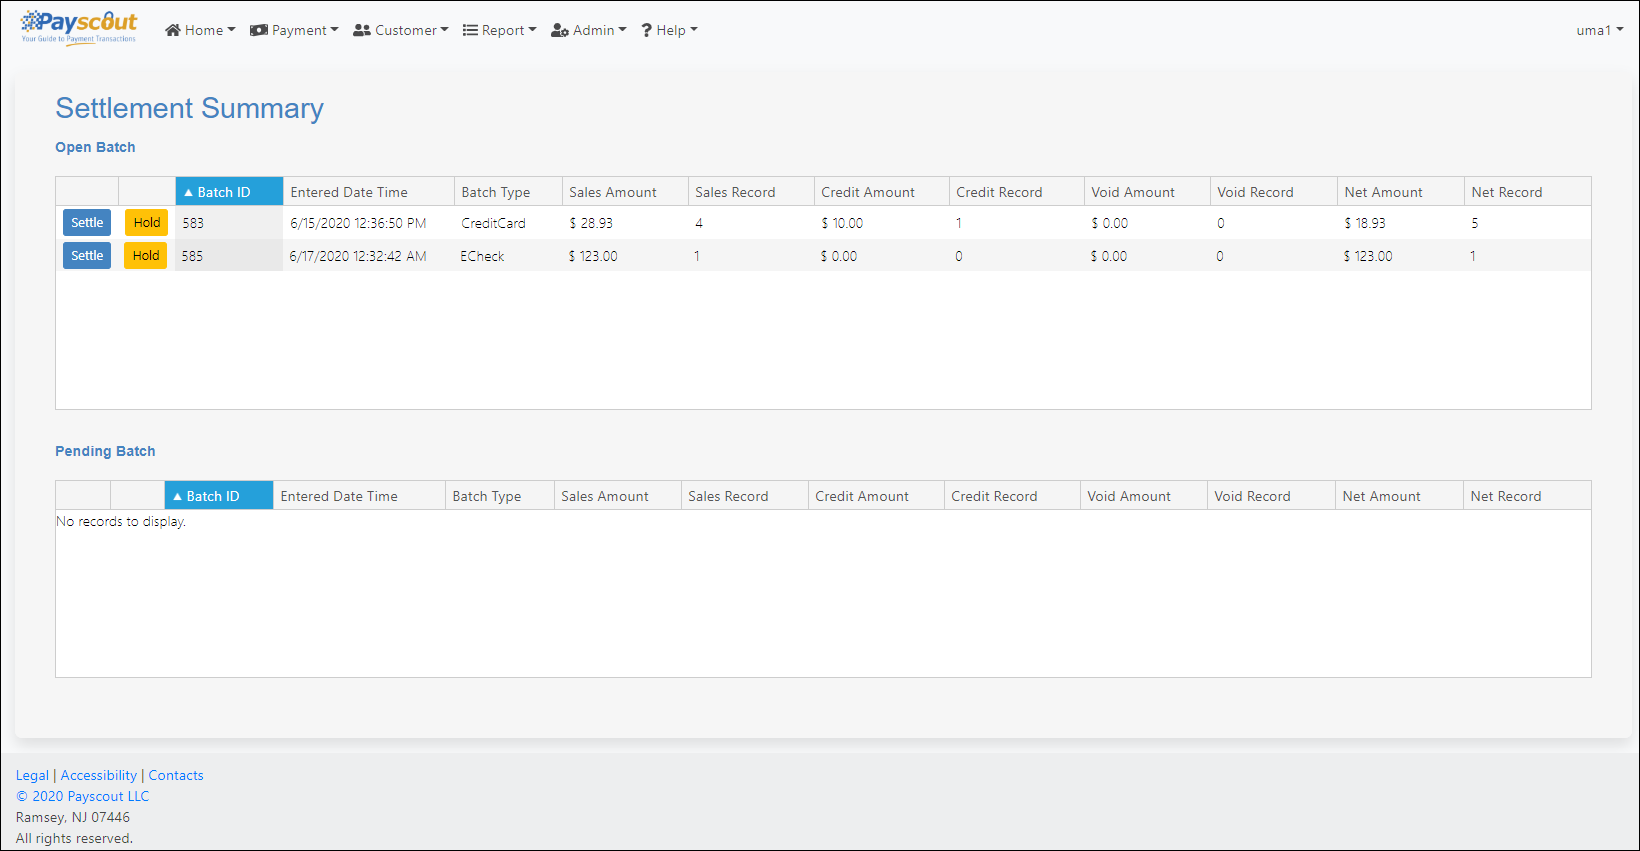
Upon opening this page, any open batches will be listed under the 'Open Batch' table.
Click on to close the batch. Transactions within that batch will have their status changed to SETTLED.
Click on to move the batch to the 'Pending Batch' table.
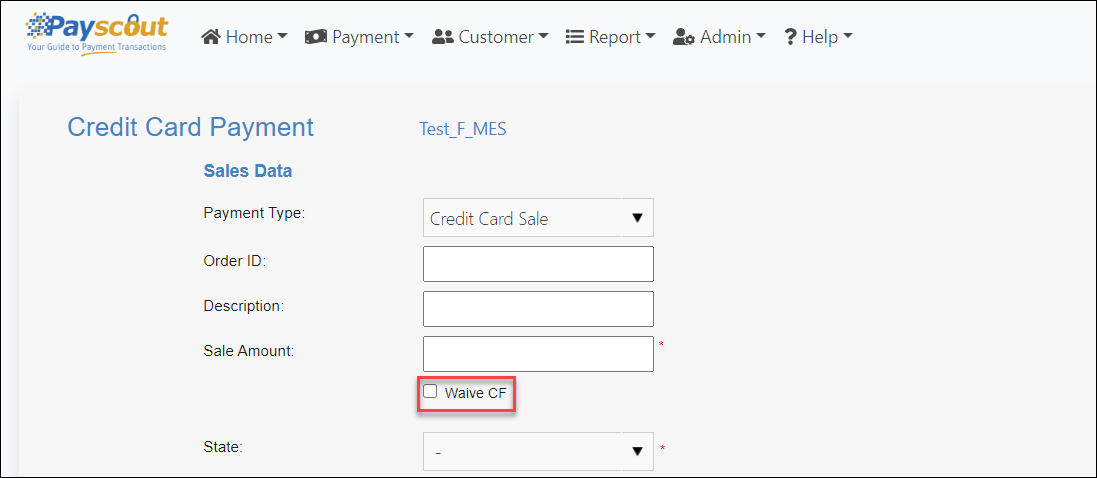
Convenience Fees
Paywire also offers a Convenience Fee solution with the VPOS, wherein customers are charged a fixed fee per transaction, significantly cutting down merchants' processing costs.
For enrolled merchants, this is configured on the gateway by Paywire and will require that STATE is submitted with each payment.
There are a few U.S. states that do not allow convenience fees. The gateway will by default assess a Convenience Fee if the STATE submitted is not one these.
The VPOS will display the below box if a "Fee-State" is selected from the 'State' drop-down in the Make Payment page.
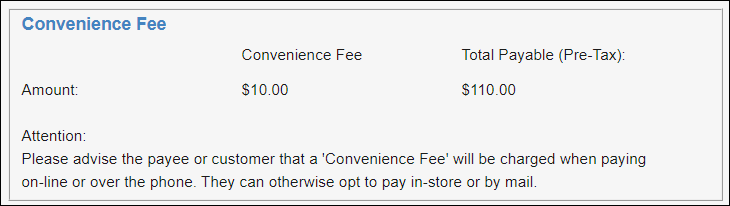
The message at the bottom is configurable in the merchant admin page.
Users have the option to override charging a fee by clicking the 'Waive CF' checkbox:
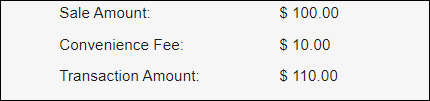
On completing the payment, the Transaction Confirmation, Transaction Result and Transaction Detail pages will include the following lines in their summary:
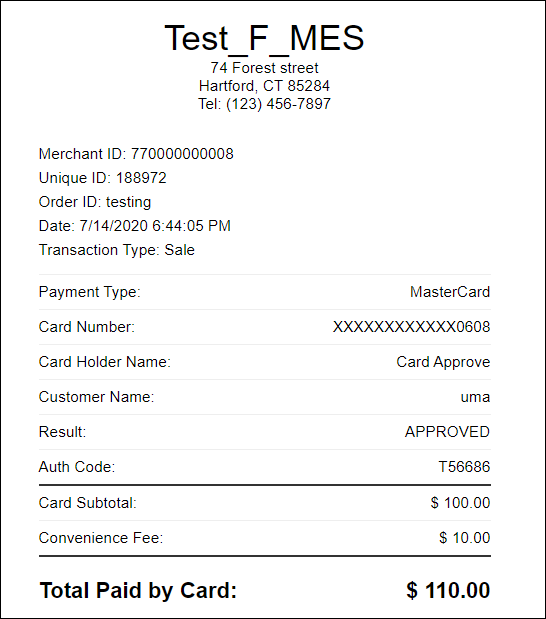
Receipts sent to customers/payees will also include line items for the convenience fee:
Receipts
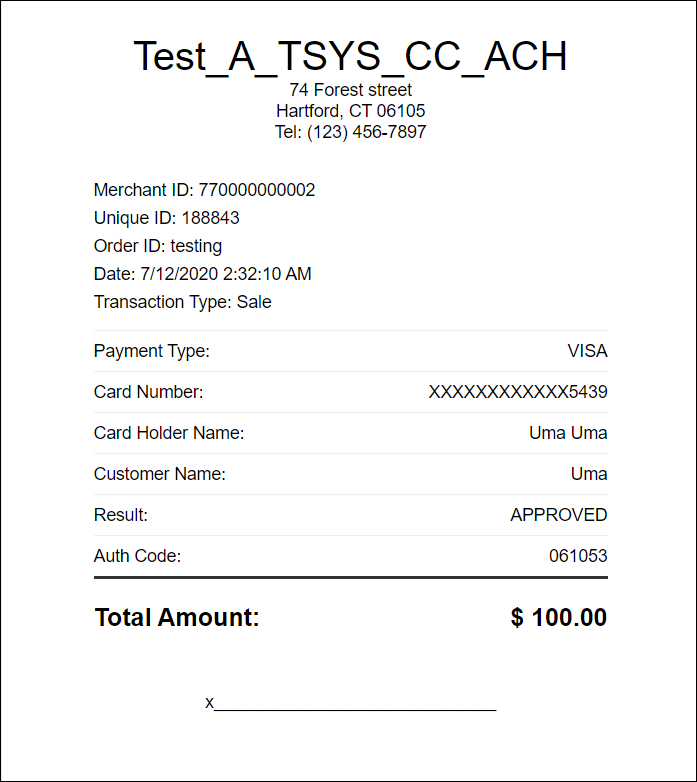
The Paywire Gateway supports both automated and manual receipt distribution to customers and payees.
Automated emails can be configured in the Merchant Admin Page.
Manual emails can be sent from the Transaction Result Page or the Transaction Detail Page.
The receipt sent will look like the following:
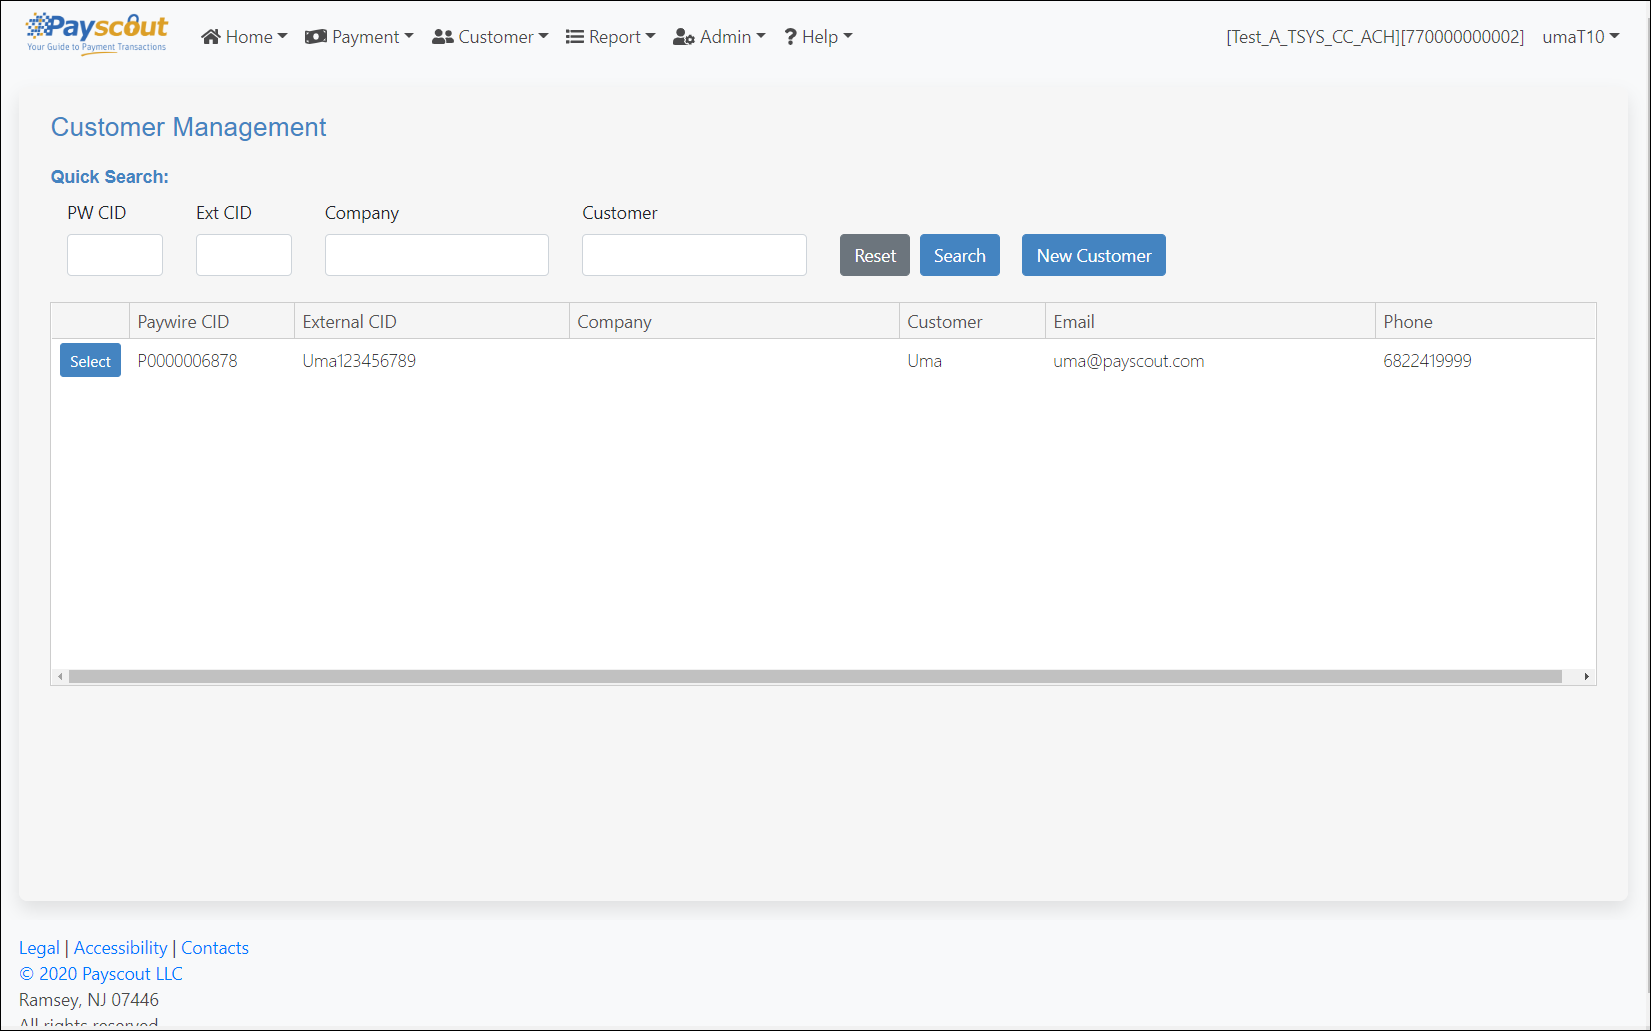
Customer Management
Upon opening the 'Customer Management' page, a list of customers stored in the Paywire Vault are displayed in a table.
Four filters are available to search customers' data.
New Customer
Click on to load the following form:
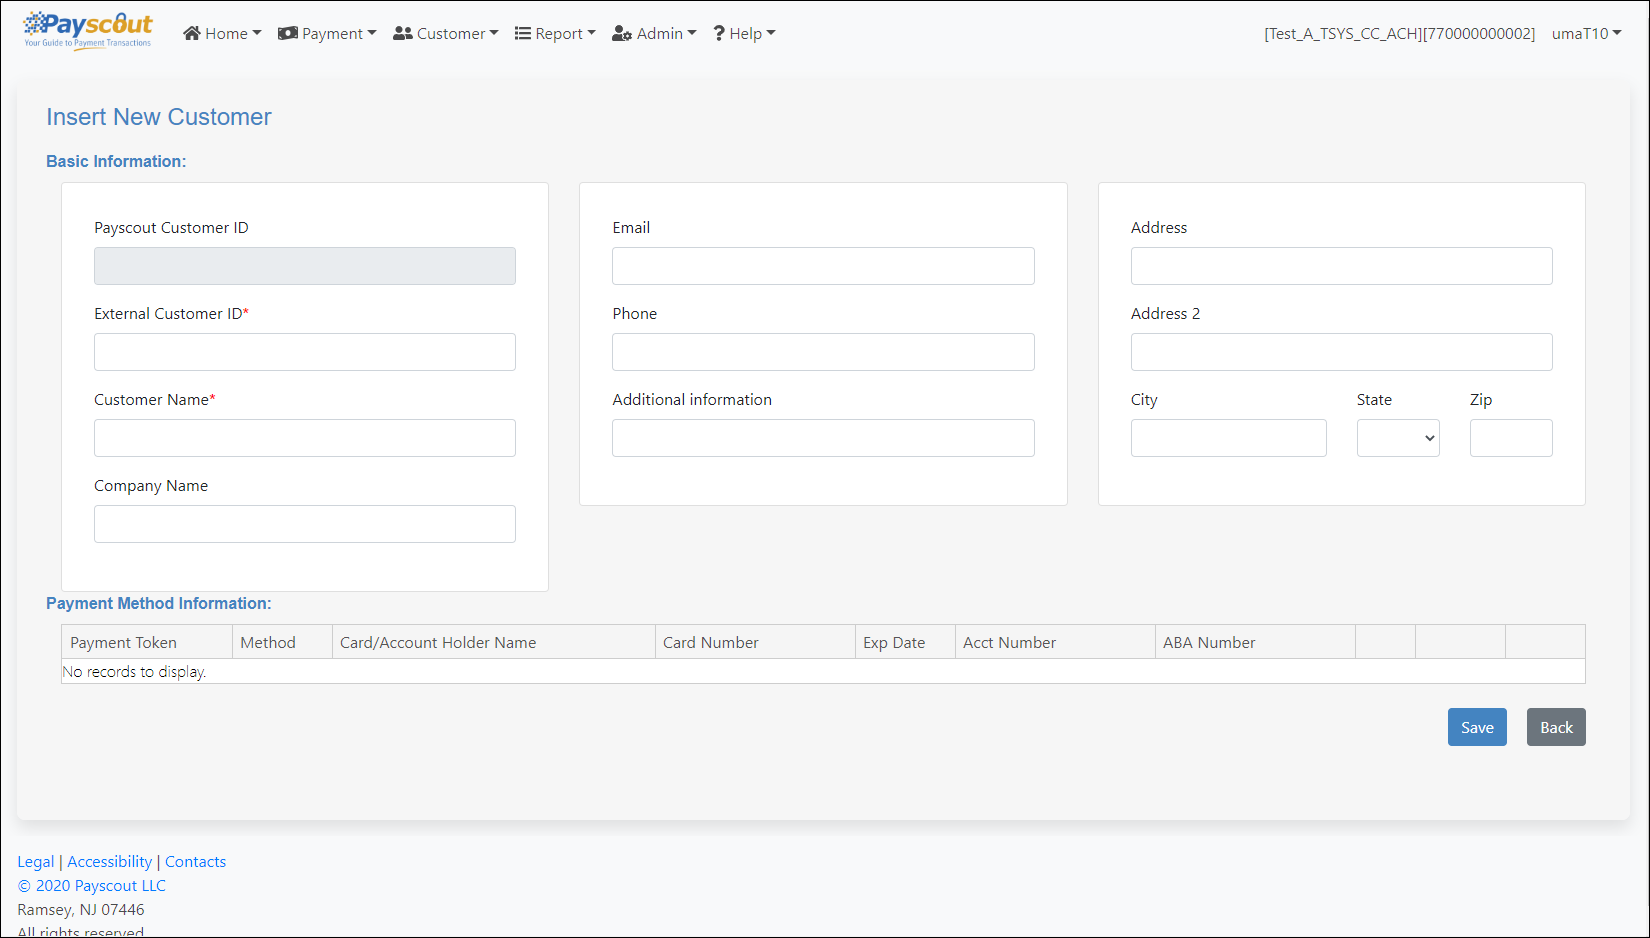
This requires at least:
- External Customer ID: a user-defined identifier for this customer.
- Customer Name.
Once saved, the user is redirected back to the Customer Management Page.
Customer Details
Click on on a row within the Customer Management List to open the selected customer's details.

From this page, users can:
- Modify the customer's basic information.
- Add/Edit/Delete existing Payment Tokens.
- Process a payment using one of the listed tokens.
- View Periodic Billing Plans associated with the customer.
- Generate a historical report of all transactions associated with the customer.
- Delete the customer.
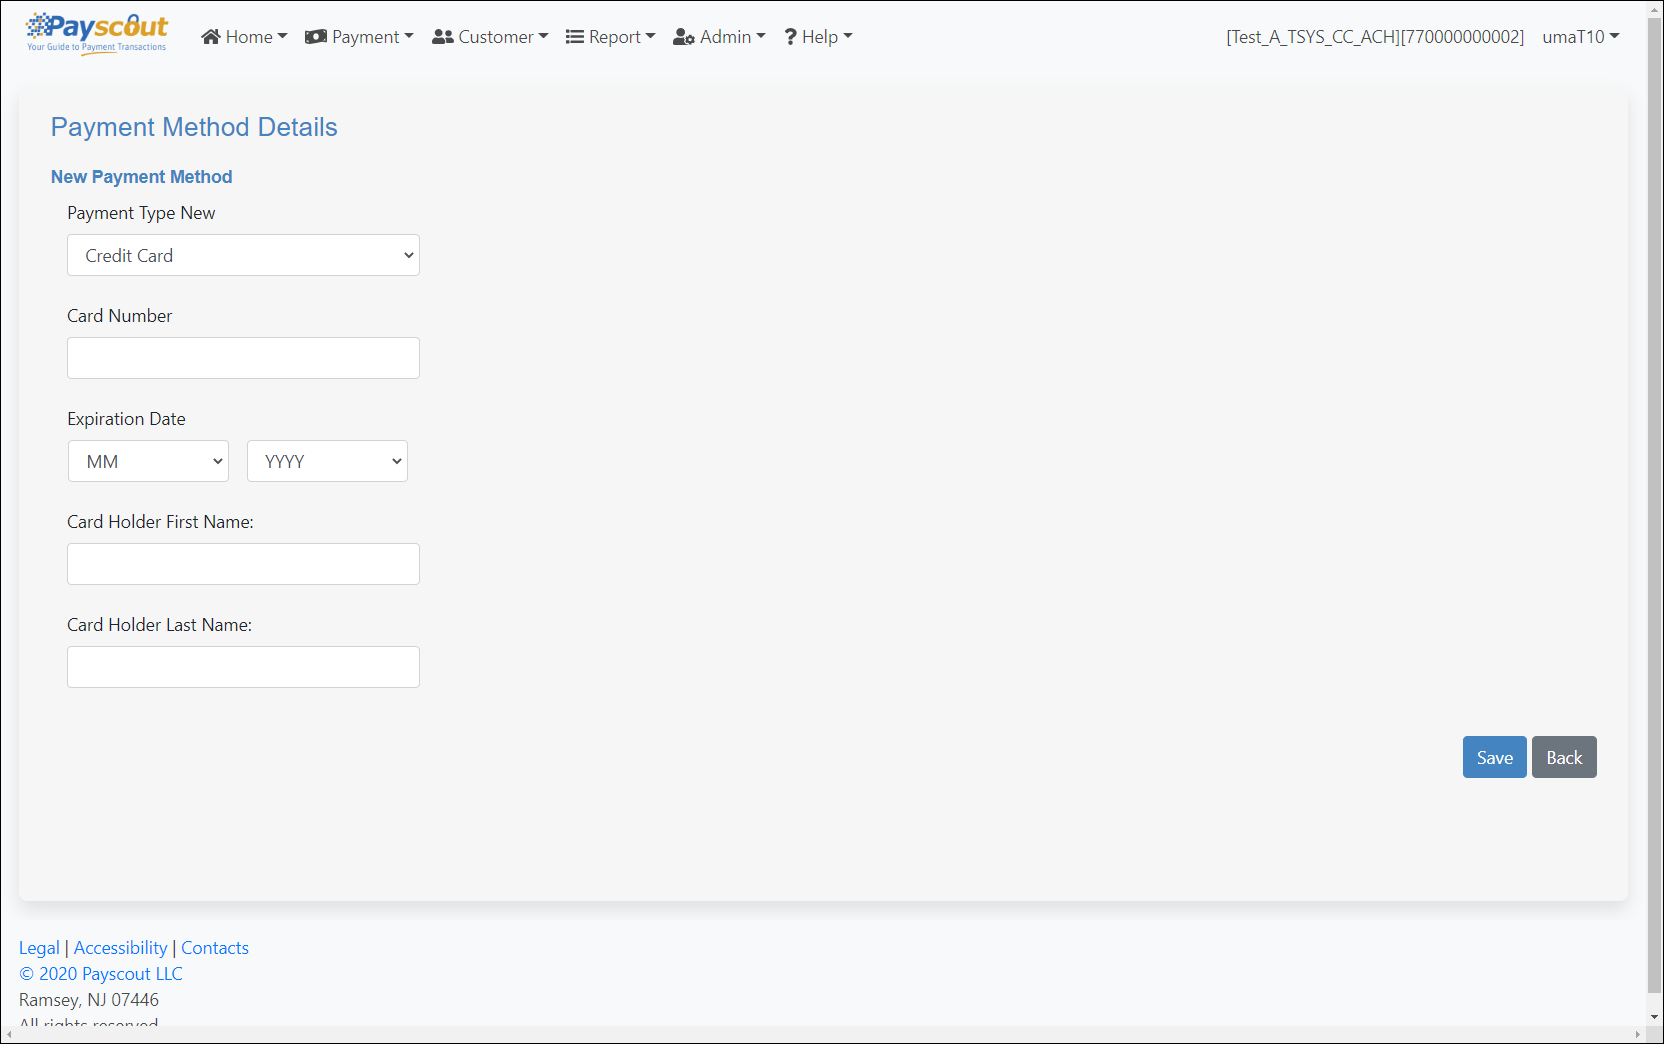
Adding New Payment Method
Click on from the Customer Detail page to load a form to create a New Payment Method.
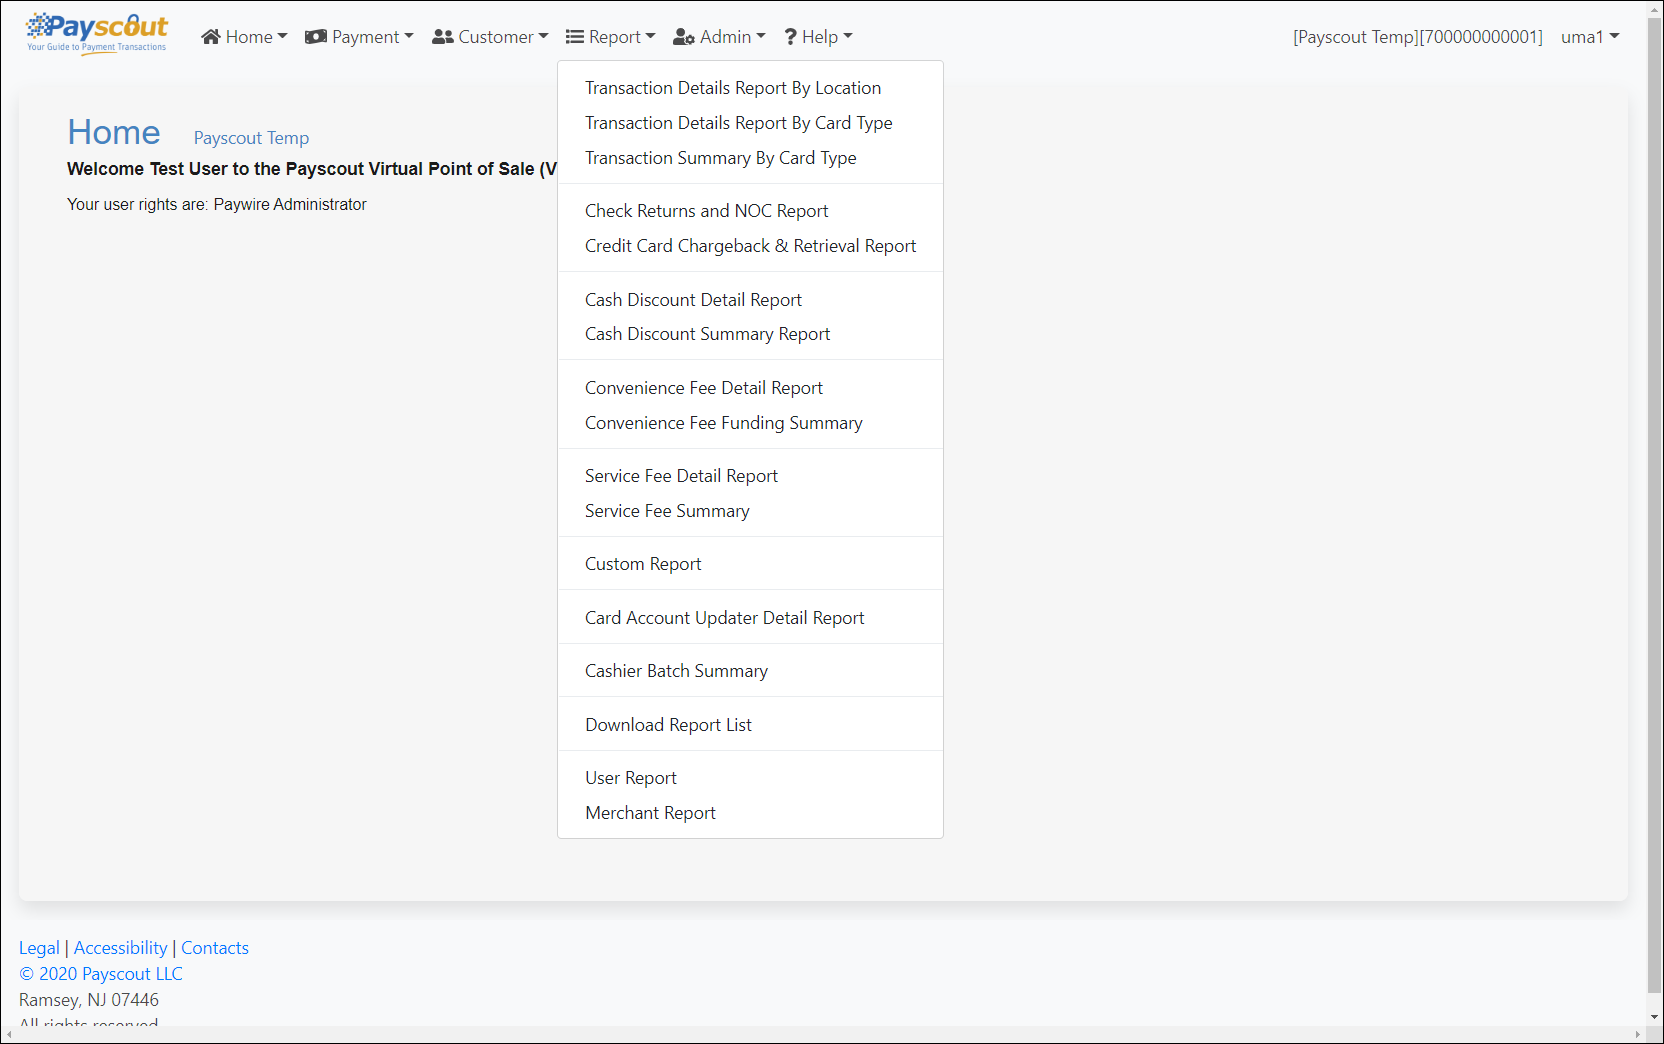
Reports
Transaction Reports
The following are available in this section:
- Transaction Details Report By Location
- Transaction Details Report By Card Type
- Transaction Detail Report
- Transaction Summary Report By Card Type
- Check Returns and NOC Report
- Credit Card Chargeback & Retrieval Report
- Cashier Batch Summary
- Download Report List
For merchants configured with Cash Discount, the following is available:
- Cash Discount Detail Report
- Cash Discount Summary Report
- Cash Discount Funding Summary Report
For merchants configured with Convenience Fees, the following are also available:
- Convenience Fee Detail Report
- Convenience Fee Funding Summary Report
Transaction Details Report By Location
This report lists individual transactions based on the filters applied.
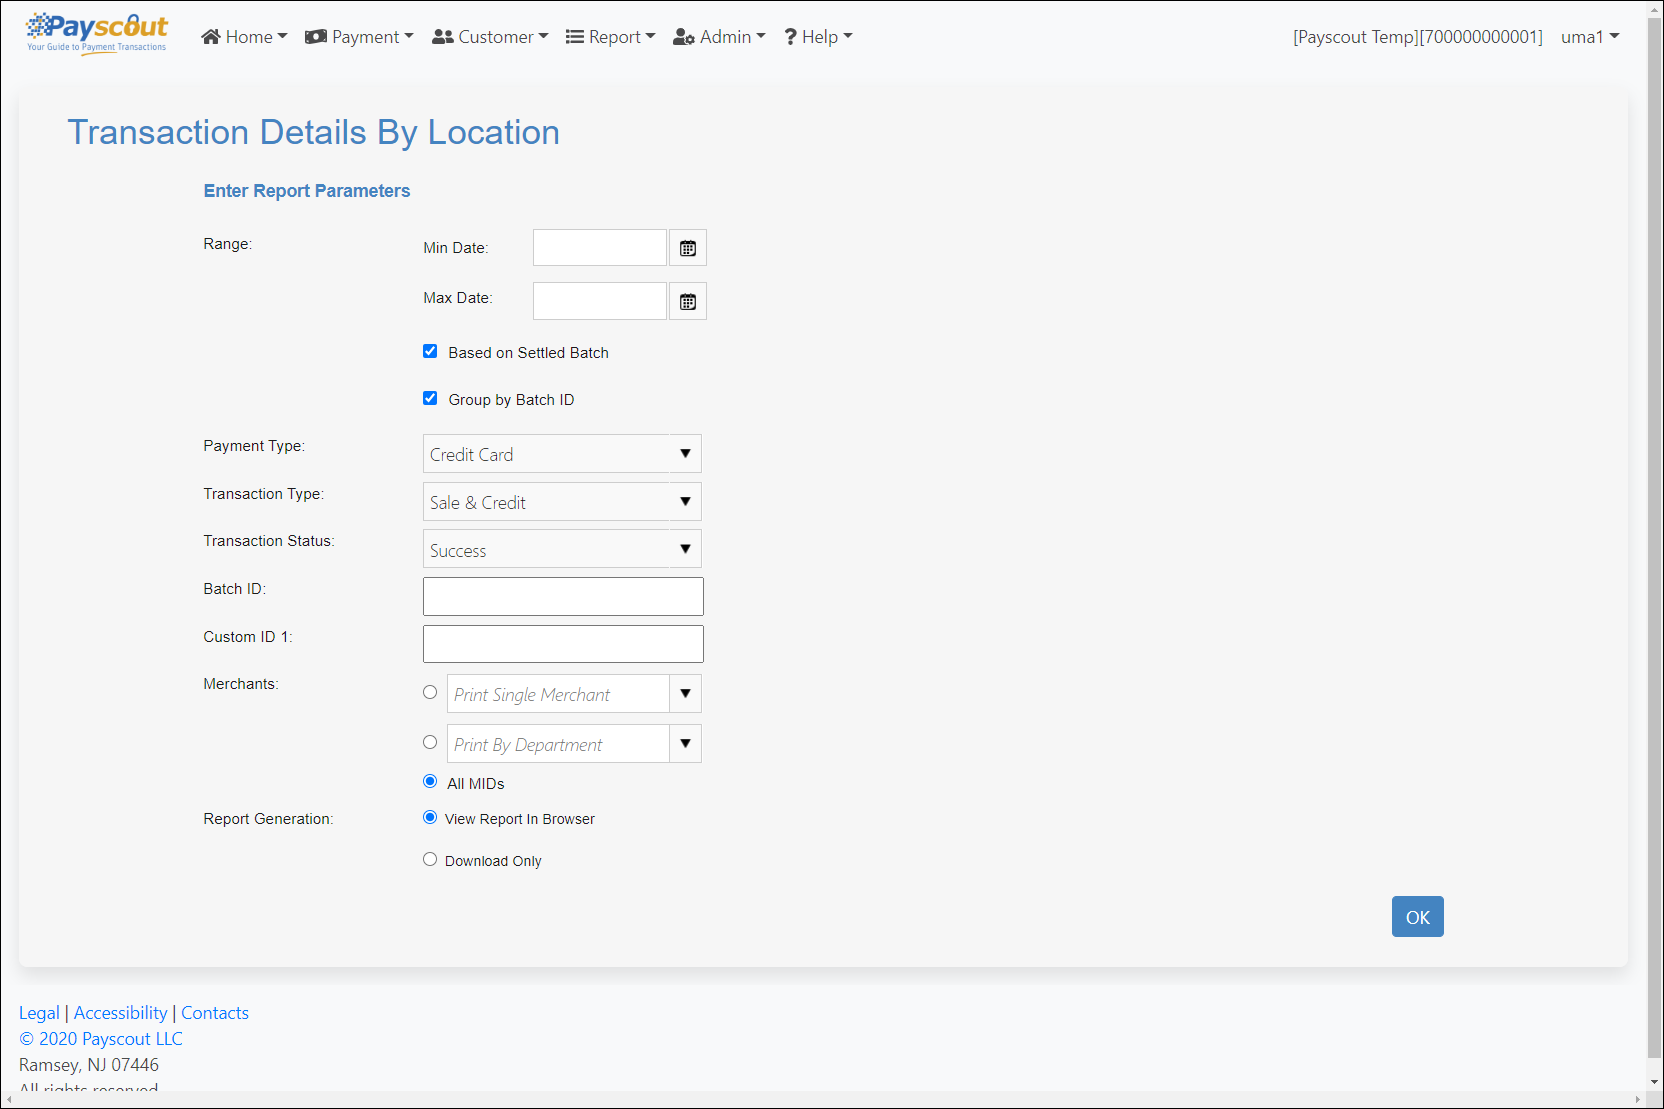
Filters include:
- Date range - based on transaction timestamp.
- Based on Settled Batch - will only return transactions in settled batches.
- Group by Batch ID - will group the transactions in the report by batch.
- Custom ID 1 - a merchant-assigned identifier optionally submitted in the transaction request.
- Report Generation - users have the option to directly Download the report or View Report In Browser (with an option to download).
Transaction Details Report By Card Type
This report also lists individual transactions, but also groups them by the card type used (i.e. VISA, Mastercard, Discover, etc.).
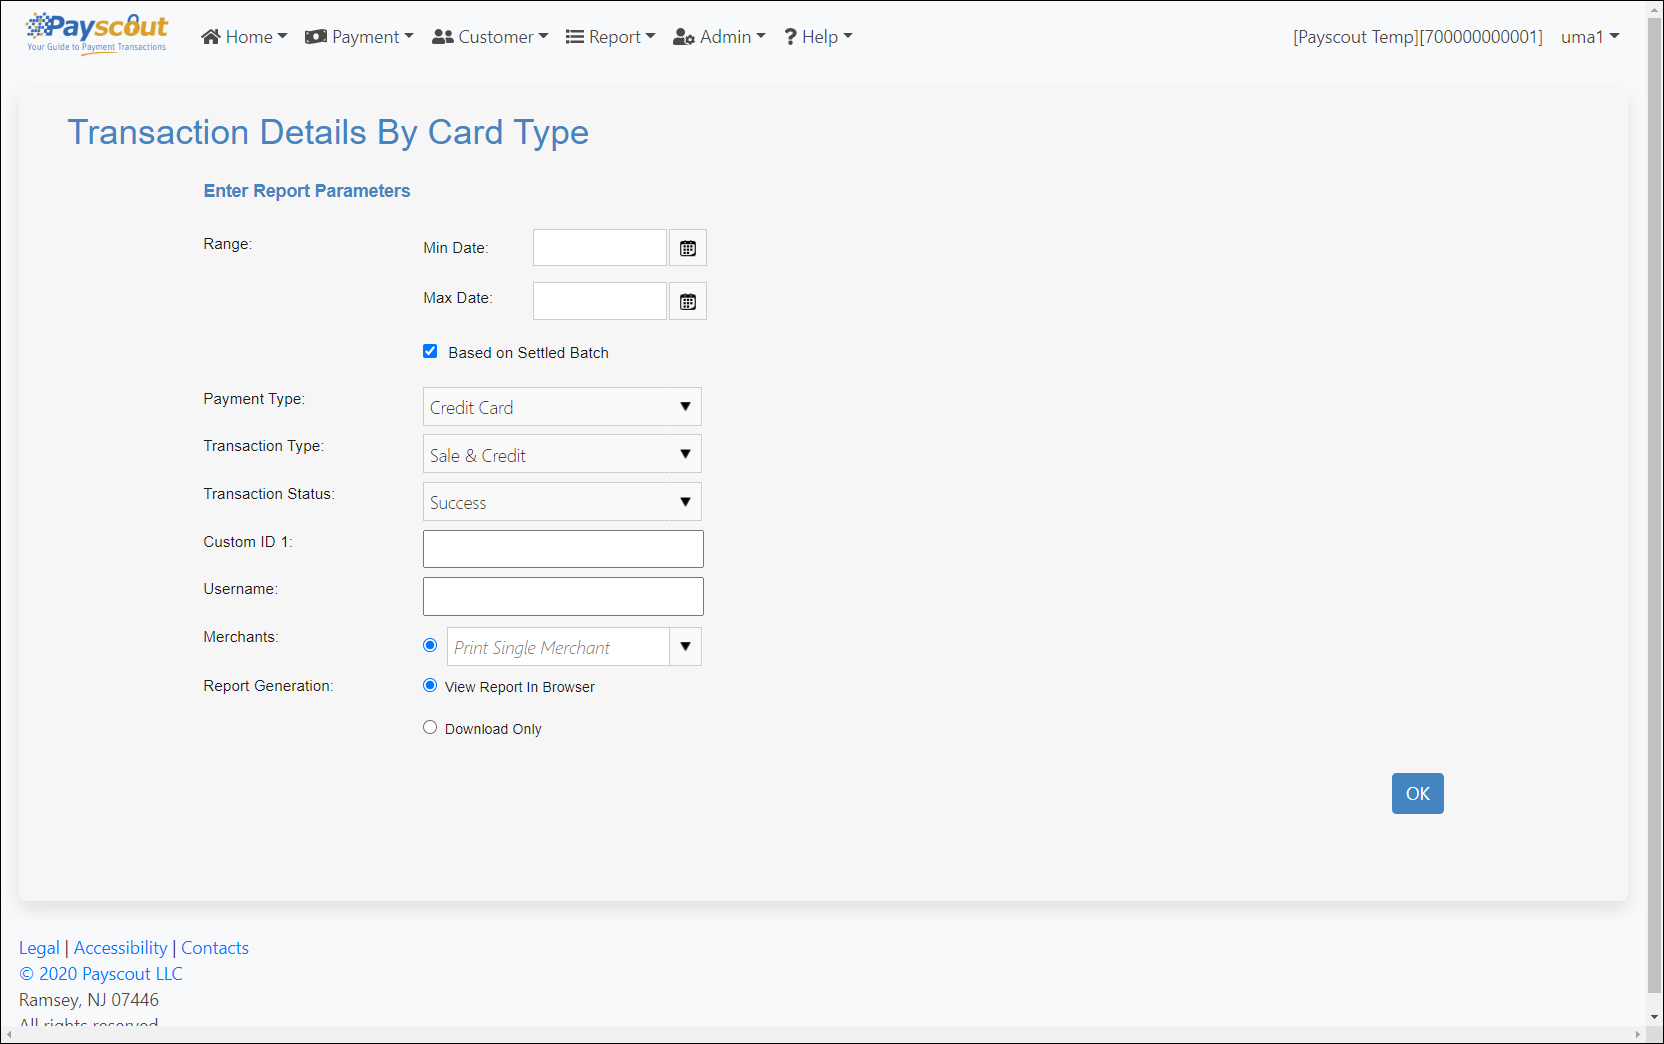
Filters include:
- Date range - based on transaction timestamp.
- Based on Settled Batch - will only return transactions in settled batches.
- Custom ID 1 - a merchant-assigned identifier optionally submitted in the transaction request.
- Report Generation - users have the option to directly Download the report or View Report In Browser (with an option to download).
Transaction Summary Report By Card Type
This report displays card totals per merchant, splitting Visa, MasterCard, Discover and AMEX.
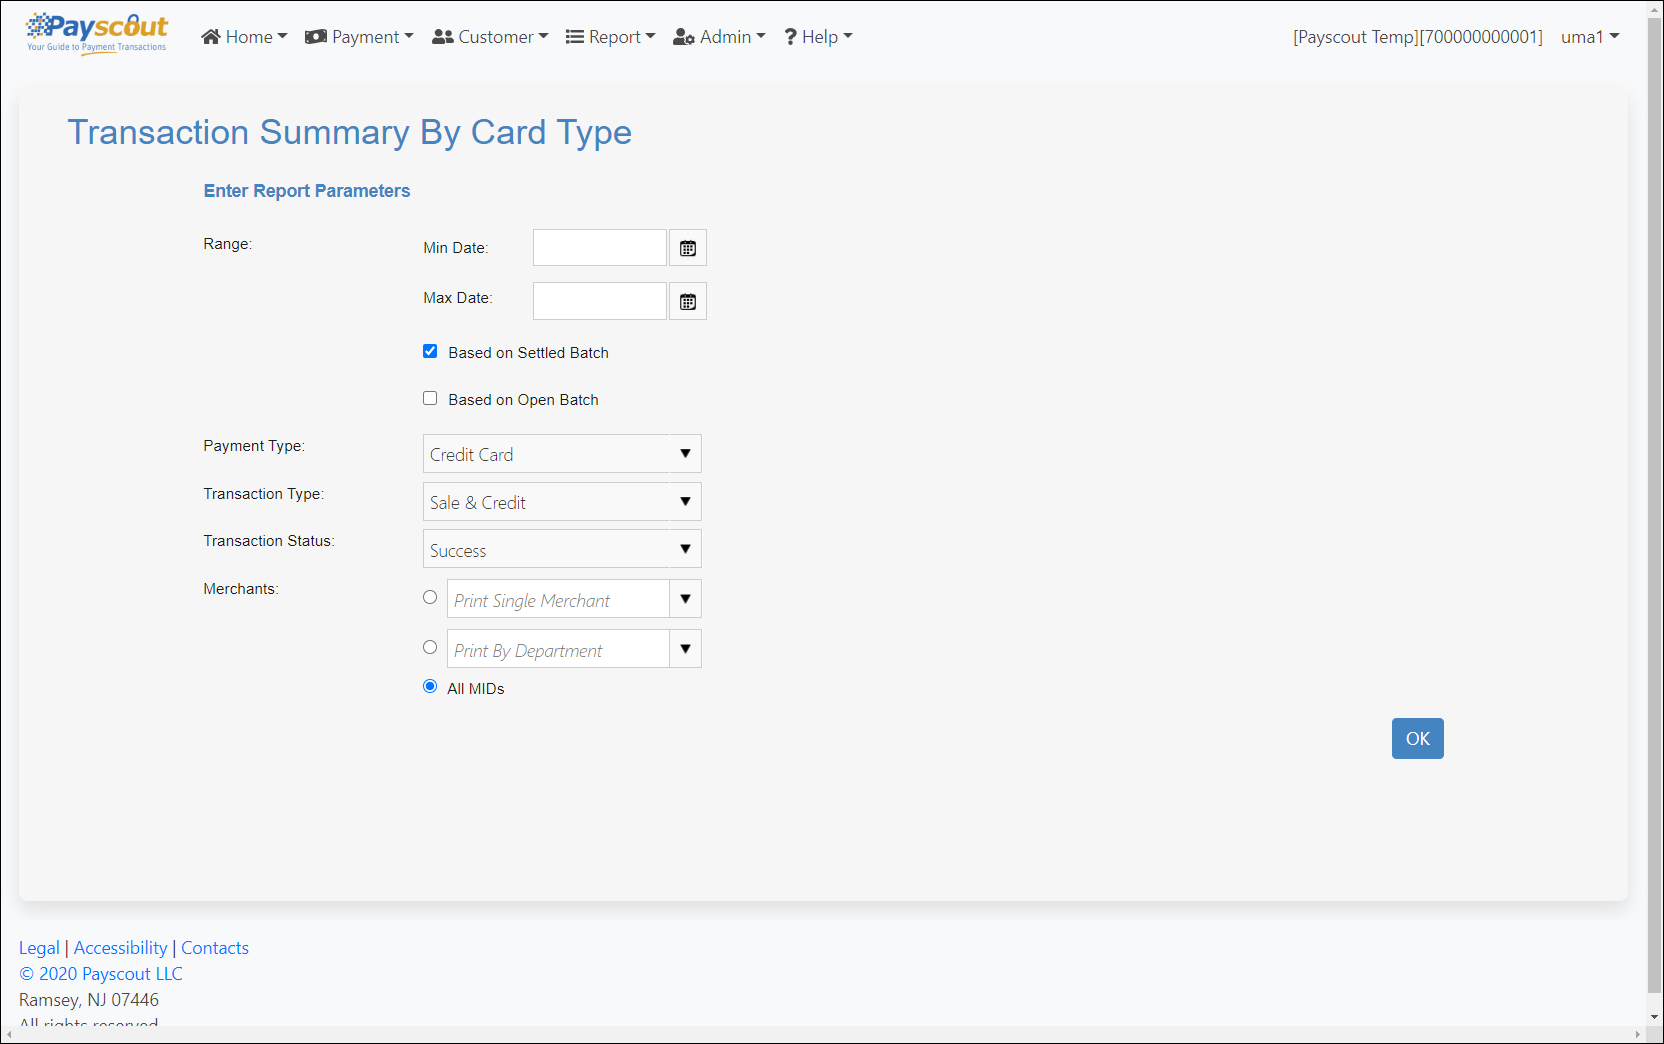
Filters include:
- Date range - based on transaction timestamp.
- Based on Settled Batch - will only return transactions in settled batches.
- Based on Open Batch - will only return transactions in open batches.
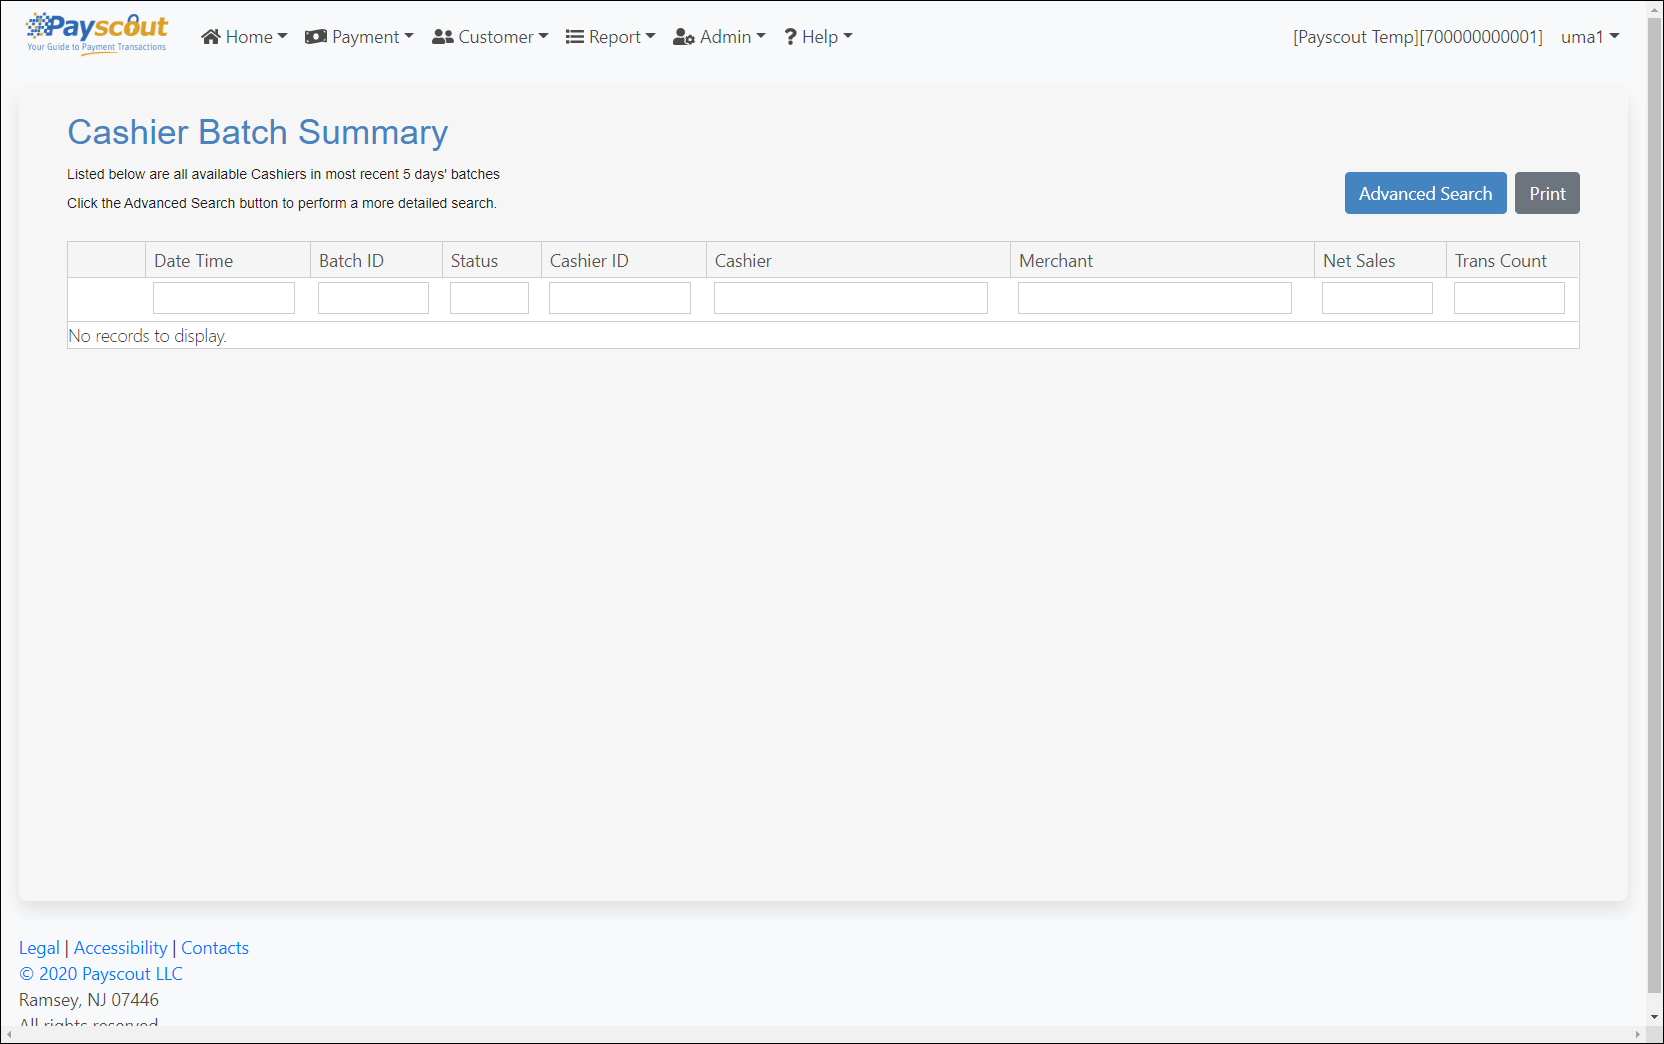
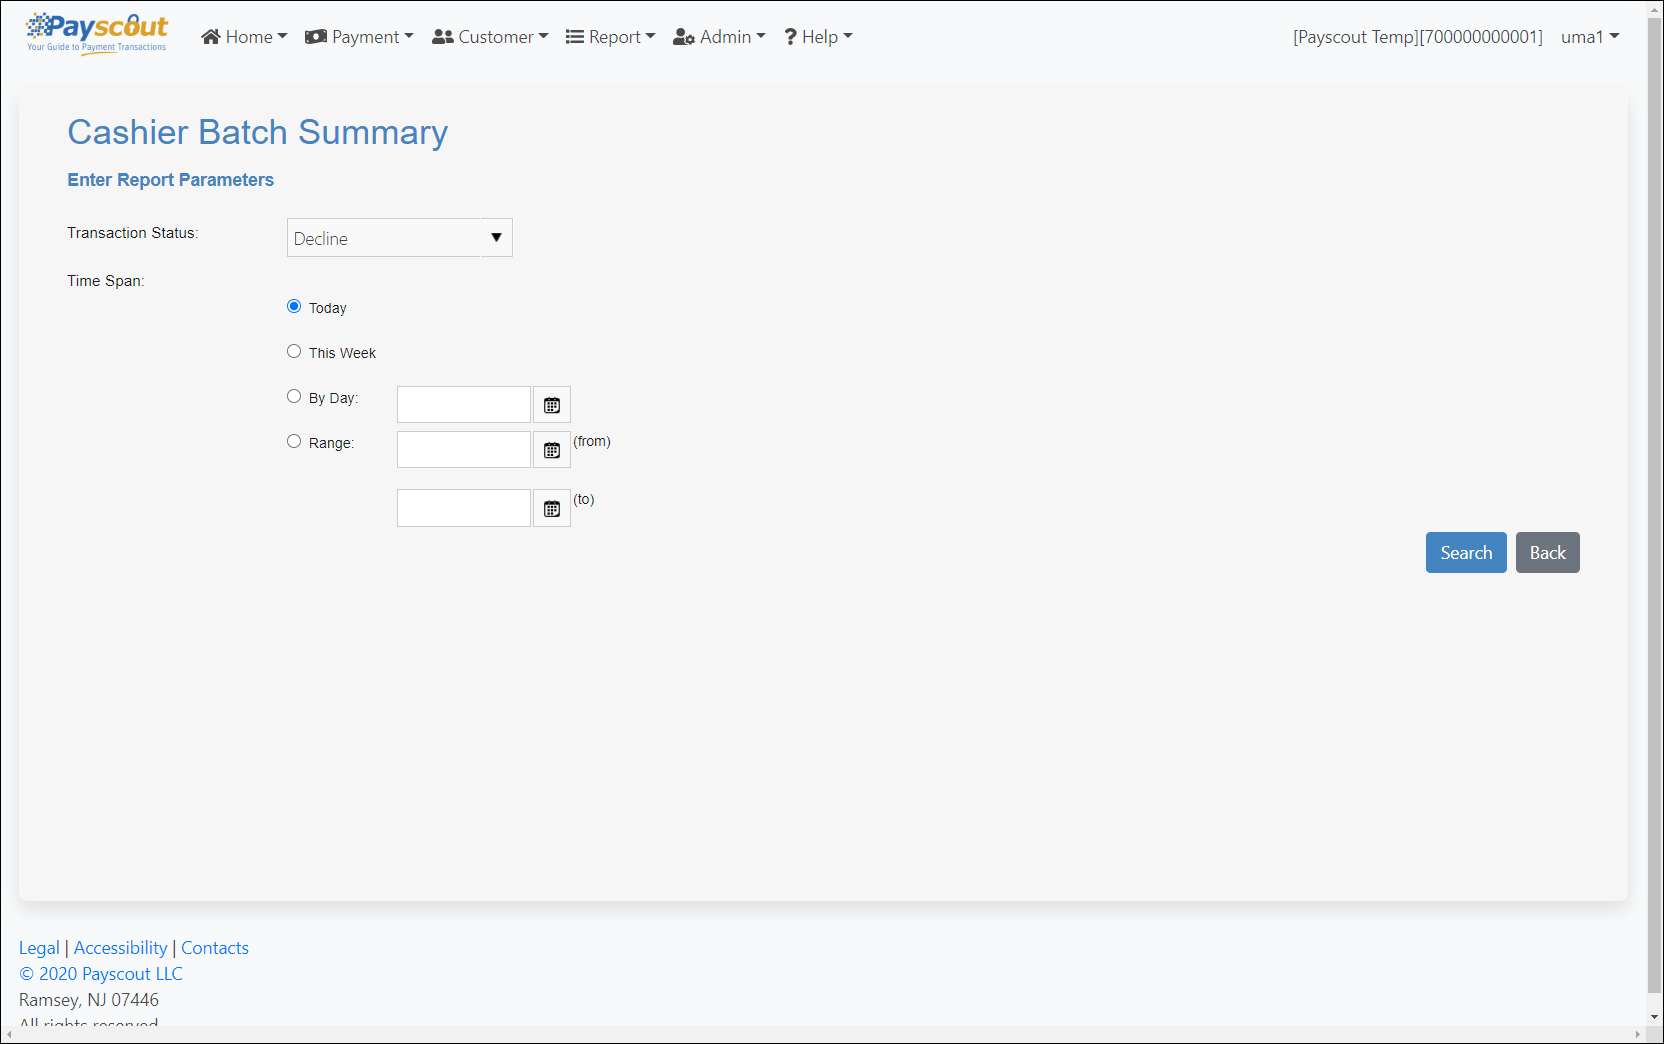
Cashier Batch Summary
This report will display all transaction batches for any cashiers configured to process on a merchant.
Advanced Search
Clicking on will bring up the Advanced Search page with filters. These include:
- Transaction Status
- Time Span
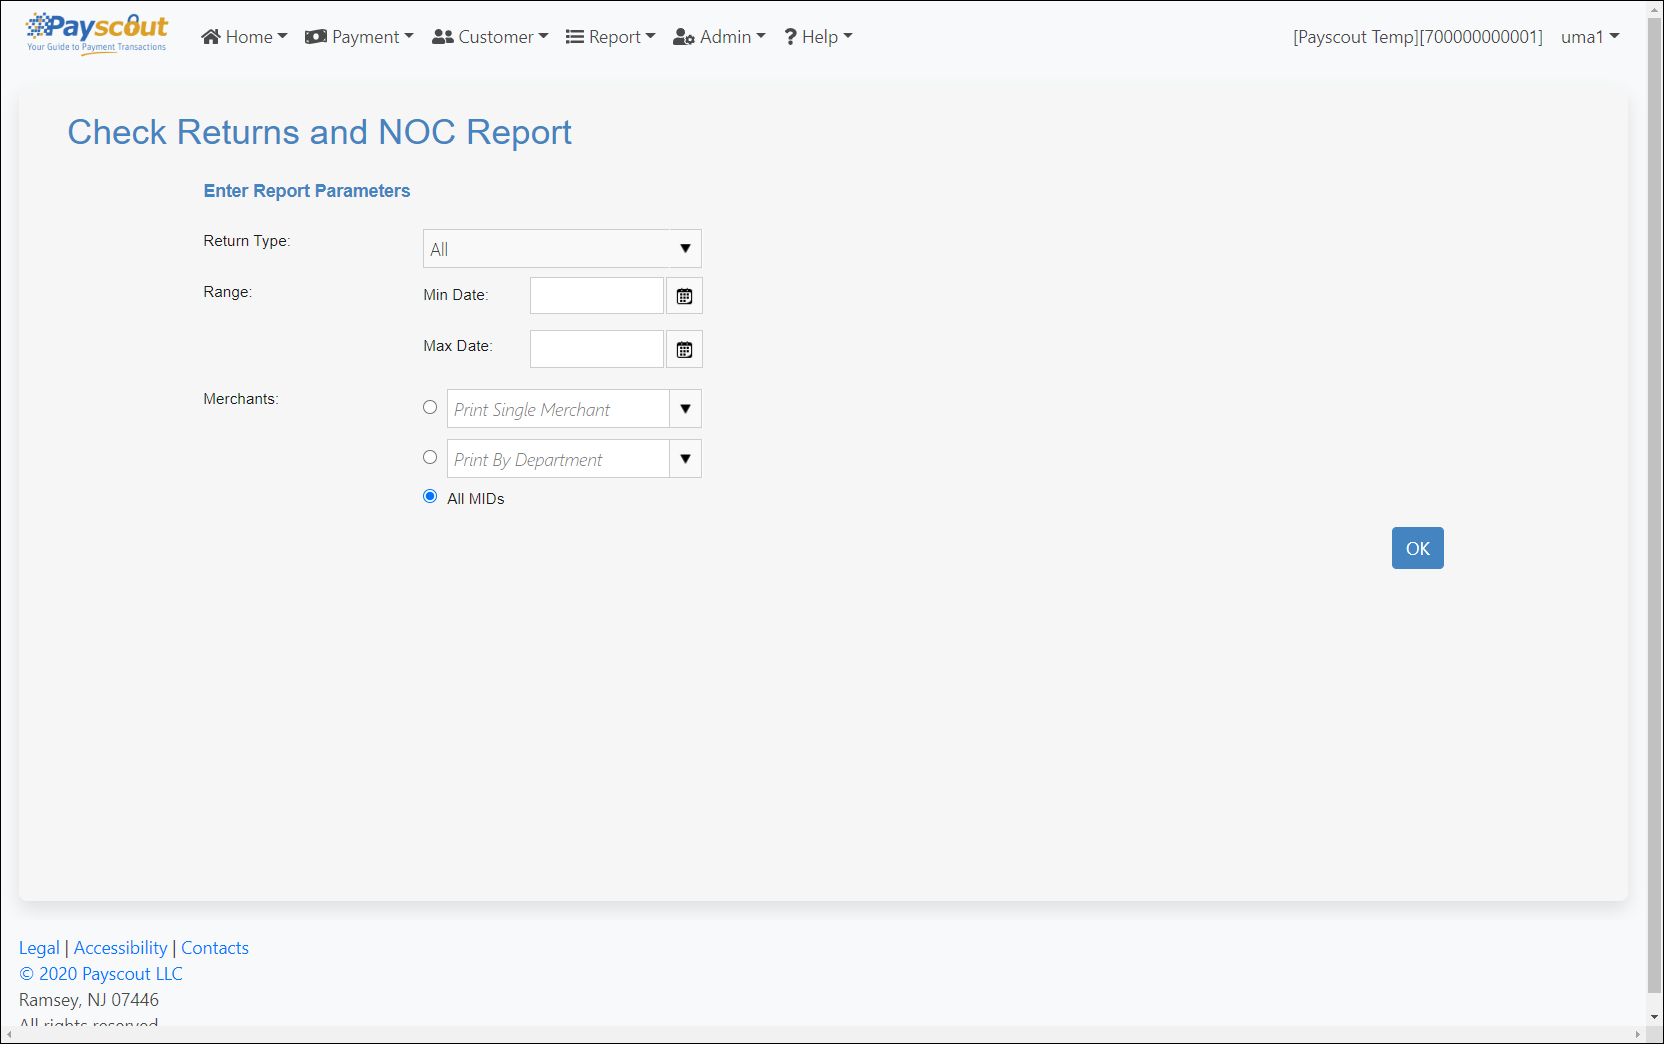
Check Returns and NOC Report
This report lists any ACH returns received.
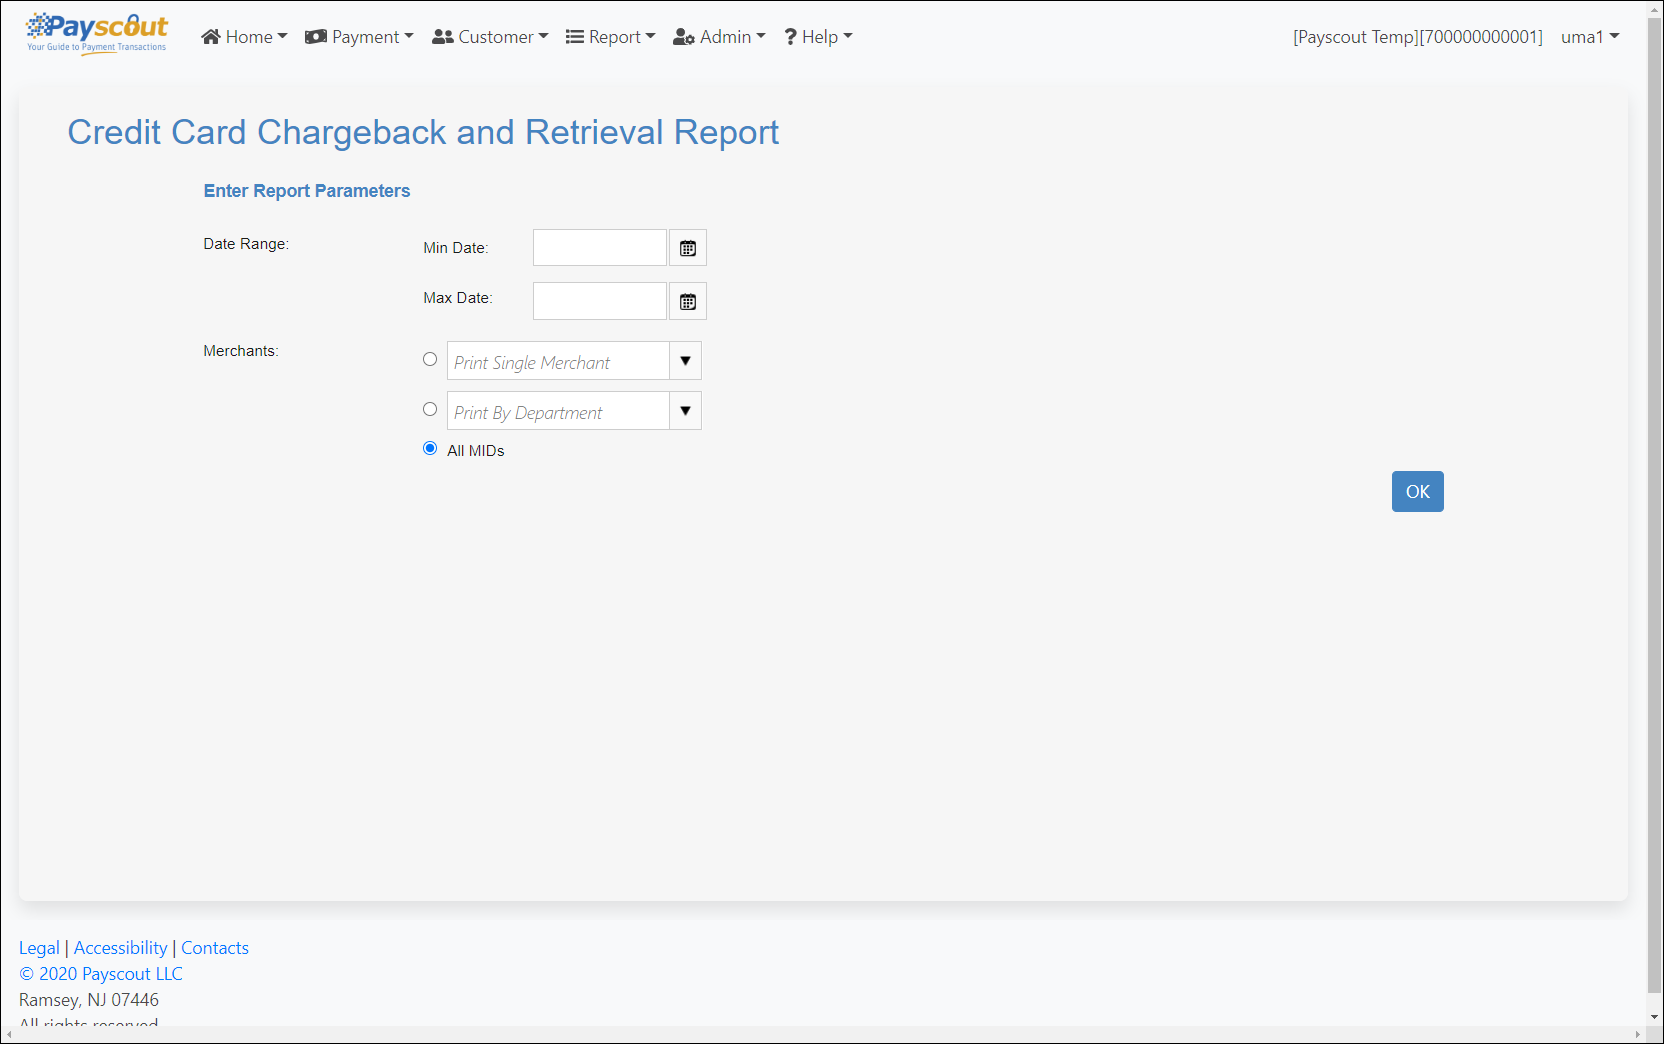
Credit Card Chargeback & Retrieval By Location
This report lists any Chargebacks or Retrieval Requests received from the Card Networks.
Download Report List
Larger datasets and reports run with Report Generation of 'Download Only' will be listed on this screen once processed and available.
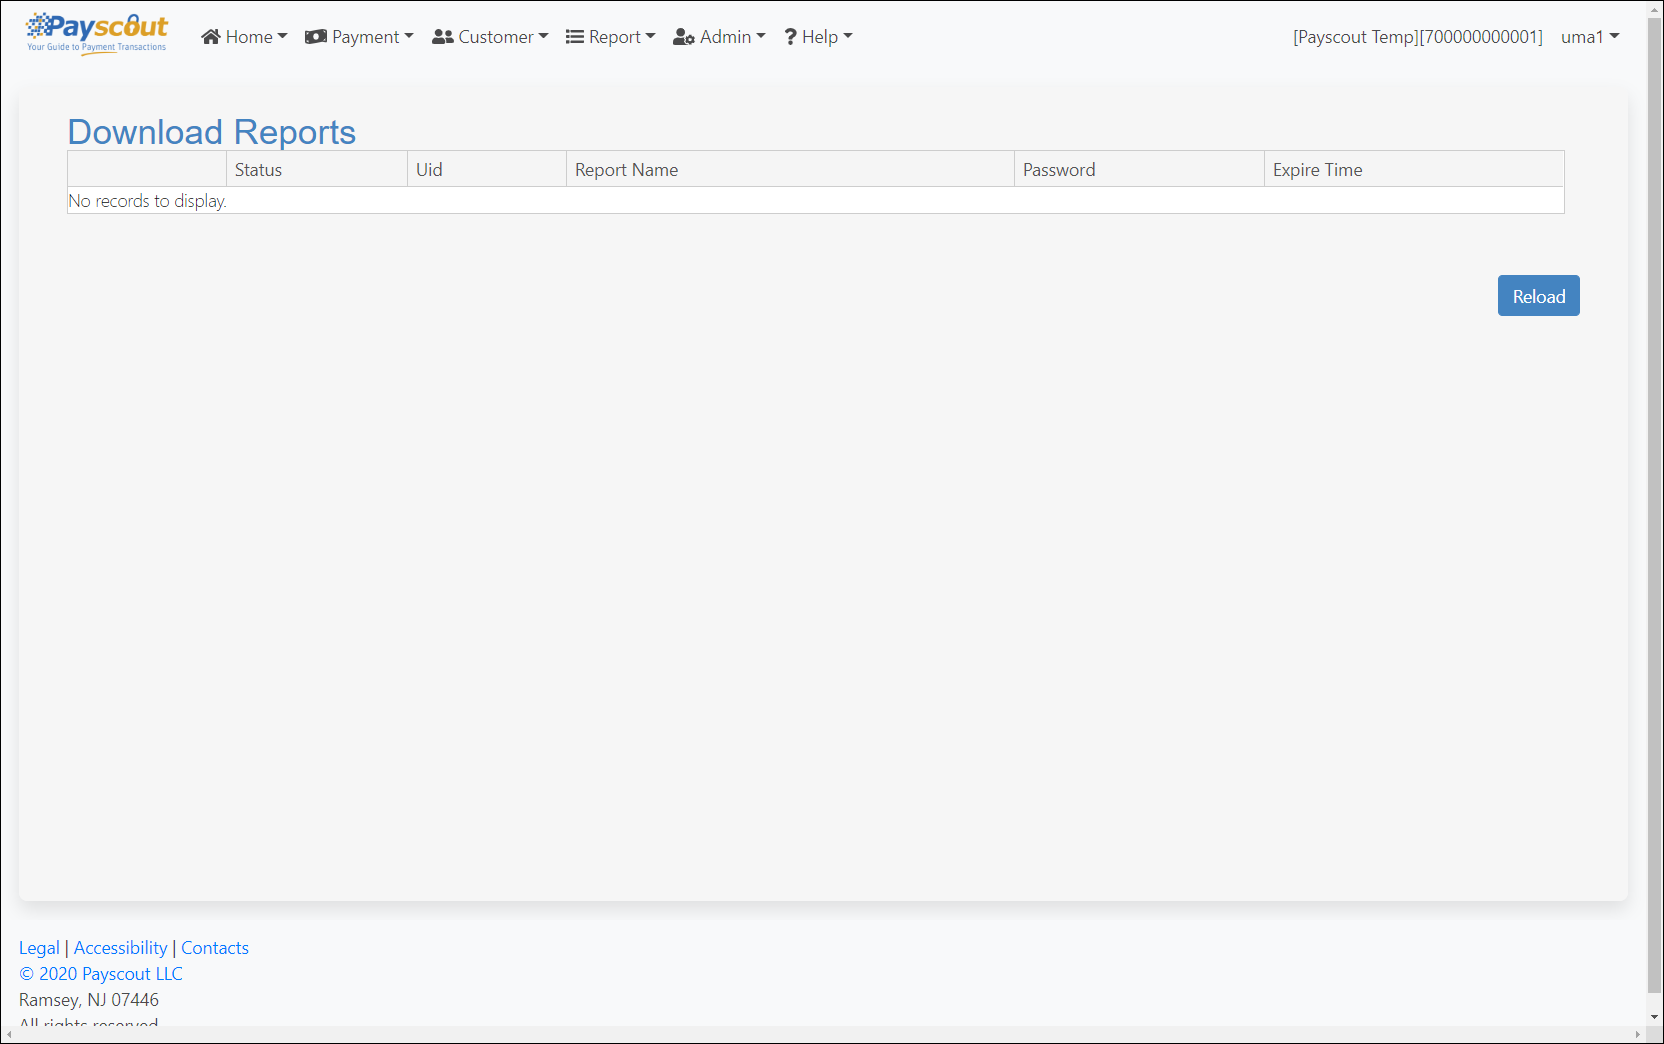
These reports will be encrypted with a password and have an expiry timestamp. The password can be found within the same entry.
Convenience Fee Detail Report
For merchants configured with Convenience Fees, this report will list individual transactions along with their State submitted, a CF Fee flag to describe whether the transaction qualified for a Convenience Fee, the Convenience Fee amount and the Sales Tax applied (if any).
Transactions are grouped by transaction date and merchant. Subtotals per Card Type (VISA, Mastercard, Discover, AMEX, Other), Payment Type (Card, E-Check) and Merchant are included.
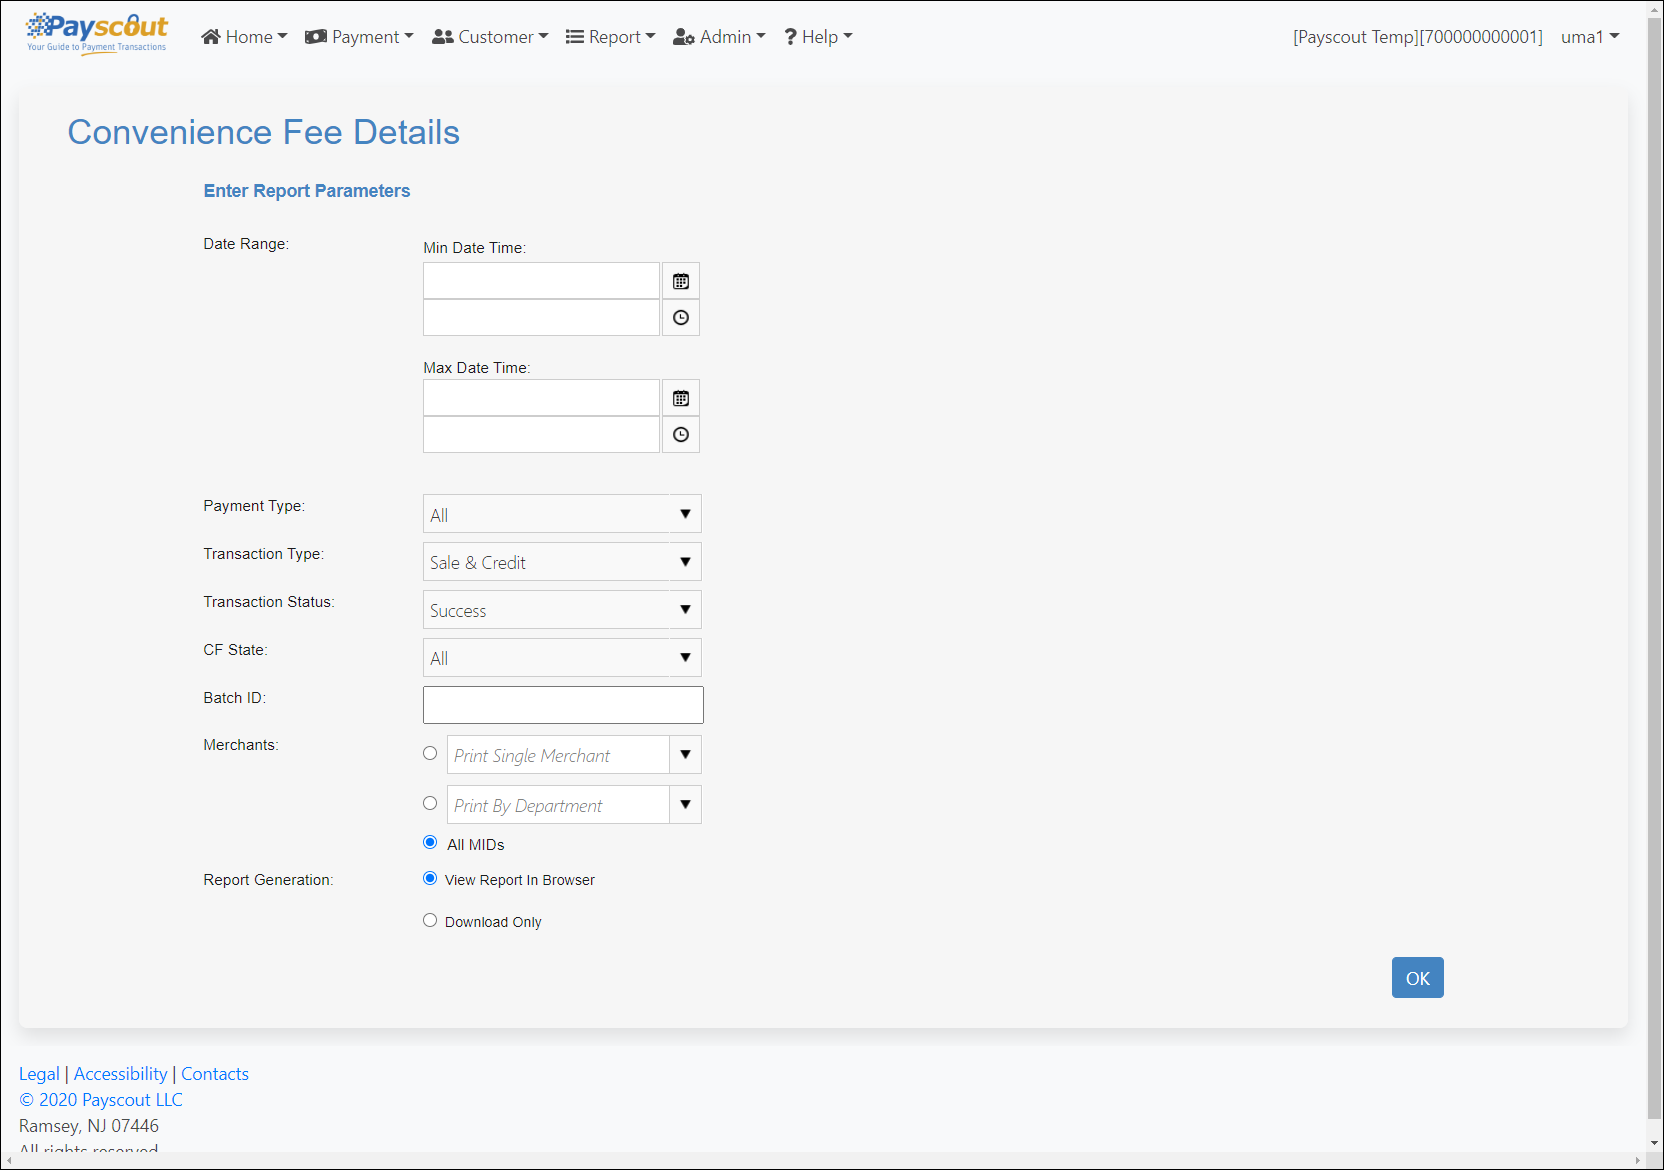
Filters include:
- Date range - based on transaction timestamp.
- CF State - flag to describe whether a transaction is qualified for a Convenience Fee.
- Report Generation - users have the option to directly download the report or View Report In Browser (with an option to download).
Convenience Fee Funding Summary Report
For merchants configured with Convenience Fees, this report will summarize settled transactions by Payment Type (Card, E-Check) and displays the funds expected in the merchant's bank account along with the adjustment total (Convenience Fees) for each summary.
Summaries are grouped by settlement date (batch close date) and merchant. Subtotals per Payment Type and Merchant are included.
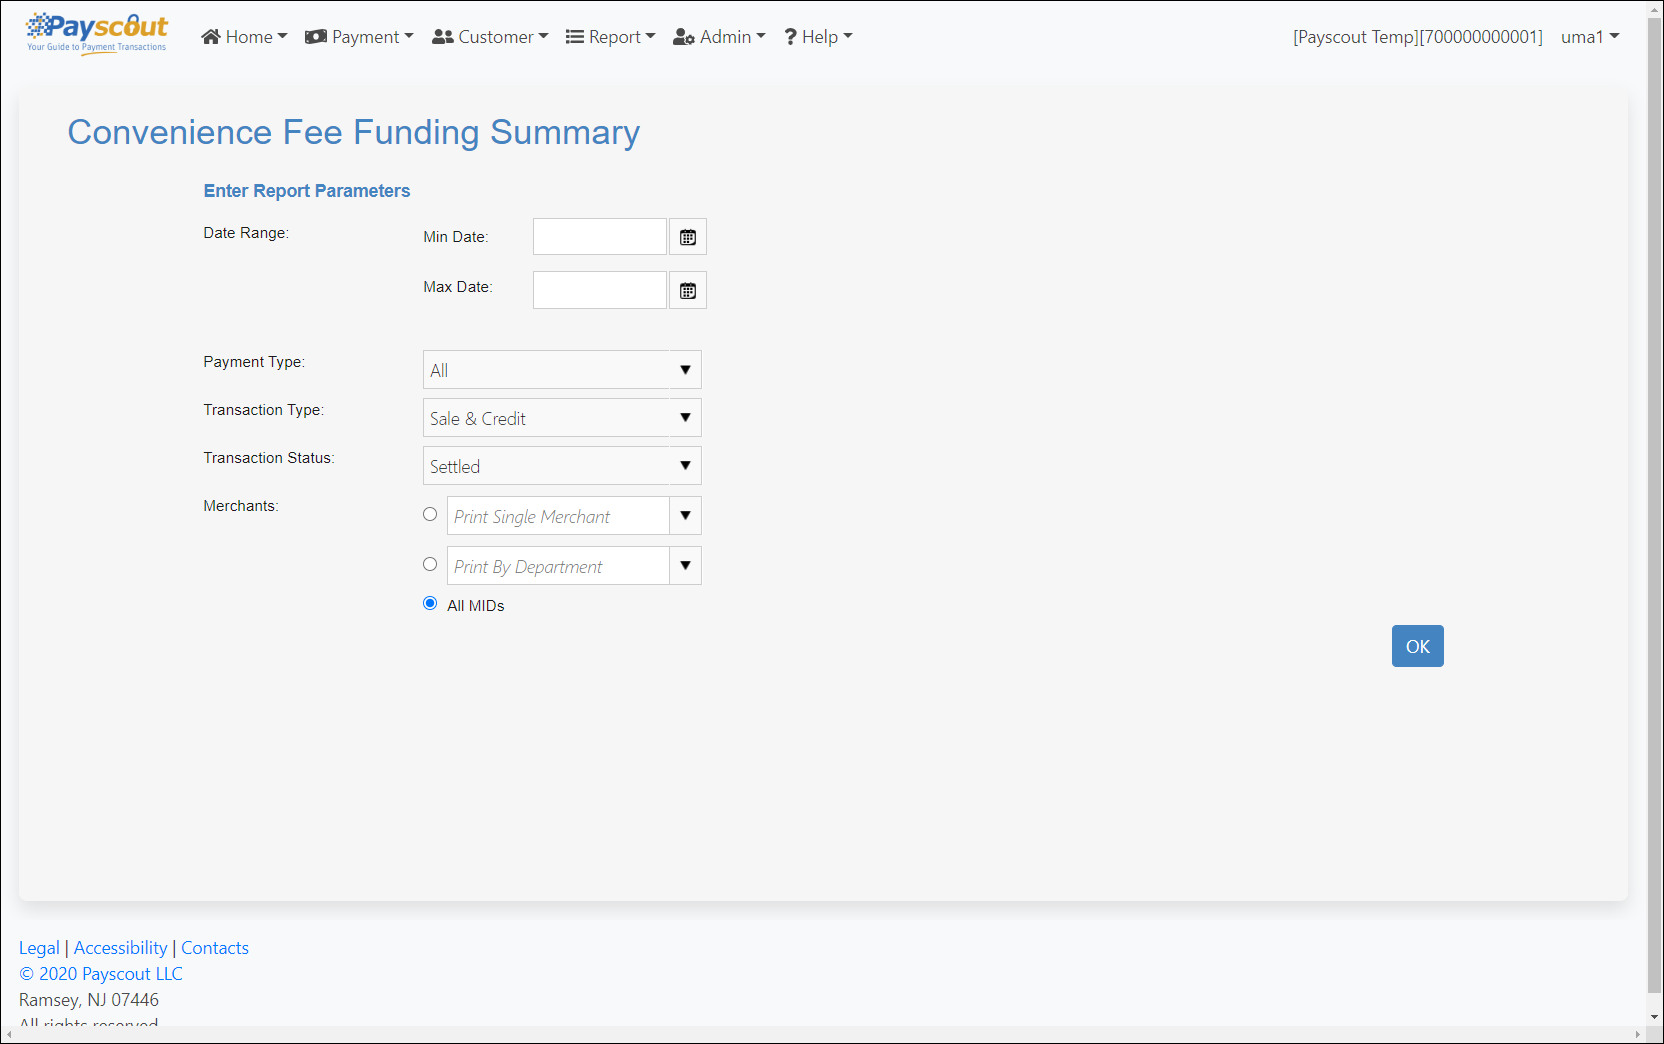
Filters include:
- Date range - based on settlement date (batch close date).
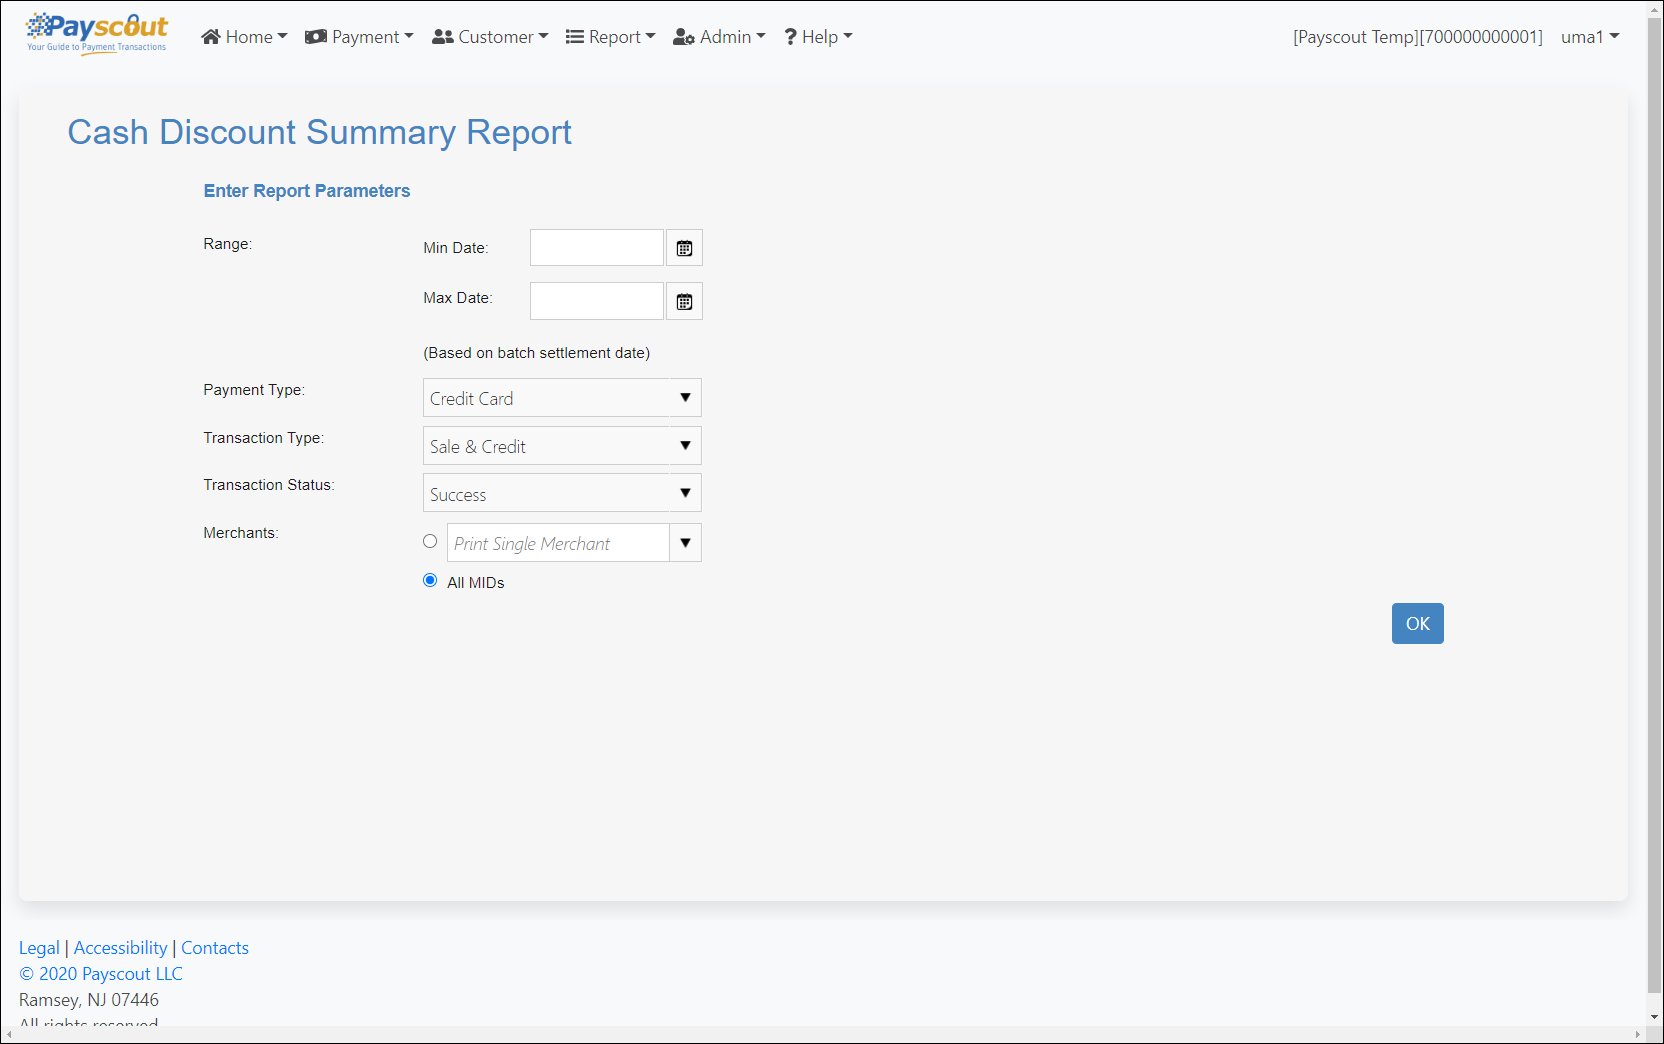
Cash Discount Summary Report
For merchants configured with Cash Discount, this report will summarize transactions by Batch ID and displays the Gross Sales amount, Adj. Amount (the discount) and any Sales Tax.
Summaries are grouped by merchant.
Transaction Reports UI
Reports UI is common for all the reports, UI allows the following functions:
- General toolbar.
- Text Search.
- Export.
General Toolbar
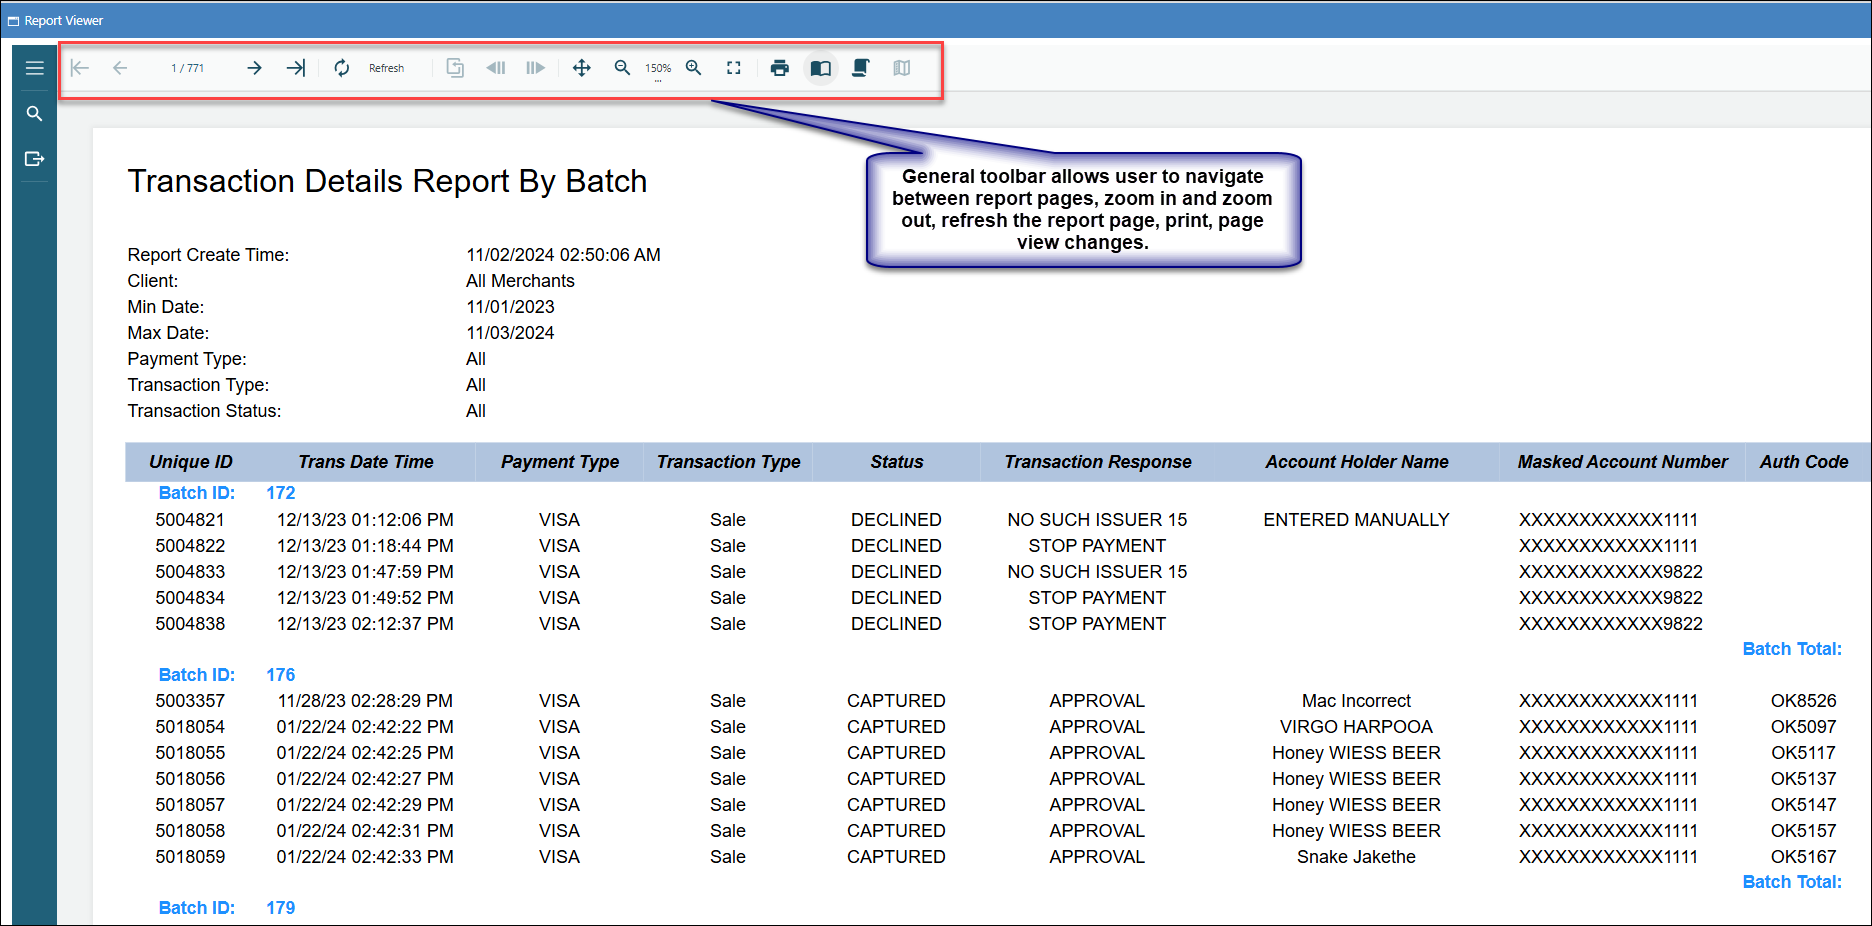
General toolbar allows user to navigate between report pages, zoom in and zoom out, refresh the report page, print, page view changes.
Text Search
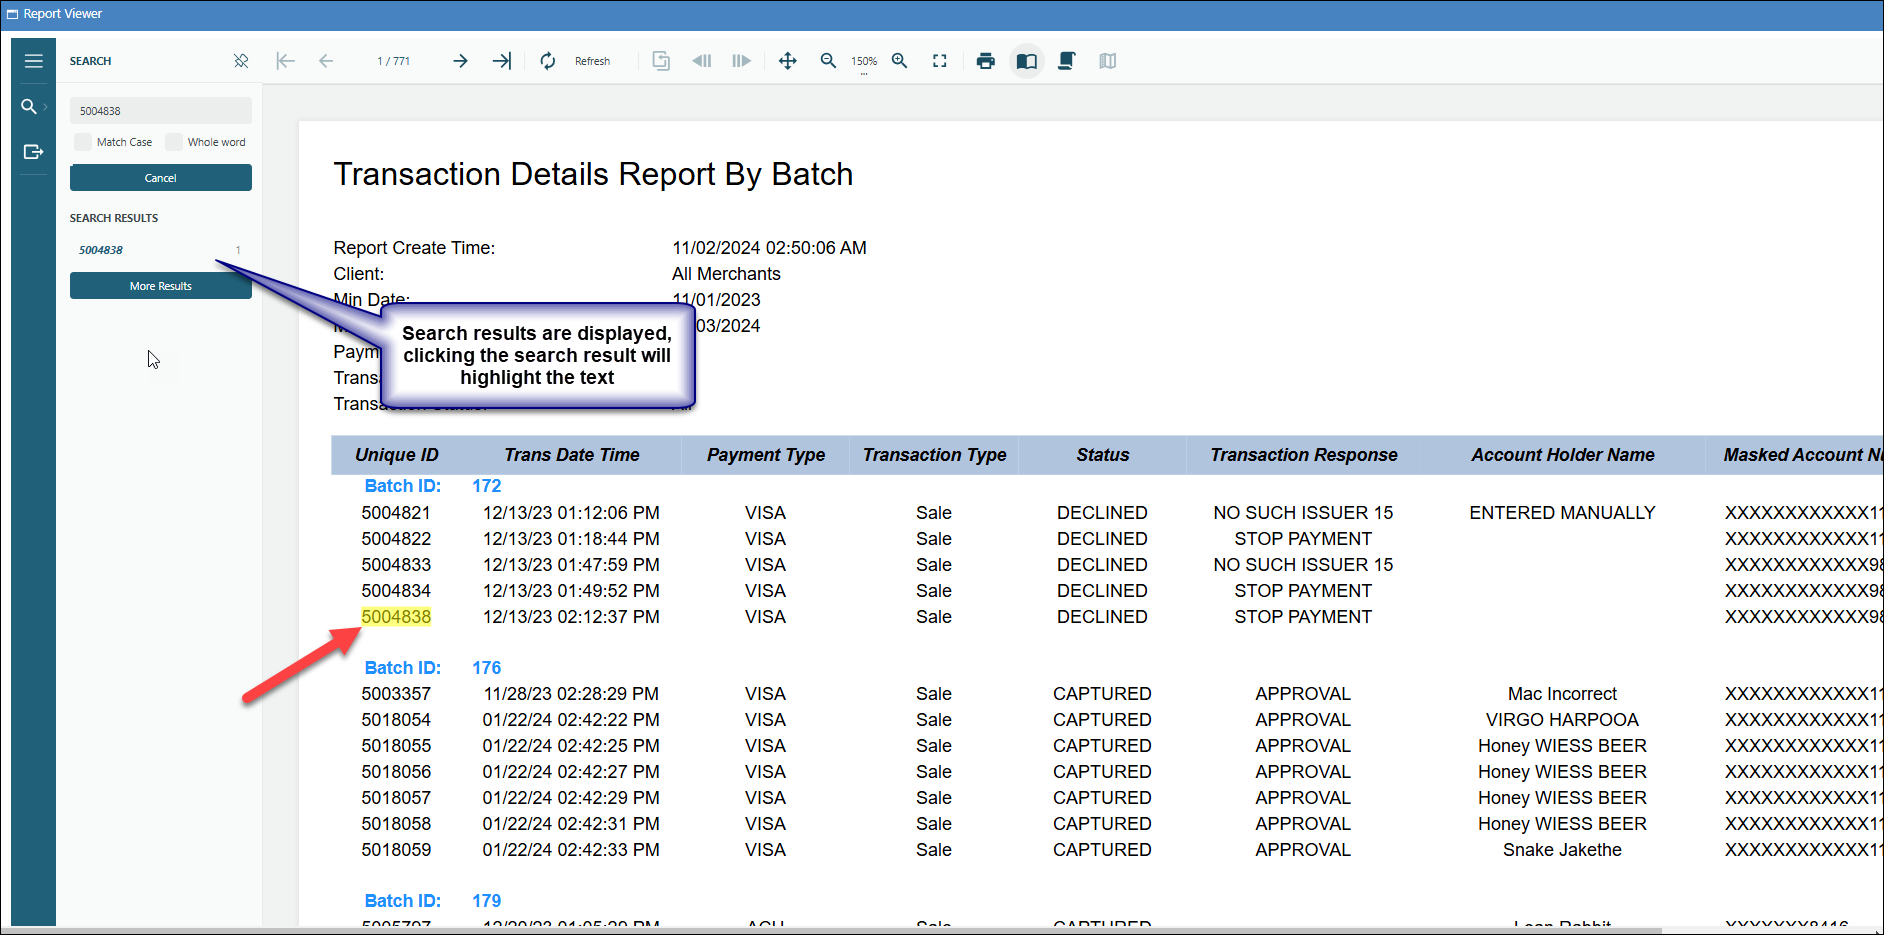
Users can conduct search of the text which is displayed within the report, upon conducting search, if the text is found its displayed under search results, clicking the result will highlight the text in yellow.

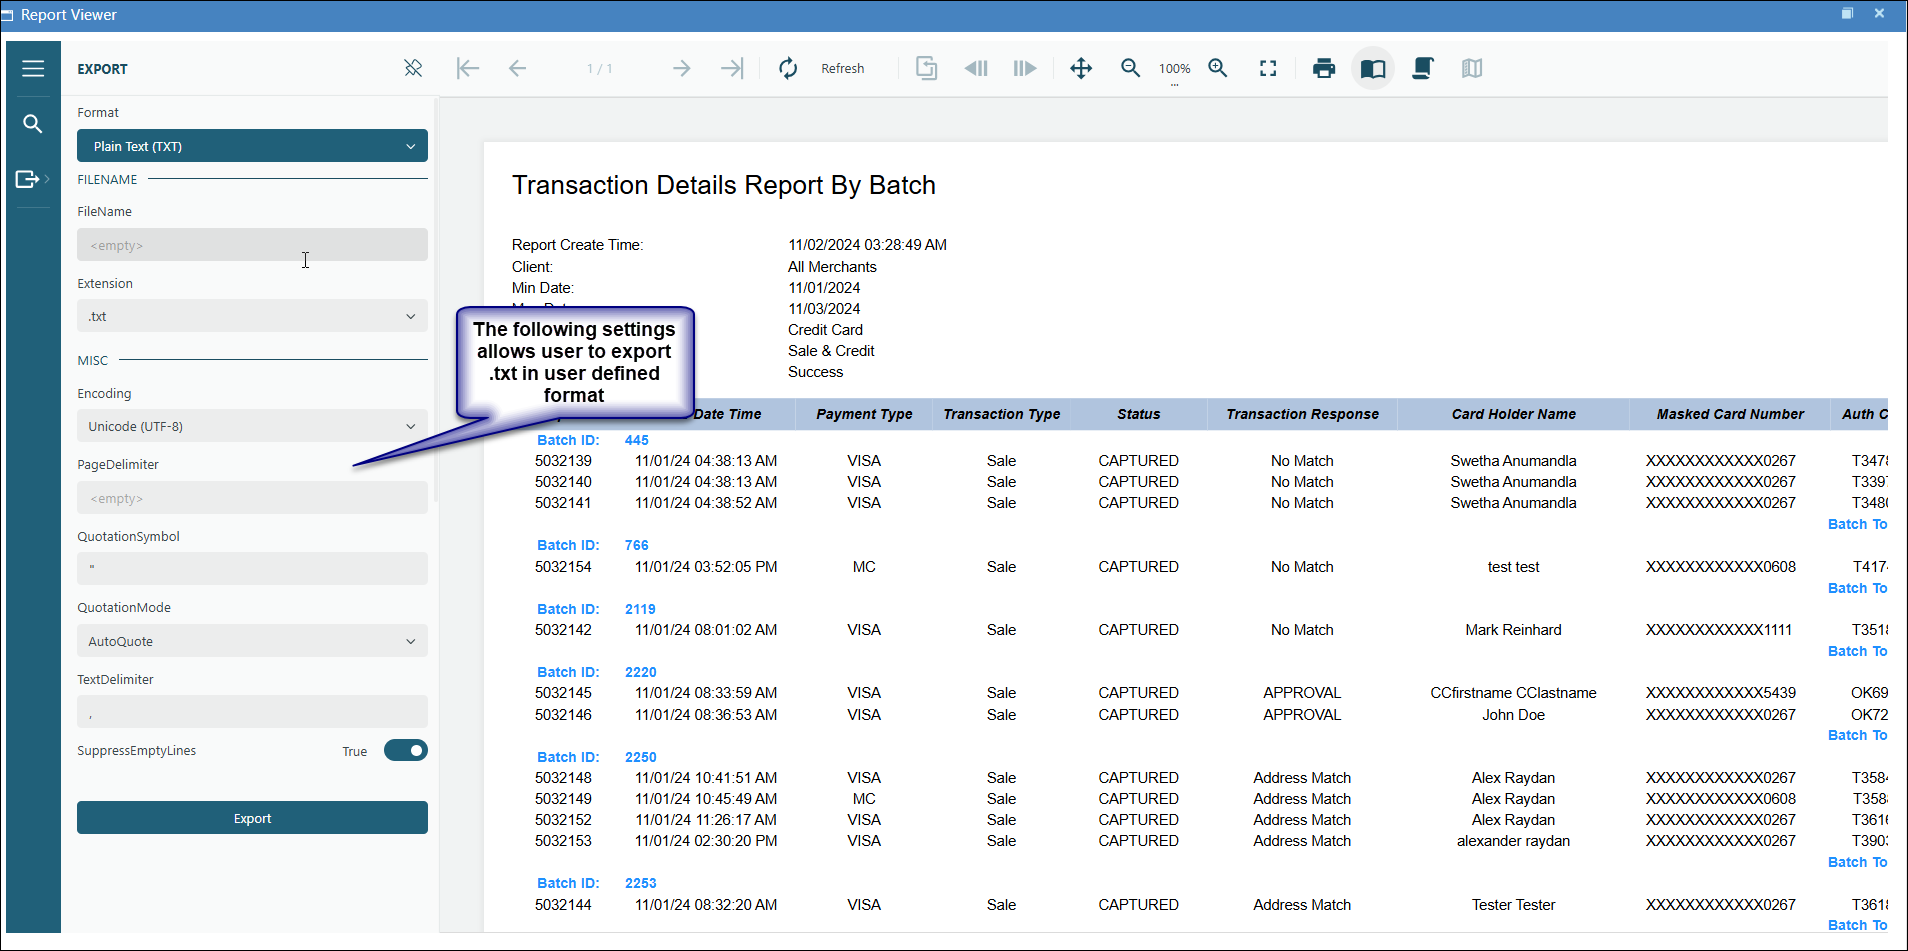
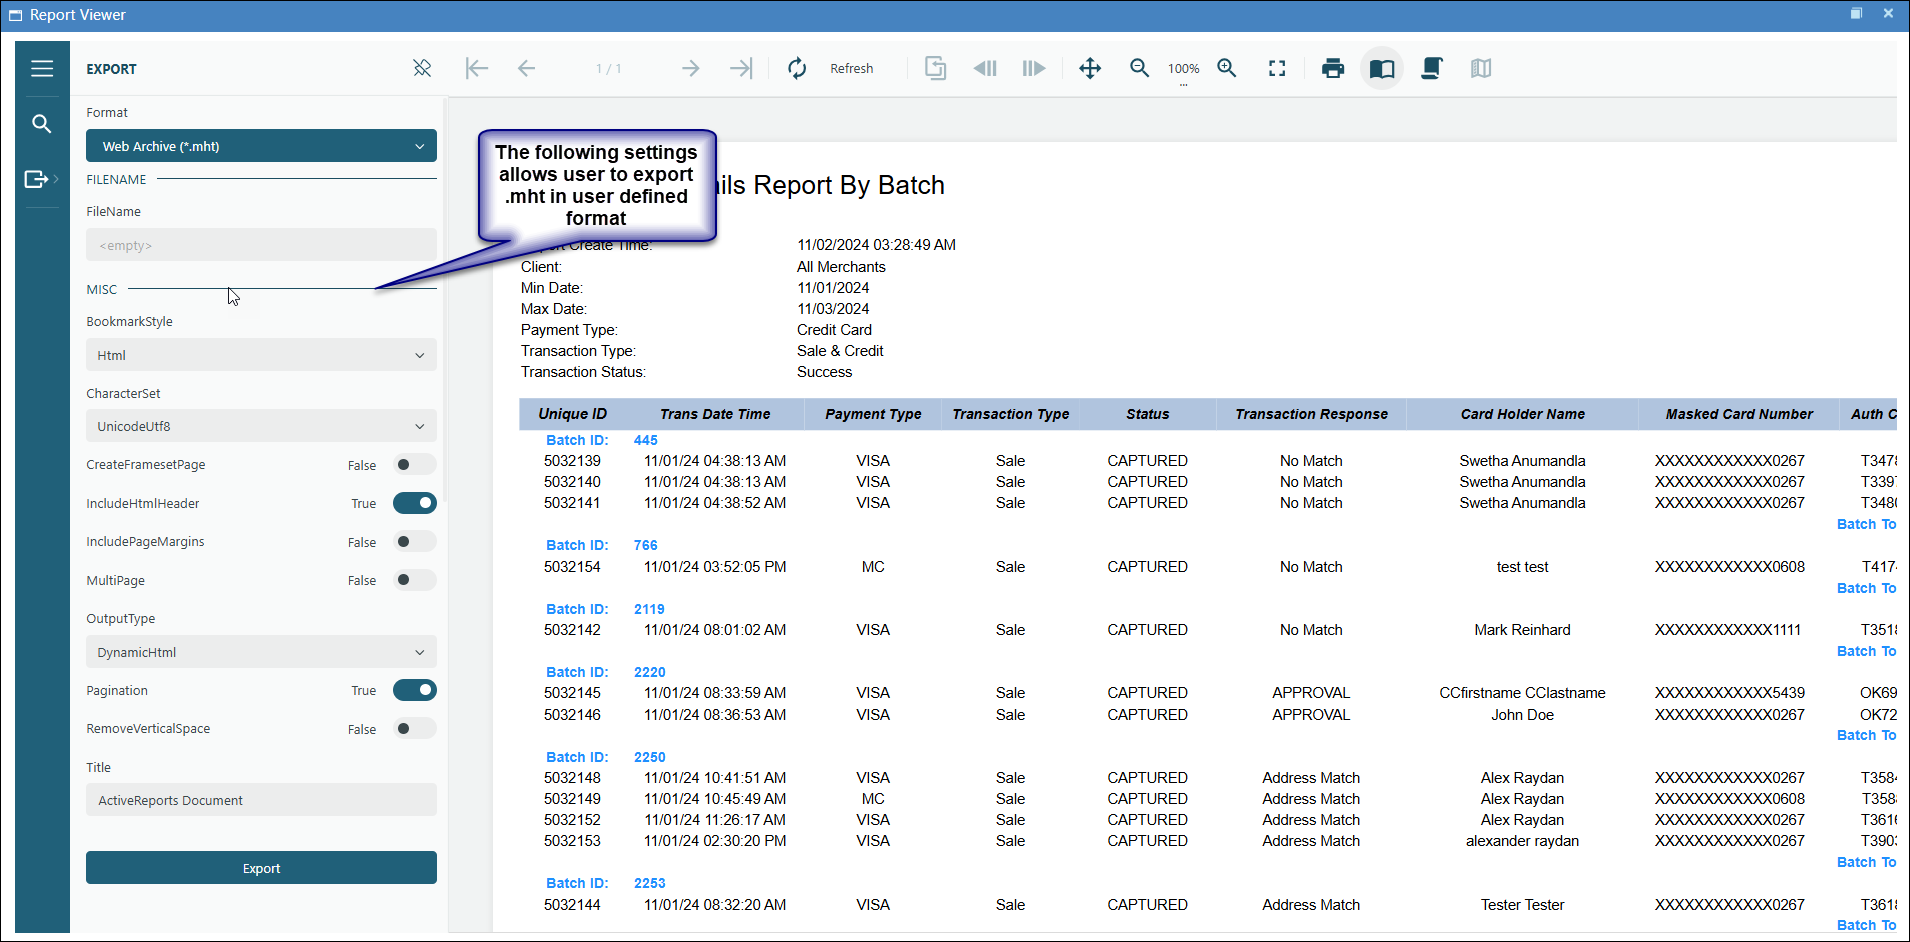
Export
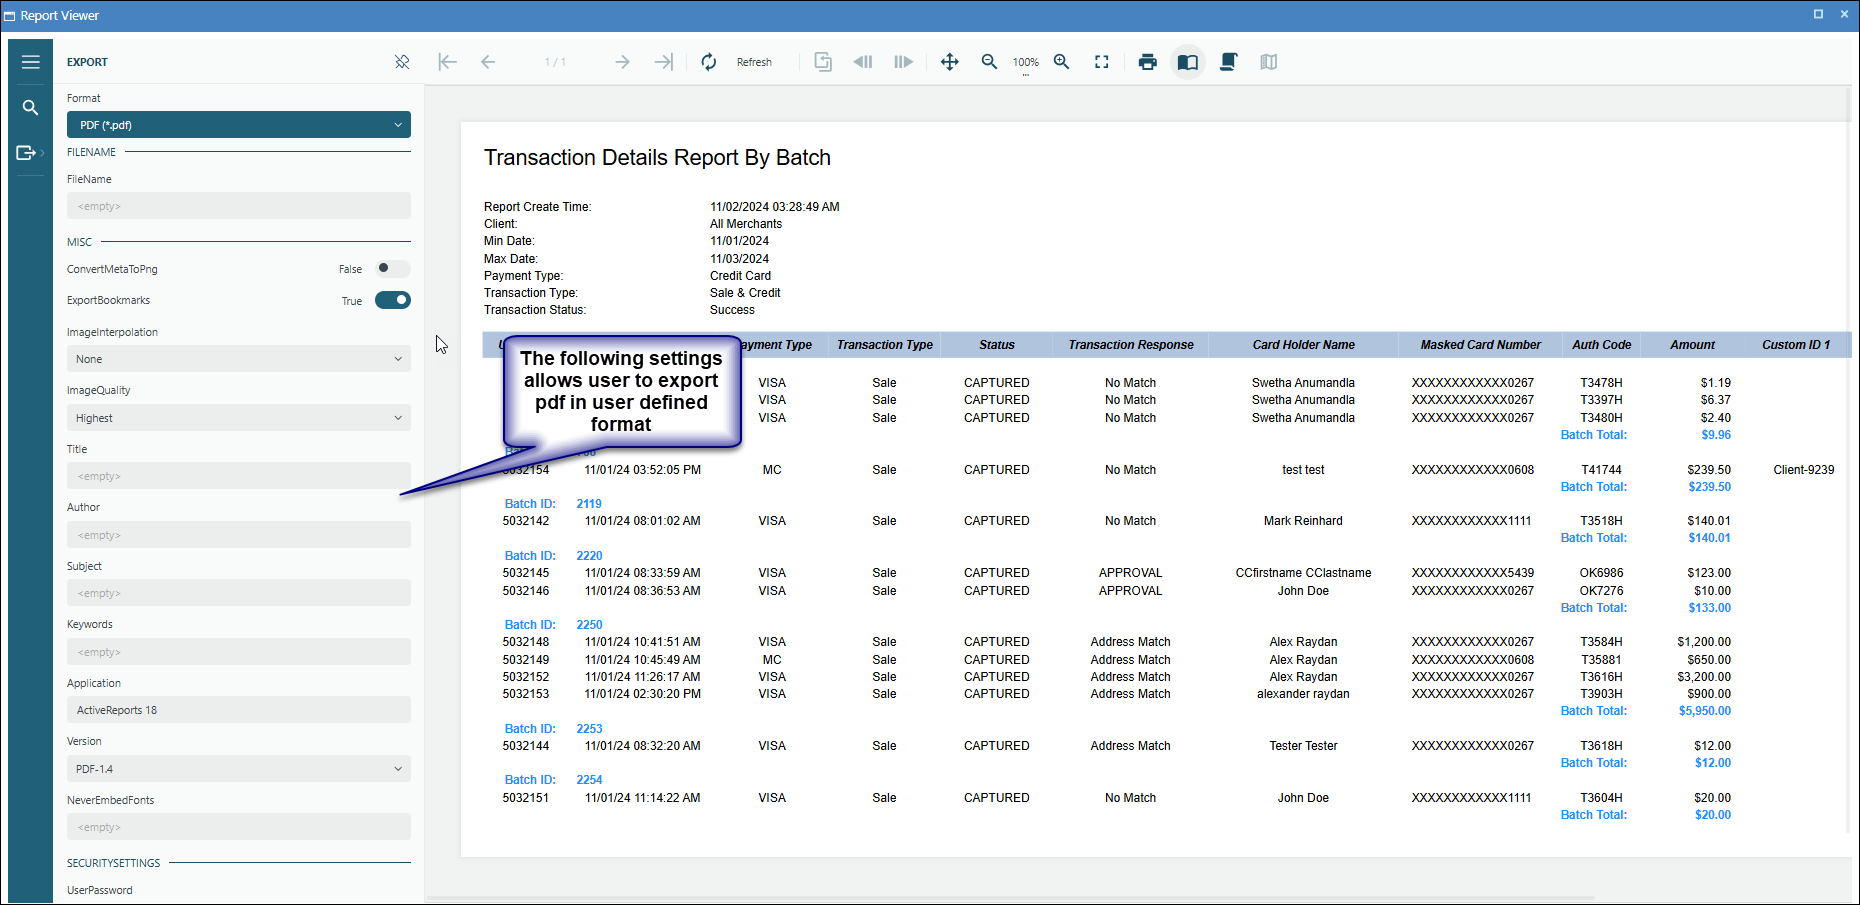
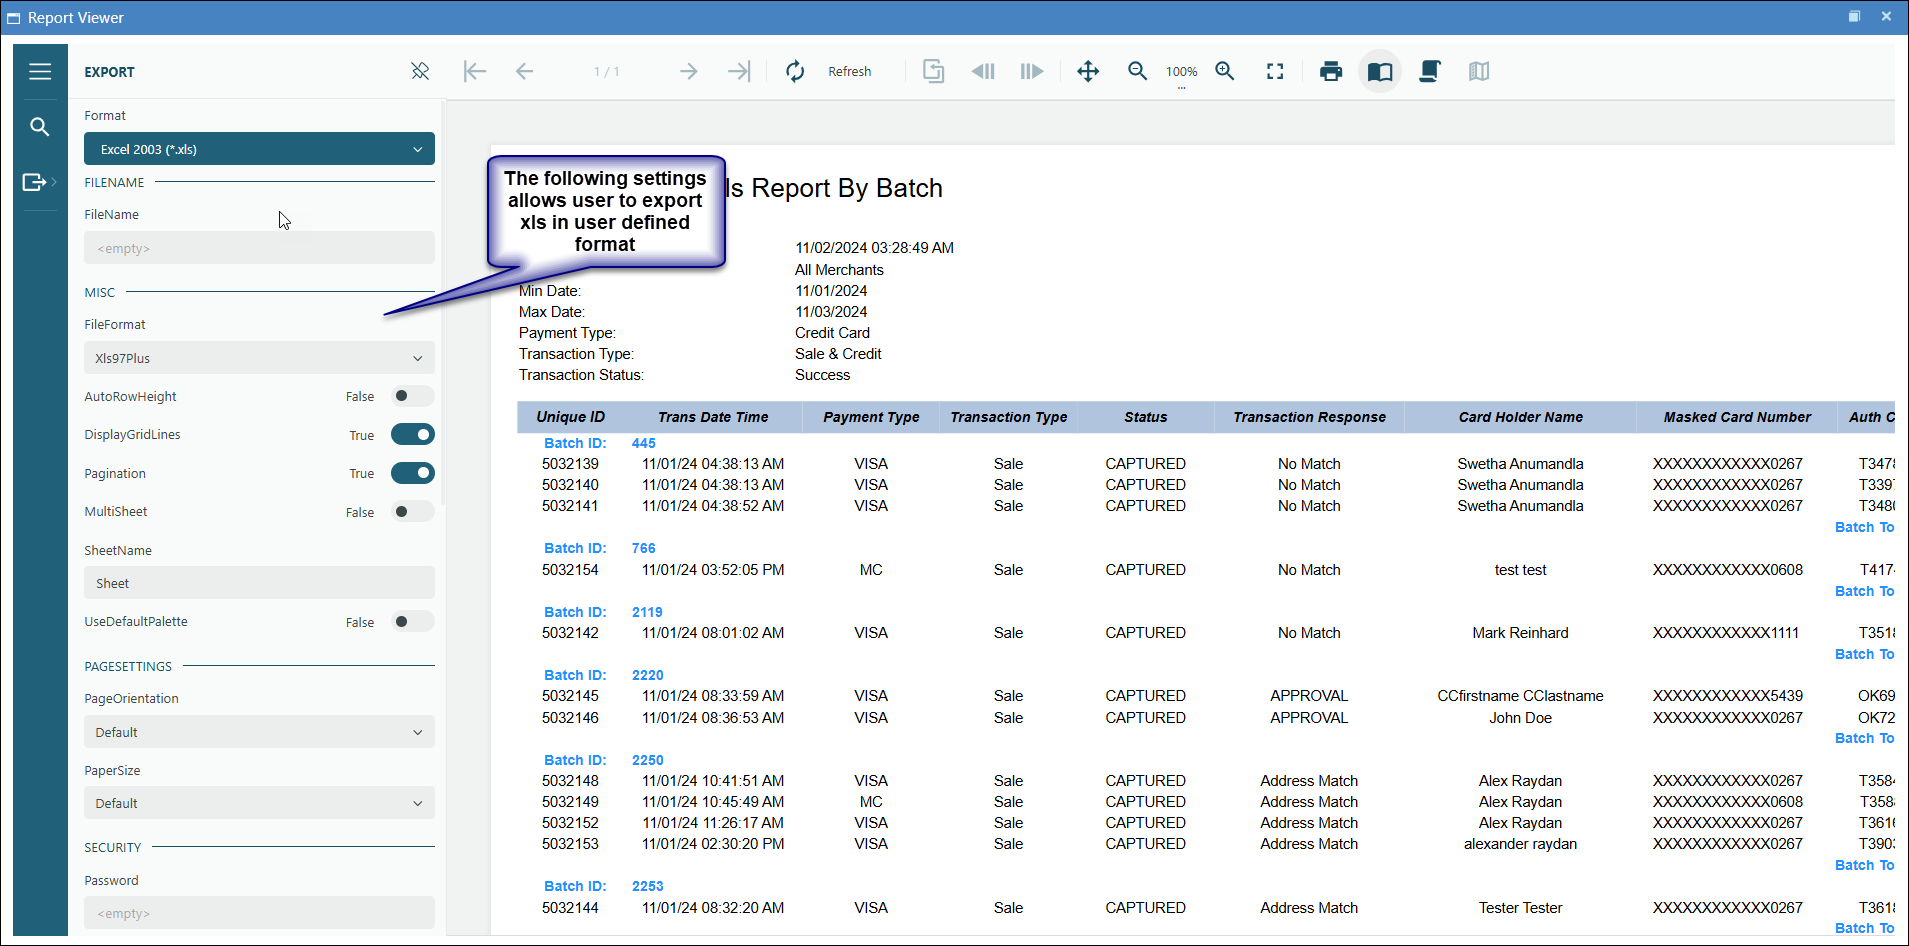
Export allows user to consolidate the reports into specific formats of .pdf, .xls, .txt and .mht
Admin
Users configured with administrative functions have access to the Admin section.
Merchants
This screen lists all merchants in a table.
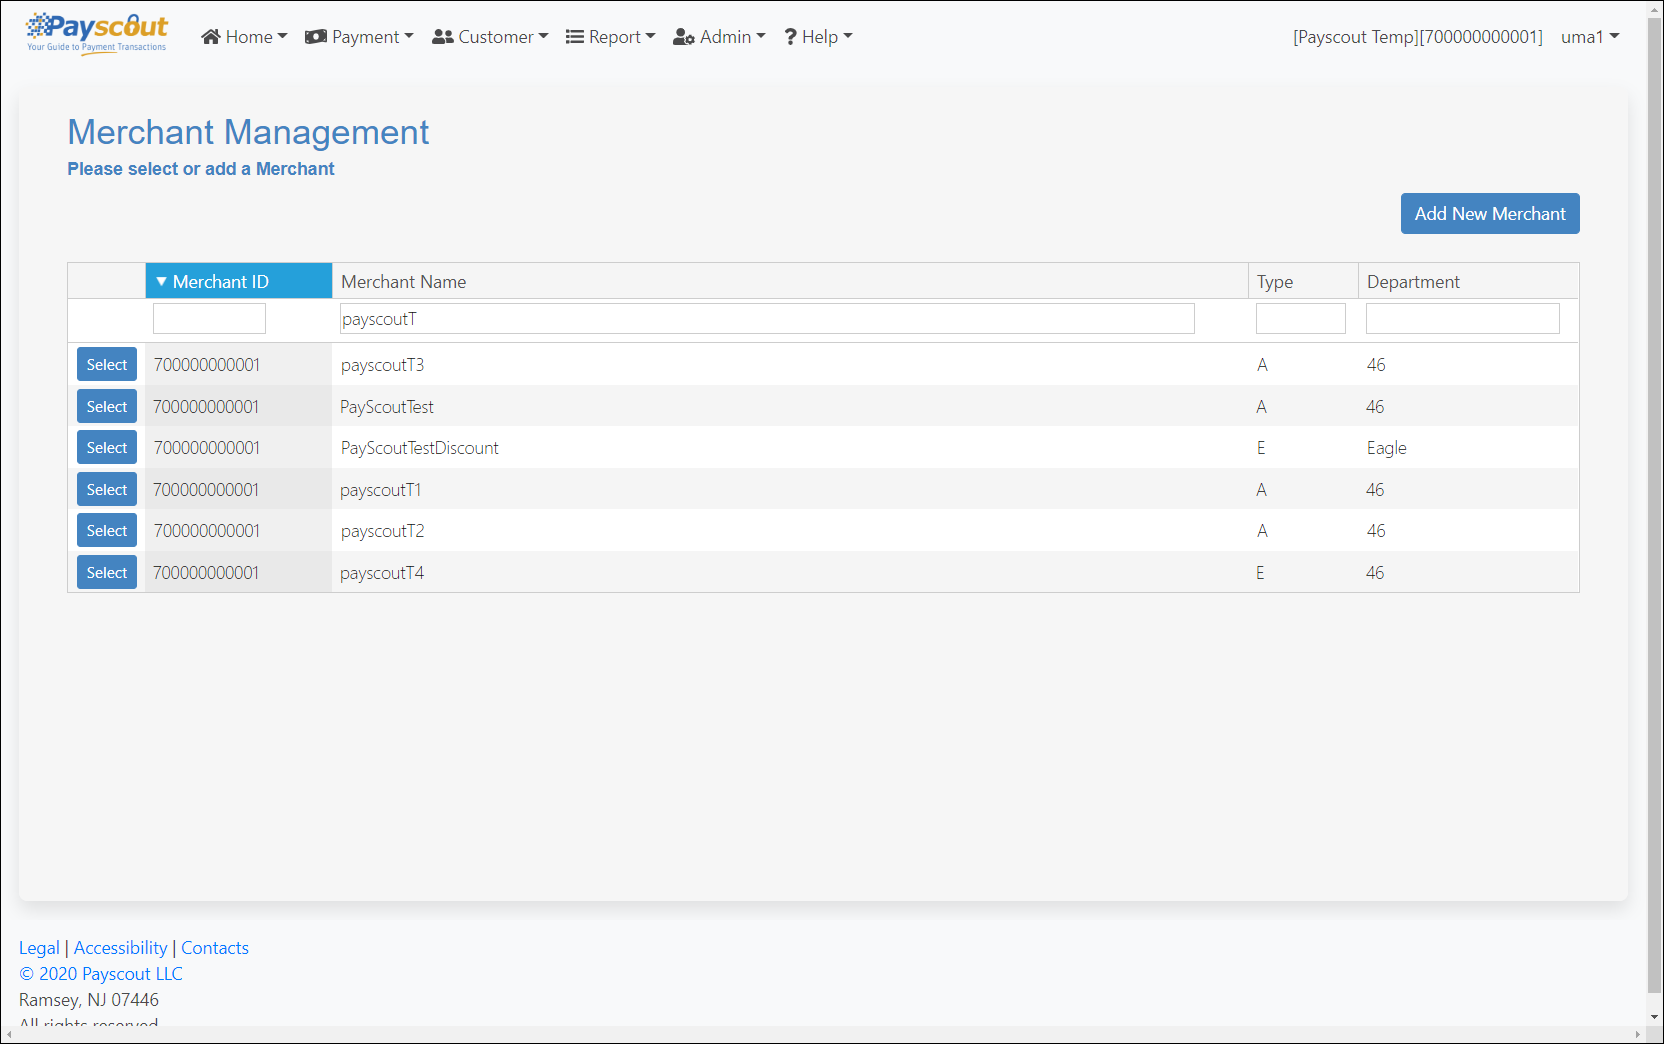
Click on to pull up the merchant information, including the Client ID and Merchant Key used for the OSBP.
Click on to provide options to create a new merchant.
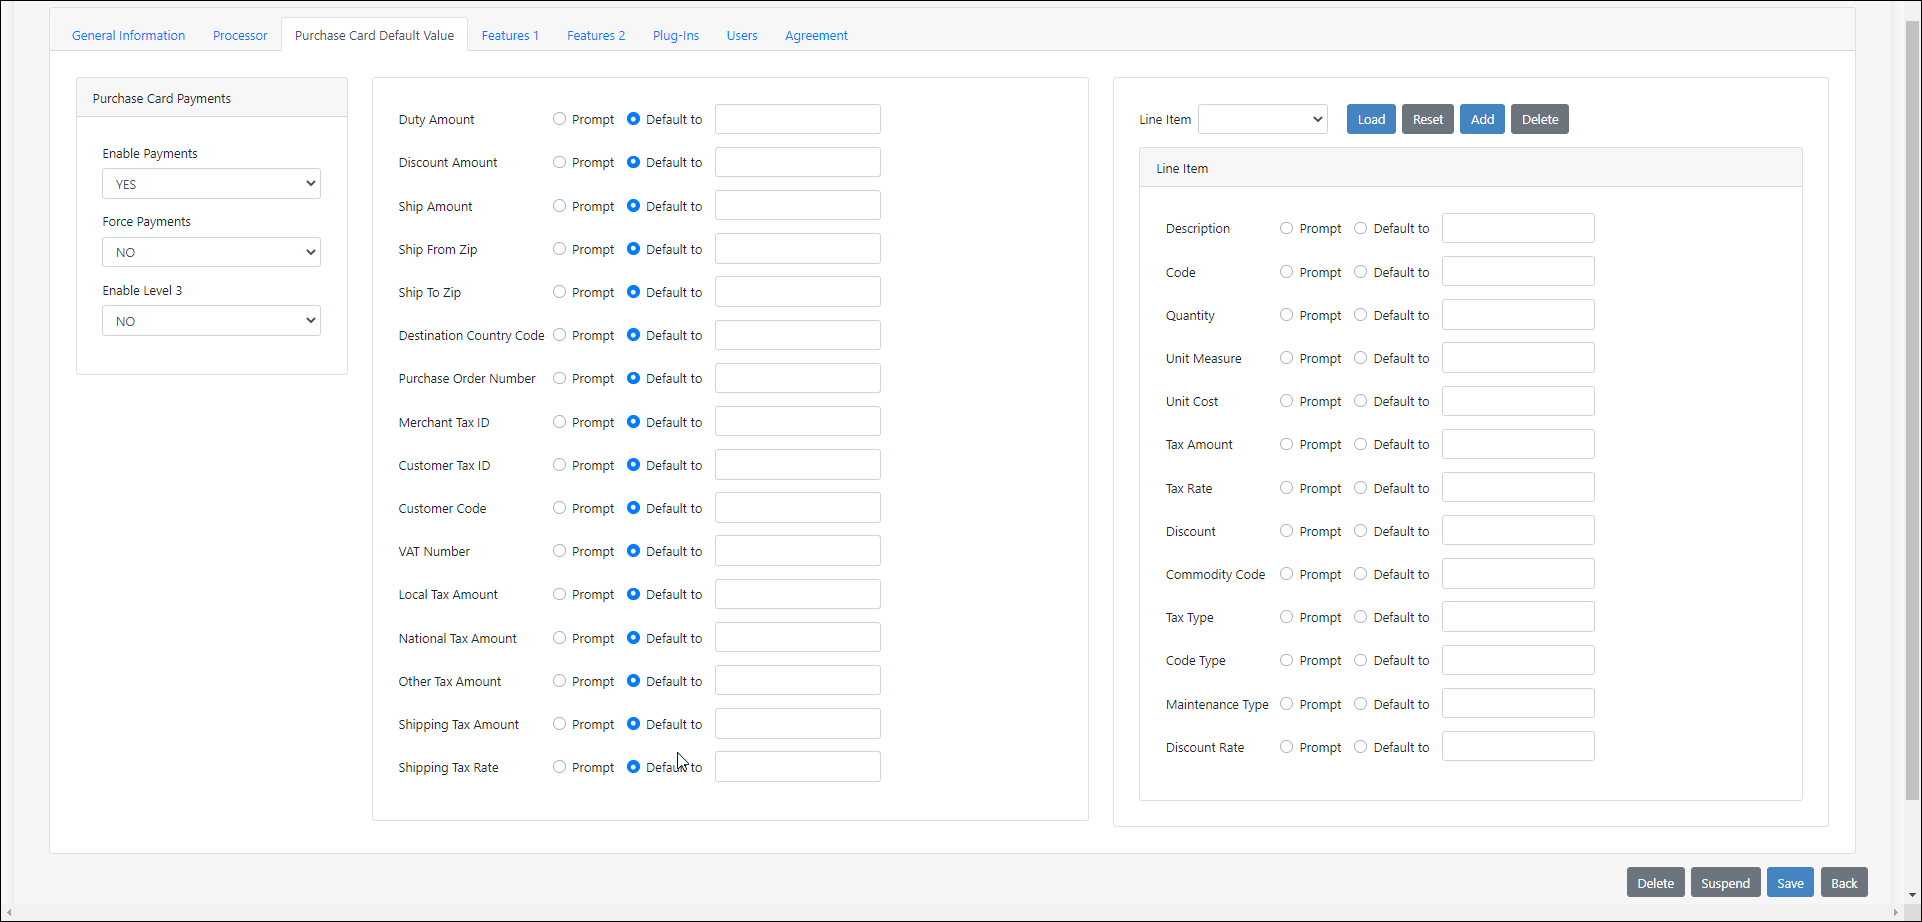
Level 3 Processing Defaults
The merchant configuration page allows setting default values for the API Level 3 Processing request parameters as follows:
Departments
This screen will display a list of departments in a table.

Click on the button from within the table to edit the Department Name and modify the assigned merchants.
Click on the button to display a Department Name field to create a new department.
Users
This screen lists users created on the Paywire Gateway related to the merchant(s) assigned to the active user.

The following user types are available:
- Paywire Administrator - all rights.
- Primary Administrator - can view and modify assigned merchants.
- Secondary Administrator - can maintain certain merchants within their department.
- VPOS User - rights are assigned by an administrator on creation.
- OSBP User - used to process transactions via the Off Site Buy Page.
Adding a New User
Click on to open a form with four tabs:
1. General Information
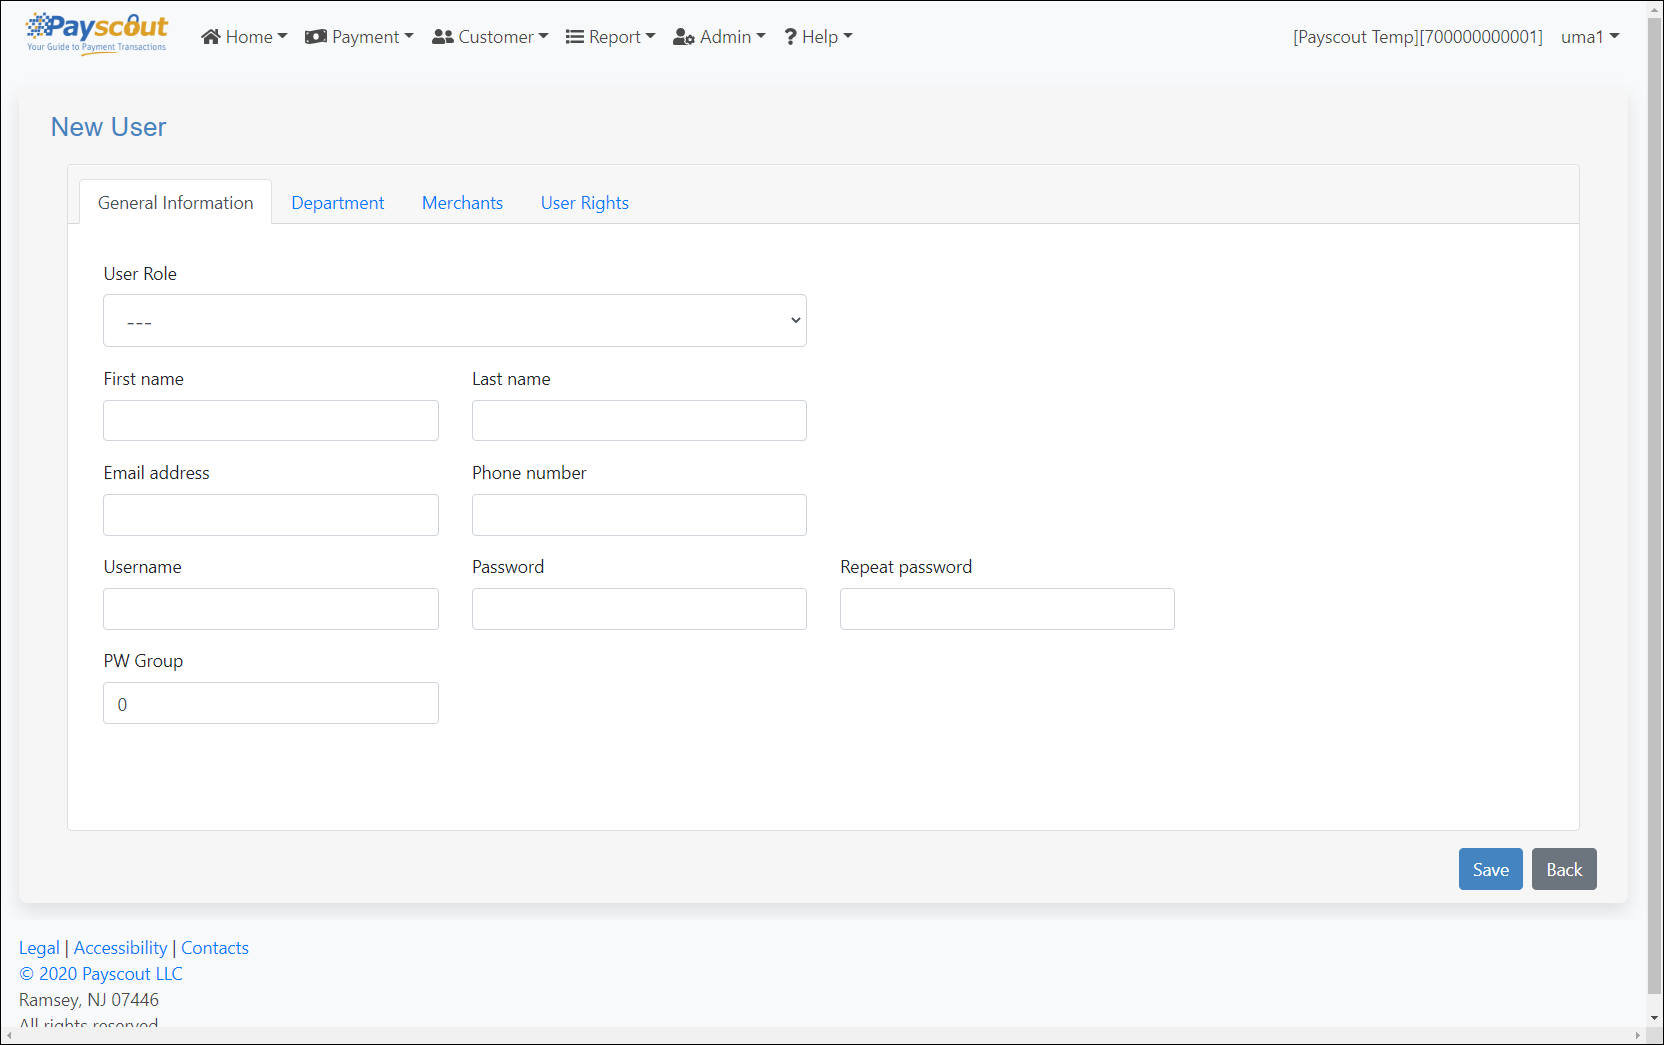
Click on the "Department" tab to go to the Department page.
2. Assign Department For Department Admin
Applies only to 'Secondary Administrator'.
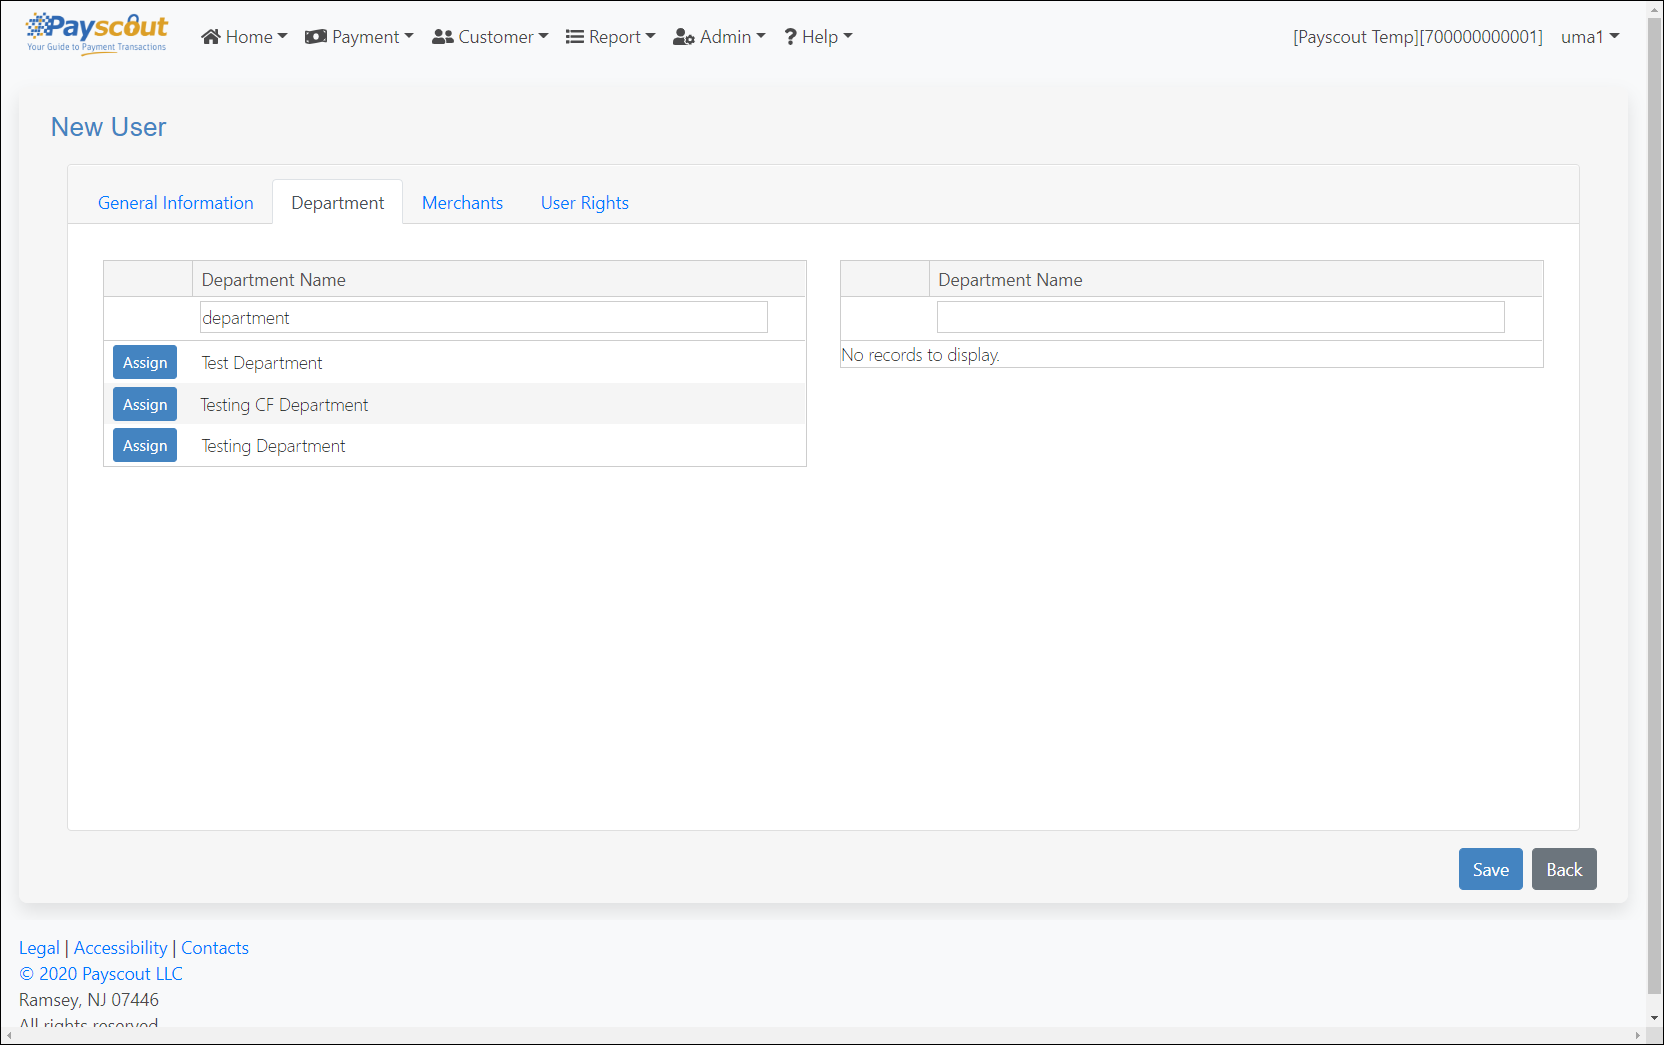
Click on to move the selected deparment on the left table to the right department table.
Click on the "Merchants" tab to go to the Merchant page.
3. Assign Merchant(s) For User
Applies only to 'VPOS User'.

Click on to move the selected merchant on the left table to the right merchant table.
Click on the "User Rights" tab to go to the User Rights page.
4. User Rights
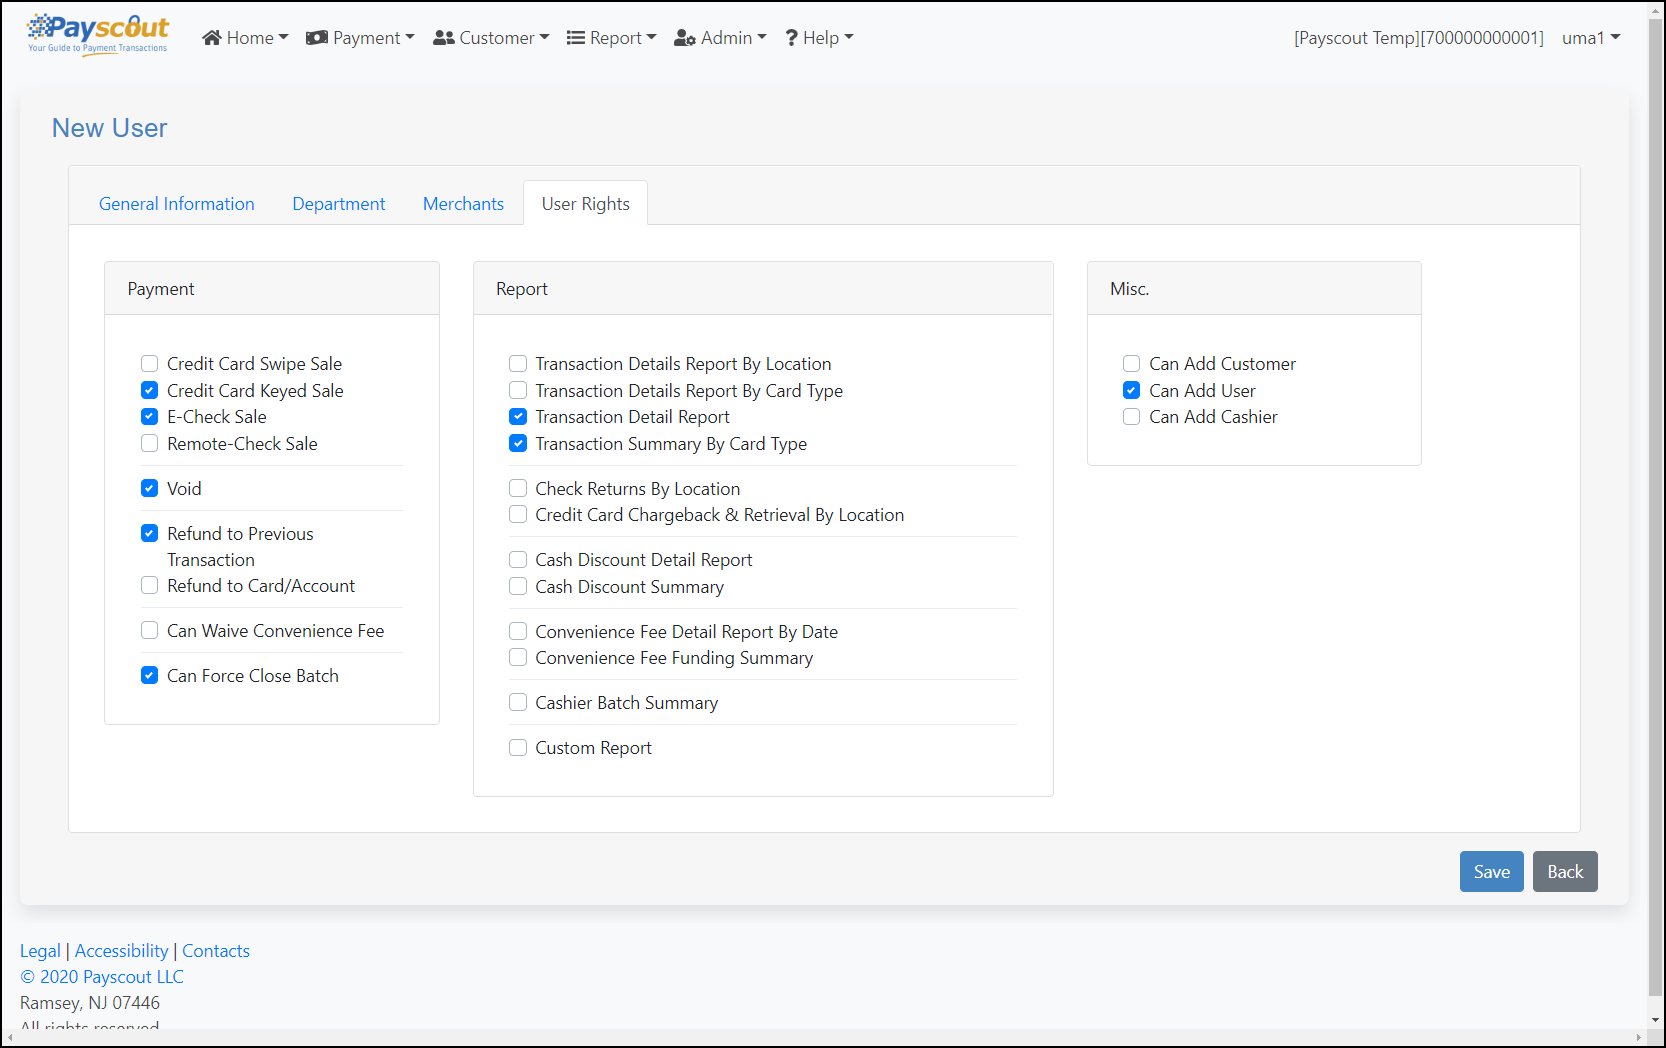
This screen is used to set permissions for the new user.
Click on to create your user.
Logging Out
To log out of the VPOS, users need to click the username dropdown to the right of the navbar and click "Log out" option.

Software Installation
Paywire Receiver
Paywire Receiver is a desktop application that communicates between web browsers and credit card readers or check scanners.
System Requirements
- Windows 7/ Windows 8.1/ Windows 10 / Windows 11.
- Microsoft .NET Framework 4.8.
- Visual C++ Redistributable for Visual Studio 2015-2022.
- Support morden web browsers: Edge, Chrome and Firefox.
Installation
- Make sure all Ingenico and TS240 devices are disconnected from the PC.
- The latest version of the Paywire Receiver can be downloaded here.
After downloading and extracting the installation package, there should be 3 folders as seen here:
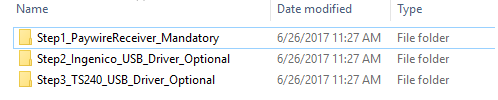
Step1_PaywireReceiveris mandatory for all merchants,Step2_Ingenico_USB_DriverandStep3_TS240_USB_Driverare optional depending on credit card merchants or remote check merchants.Locate the
Install.batfile of each folder, double click to run, or right click and run as administrator.If the User Account Control prompt appears, click on Yes to continue.
Depending on different drivers, this process could take up to several minutes to complete. The expected result should be “Success” without any error codes.
If the Windows Security Alert appears, check the options for Paywire Receiver to use the internet connection depending on your network setting, then click on “Allow access".
Once completed, the Paywire Receiver should be running in the system tray on the bottom right corner of the task bar. If not, restart the computer and it will run on start up.
Paywire Receiver Configuration
The Paywire Receiver will be ready to use after the installation. No further configurations needed.
This section is only for system administrators to use for troubleshooting purposes.
Open the configuration page by double clicking or right clicking on the Paywire Receiver icon in the system tray.
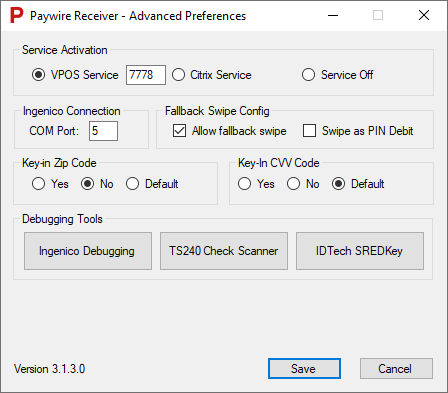
Service Activation
The Paywire Receiver can work in different modes. For VPOS users, please make sure “VPOS Service” is on.
Transaction Settings
Allow Fallback Swipe: In case the chip on the credit card is corrupted or damaged, this feature will allow the user to swipe the chip card from the magnetic stripe reader on the right side of the reader. If turned off, the chip card will be rejected when swiped from the magnetic stripe reader and the user will be required to insert the EMV card in the EMV slot.
Swipe as PIN Debit: This option is used in combination with the fall back swipe. If this option is checked, the reader will prompt the user to select a payment method as credit card or debit card. However, the debit transaction will not be approved unless the merchant is configured to process debit cards.
Key-In ZIP Code: Enable/Disable the zip code input when user is processing a key-in transaction. If this option is set to Default, the zip code entry will be set to the default configuration from the reader firmware.
Debugging
Ingenico Test App:
Test the connectivity of the Ingenico EMV credit card reader. If any error messages are returned, please send the error message to your technical support representative.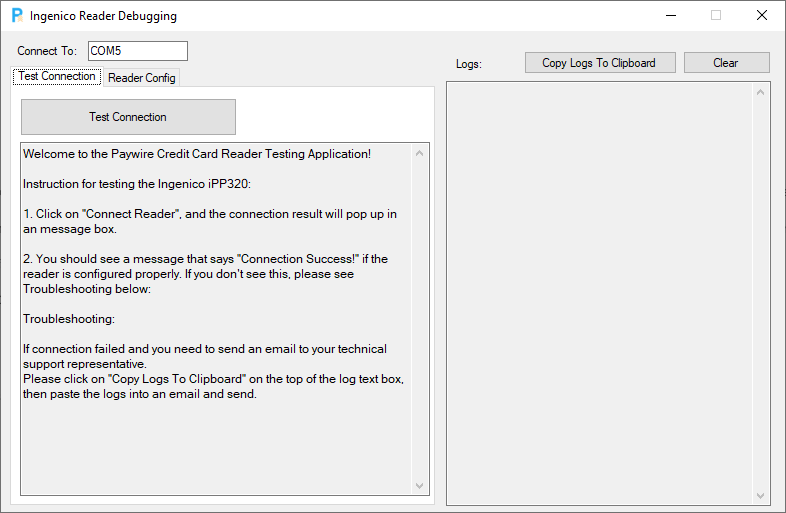
TS240 Test App:
Test the TS240 check scanner. If any error messages are returned, please send the error message to your technical support representative.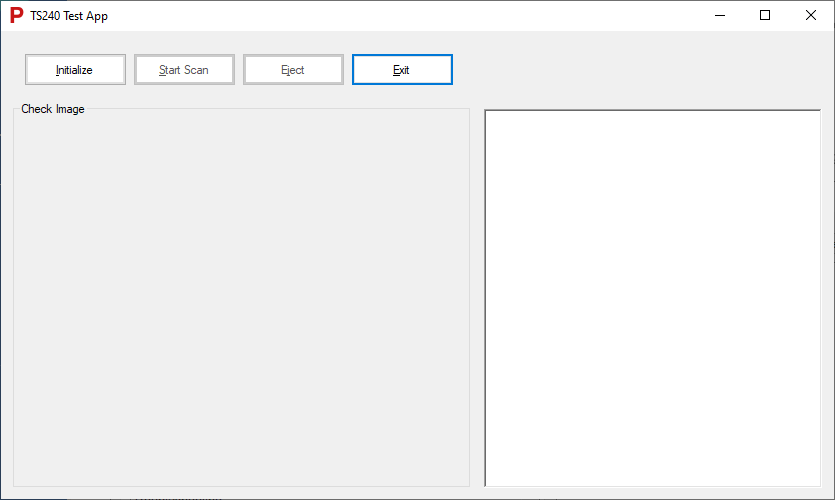
IDTech SREDKey Test App:
Test the IDTech SRED keypad. If any error messages are returned, please send the error message to your technical support representative.