Check Scanner - ActiveX Control
Setting up TS240 check scanner
Paywire Incorporated
For Johns Hopkins University VPOS
For Windows 7 Professional 64 Bit
Update: August 30 2016
Directions:
1. Update IE to the latest version and restart.
The version to be downloaded should be:
Internet Explorer 11 for IT Professionals and DevelopersWindows 7 64bit Edition and Windows Server 2008 R2 64bit Edition.
2. Download the drivers for TS240 then install the three executables in the order specified by the first digit in the file name, and then restart the computer.
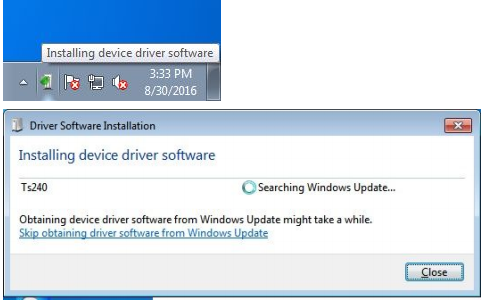
3. Plug the reader to the PC (reader light should be RED). Watch the system tray (pictured below): if windows keeps searching for updates for this device (shown as below), you need to unplug the reader and restart PC.
4. After Windows restarts, plug in the reader. After you plug in the reader, Windows should not display that it is searching for updates for the device, and the “Installing device driver software” icon should not appear in system tray. If either of these occurs, you will need to do the Fix in step 5.
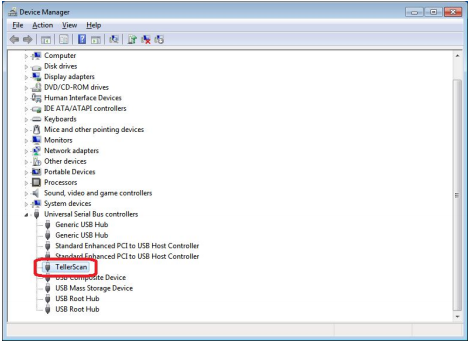
5. Open device manager, under "Universal Serial Bus Controllers", there should be a "TellerScan". If "TellerScan" does NOT exist here, please check if it is in "Other Devices" with a yellow exclamation point, which means the device is not installed correctly and you need to try the Fix below.
Fix: Sometimes it takes a few tries for the device to install properly on certain computers. You will need to try a combination of unplugging the reader, reinstall the drivers and restarting PC. Eventually we need this scanner device to appear in "Universal Serial Bus controllers" with no errors.
Pictured below is how the device should display if it is installed properly.
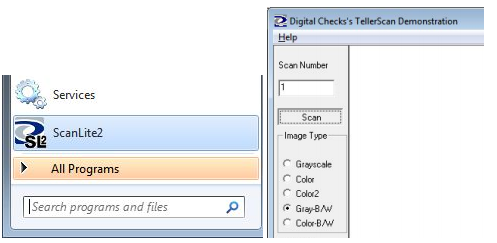
6. Make sure the reader is turned on and the light is RED. Then run ScanLite2 from Windows Start Menu (see below). Once the application has started and successfully connected to the reader, the reader light should become GREEN. If a check is already properly inserted in the reader, the light should become ORANGE. Then you can run a test scan using ScanLite2.
7. EXIT ScanLite2.
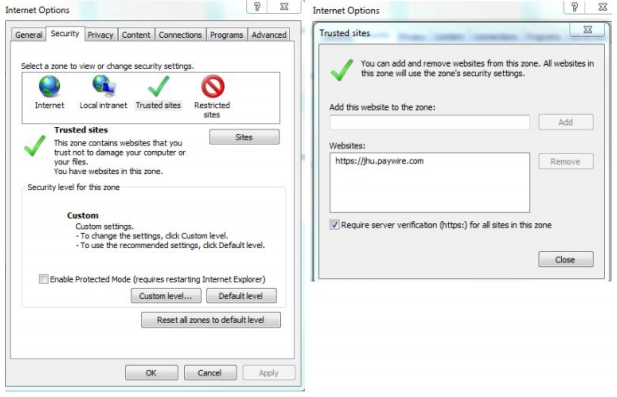
8. Open Internet Explorer 11 (select to use default settings if you are running it for the first time). Add https://jhu.paywire.com to trusted sites if it is not already added. Tools → Internet Options → Security Tab → Trusted sites → Sites.
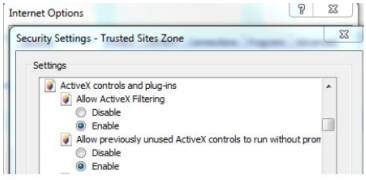
9. Next, you must edit the security options so that ALL “ActiveX controls and plugins” are enabled (not set to Prompt or Disabled), then restart Internet Explorer Tools → Internet Options → Security Tab → Trusted sites → Custom level...
10. Close all IE windows and restart IE 11.
11. Goto
https://jhu.paywire.com. Log in and go to the
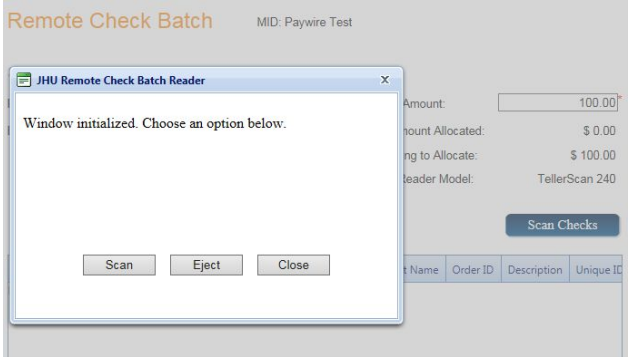
Remote Check Batch payment page. Enter control amount and batch ID, then click on ScanChecks. If this is the first time running the “ScanCheckPro” plugin (i.e. the first check you run after reintsalling the driver as per above), you may see the screen below. Click on OK and then click on Allow. Then close
ALL IE windows and restart IE.
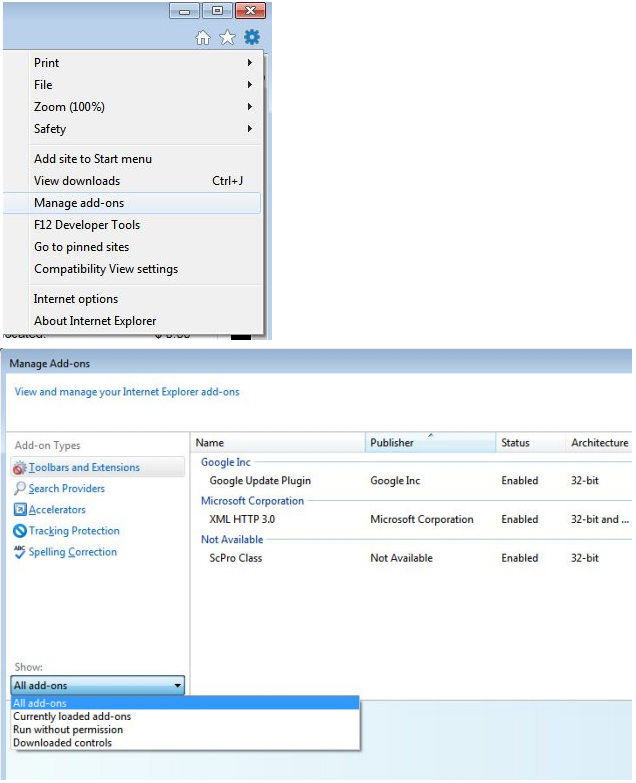
12. After you restarted IE, click on the Tools button and open “Manage addons”. Then in “Toolbars and Extensions” select “Show All Add ons”. Then you should see “ScProClass”, which should be “Enabled”.
13. Close the addon window. Goto
https://jhu.paywire.com, login and go to Remote Check Batch payment page, and enter the control amount and batch ID, then click on ScanChecks. Then you should be able to see the screen below. Now you should be able to scan checks.